


Welcome to the I Like Crochet + American Crochet Association CAL!
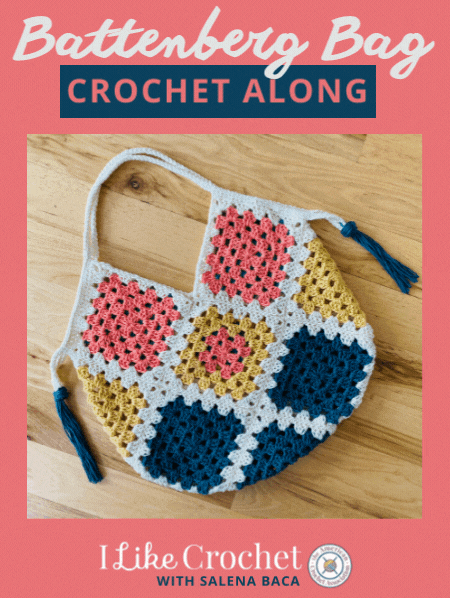
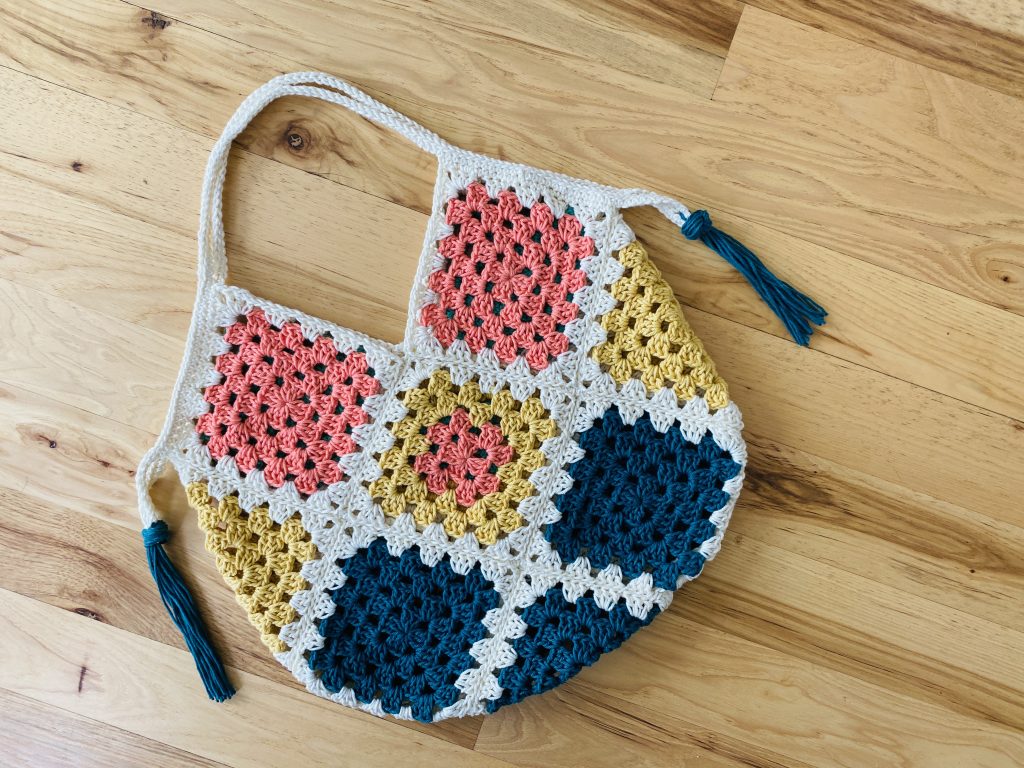
We will be making the Battenberg Bag by Salena Baca together!
If you love classic granny squares, you’ll love this modern twist on a Granny Square Bag!
Ready to join this Crochet Along Challenge?
Follow the Schedule + Join the I Like Crochet Community
- Sign Up for I Like Crochet emails to be notified about the next steps: CLICK HERE TO SIGN UP
- Join the I Like Crocheters Community: CLICK HERE TO JOIN
- Use this hashtag when you post in the group or anywhere on social media: #BattenbergCAL
- Add your project to Ravelry:
- Not sure how to add a project to Ravelry? CLICK HERE FOR INSTRUCTIONS
- Not sure if your project posted correctly? CLICK HERE TO SEE ALL BATTENBERG BAGS ON RAVELRY
- Enter our giveaway with WeCrochet!
I’m Salena Baca, with the American Crochet Association, where I work to help others crochet more, better, faster, and with less mistakes! That’s why I also designed this coordinating Granny Square Poncho CAL for All Free Crochet; it’s not only a great pattern to make and wear, it is packed full of little learning objectives that will help you to, well, crochet more, better, faster, and with less mistakes.
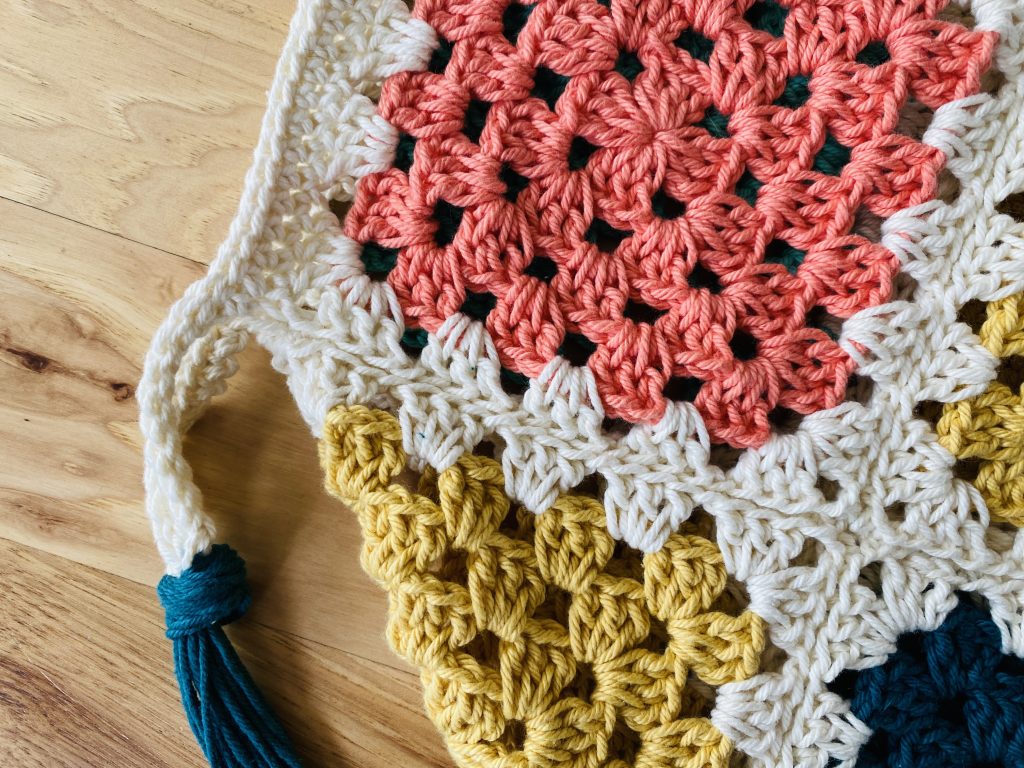
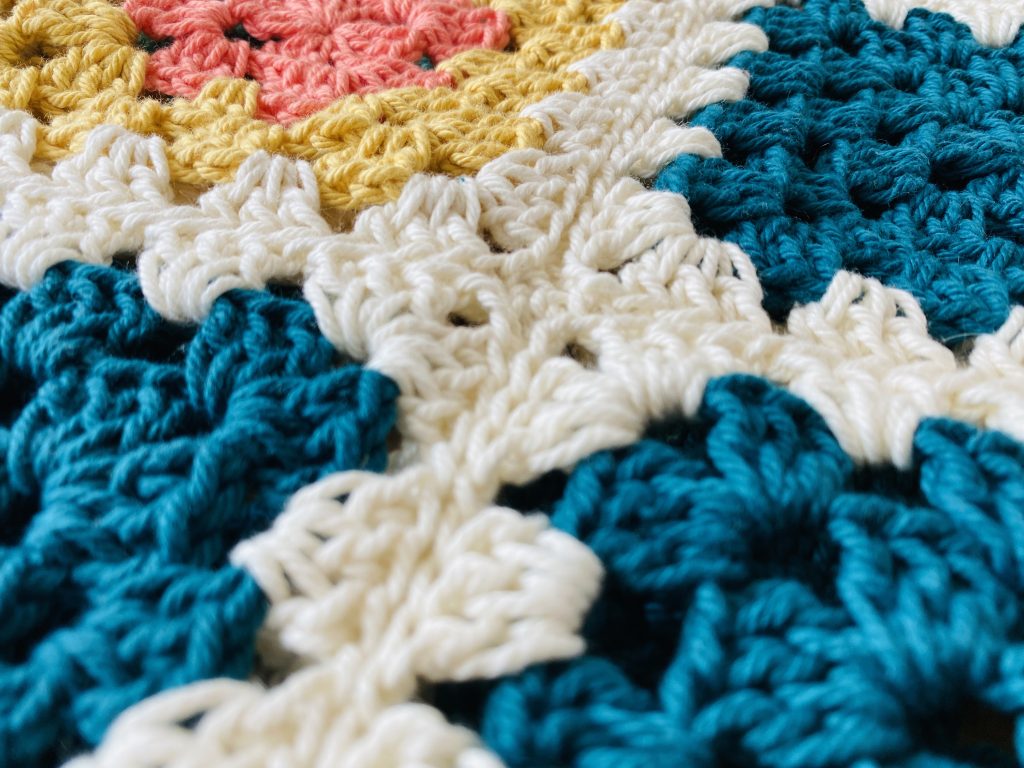
Granny squares are a classic design in the crochet world, so working them into different projects (like this easy-to-follow bag) can be a fun way to learn something new and actually use what you love!
If you’re not familiar with granny squares, I’m here to help! You can follow my detailed instructions, pattern chart, and video tutorial to learn how to successfully follow every single stitch.
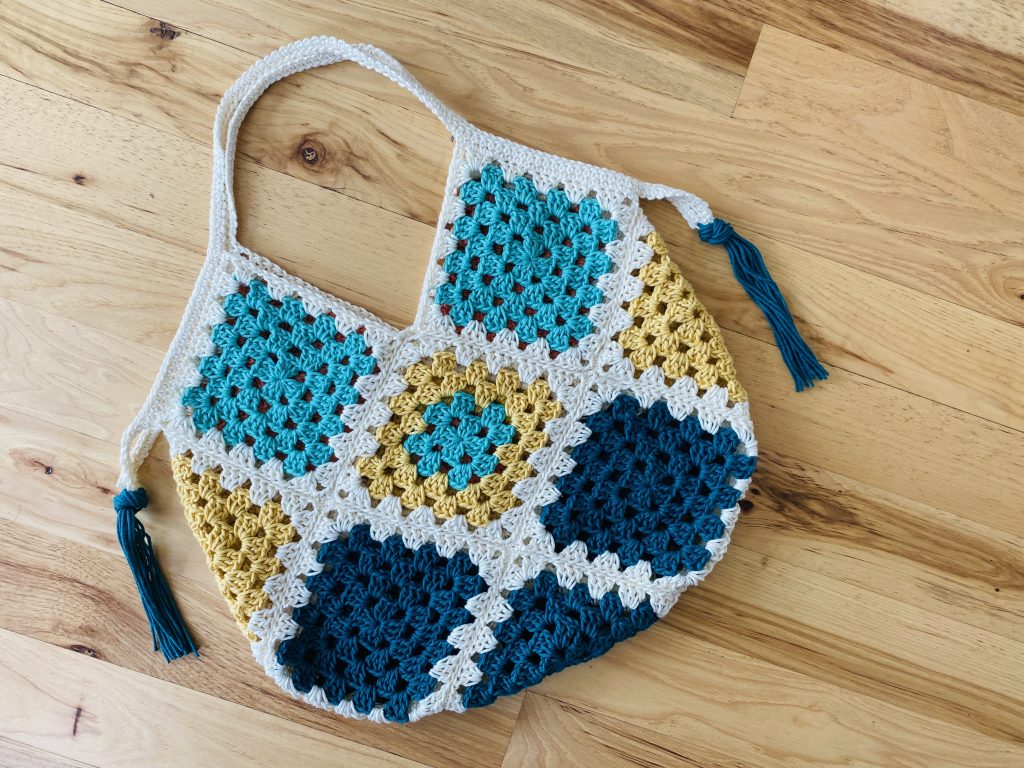
If you’re not familiar with joining Granny Squares, this is also a great project to follow along! This bag is worked with individual squares that are joined together when you’re done, giving you time and space to get each join right.
The Battenberg Bag is a great project to work up because:
- The yarn is easy to find or substitute (most weight 4 yarns will work)!
- You’ll learn how to make a classic granny square (hooray)!
- You’ll learn a quick and easy way to join granny squares together with a slip stitch seam (it’s not that hard, I promise)!
- You can get creative with the colors you use, so you can turn this classic motif into your very own style (#winning)!

- Materials Prep + Choose Colors: Find out what yarns to use (including substitutes), to get your materials ready for this design. Then, we’ll go over the size calculations together so you can measure 1 square to size your bag!
- Create your Ravelry project, share what yarn you’ll use in the community #BattenbergCAL
YARN: Knit Picks Dishie, Worsted #4 (100% Cotton; 3.5 oz/100 g; 190 yds/174 m): 1 bag = 450 yds total. Example made with:
- A = Kenai #25788
- B = Creme Brulee #25404
- C = Verdigris #28098
- D = Conch #25411
- E = Swan #25409
- Check for substitutes!
MATERIALS:
- US G/6 (4.00 mm) Crochet Hook
- Measuring Tape
- Yarn Needle
- Stitch Markers
STITCH KEY:
- Ch(s) = chain(s)
- Sc = single crochet
- Dc = double crochet
- St(s) = stitch(es)
- Sl St = slip stitch
Specialty Stitch & Technique Key:
- BLO = Back Loops Only
- FLO = Front Loops Only
- Video: Adjustable Loop
- Video: Slip Stitch Seam: Joining completed motifs together.
GAUGE:
- 1 granny square = 5.5” square
FINISHED MEASUREMENTS
- 15” wide x 15” tall (without handles)
NOTES:
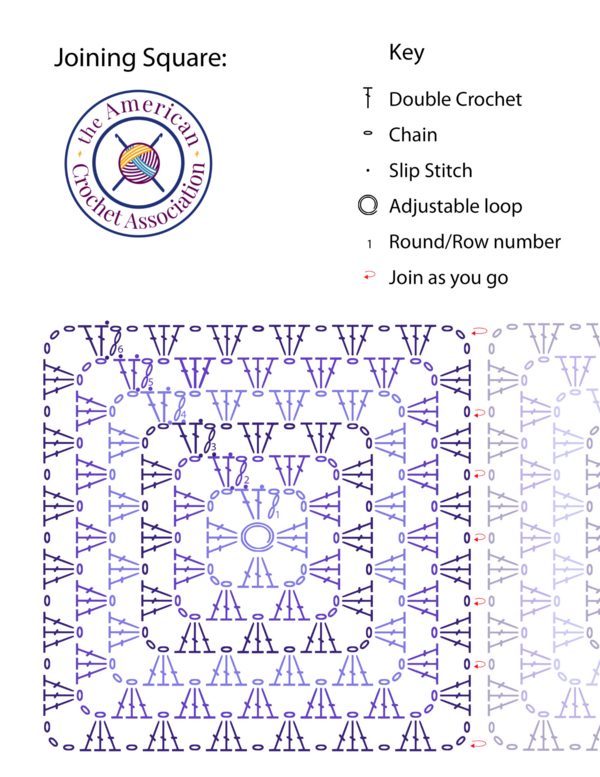
- Pattern worked in parts: Granny Squares, Joining, Handles.
- Diagrams available on final page: Granny Square, Joining Squares.
- Change color as desired, or follow Color Chart to match example (one bag, different colors per side).

- Make your first granny squares: I’ll cover some tips to make your granny squares, including how to manage ends if you change colors!
- Add progress pics to your Ravelry project, share them in the community #BattenbergCAL
Instructions: Granny Square #1 (2, 3…):
EXAMPLE COLOR CHART (optional): Work total number of squares according to color sequence outlined. Assemble and join according to example:
- Make 5: Kenai = Round 1-4, Swan = Round 5.
- Make 2: Creme Brulee = Round 1-4, Swan = Round 5.
- Make 2: Conch = Round 1-4, Swan = Round 5.
- Make 2: Verdigris = Round 1-4, Swan = Round 5.
- Make 1: Conch = Round 1-2, Creme Brulee = Round 3-4, Swan = Round 5
- Make 1: Verdigris = Round 1-2, Creme Brulee = Round 3-4, Swan = Round 5.
INSTRUCTIONS
Granny Square (Make 13)
Round 1 (Right Side): Form adjustable loop, Ch 3 (first Dc, here and throughout), work 2 Dc into loop, [Ch 3, 3 Dc] 3 times, Ch 3, Sl St into top of beginning Ch-3 to join – 24 Sts; 12 Dc + 4 Ch-3 spaces
Round 2: Sl St into each of next 2 Dc, Sl St into Ch-3 space, Ch 3, (2 Dc, Ch 3, 3 Dc) into same Ch-3 space, Ch 1, [(3 Dc, Ch 3, 3 Dc) into next Ch-3 space, Ch 1] 3 times, Sl St into top of beginning Ch-3 to join – 40 Sts; 24 Dc + 4 Ch-3 spaces + 4 Ch-1 spaces
Round 3: Sl St into each of next 2 Dc, Sl St into Ch-3 space, Ch 3, (2 Dc, Ch 3, 3 Dc) into same Ch-3 space, Ch 1, (3 Dc, Ch 1) into Ch-1 space, [(3 Dc, Ch 3, 3 Dc) into next Ch-3 space, Ch 1, (3 Dc, Ch 1) into Ch-1 space] 3 times, Sl St into top of beginning Ch-3 to join – 56 Sts; 36 Dc + 4 Ch-3 spaces + 8 Ch-1 spaces
Round 4: Sl St into each of next 2 Dc, Sl St into Ch-3 space, Ch 3, (2 Dc, Ch 3, 3 Dc) into same Ch-3 space, Ch 1, (3 Dc, Ch 1) into each Ch-1 space, [(3 Dc, Ch 3, 3 Dc) into next Ch-3 space, Ch 1, (3 Dc, Ch 1) into each Ch-1 space] 3 times, Sl St into top of beginning Ch-3 to join – 72 Sts; 48 Dc + 4 Ch-3 spaces + 12 Ch-1 spaces
Round 5: Sl St into each of next 2 Dc, Sl St into Ch-3 space, Ch 3, (2 Dc, Ch 3, 3 Dc) into same Ch-3 space, Ch 1, (3 Dc, Ch 1) into each Ch-1 space, [(3 Dc, Ch 3, 3 Dc) into next Ch-3 space, Ch 1, (3 Dc, Ch 1) into each Ch-1 space] 3 times, Sl St into top of beginning Ch-3 to join, fasten off – 88 Sts; 60 Dc + 4 Ch-3 spaces + 16 Ch-1 spaces

- Ready to start joining your squares? Let’s cover that together so you can get it done right!
- Add progress pics to your Ravelry project, share them in the community #BattenbergCAL
Instructions: Joins
Joining
- Arrange squares into a joining order, assuring all are facing the same direction.
- With right sides of motifs held together, Sl St 2 squares together at a time using FLO of closest square and BLO of farthest square, until all squares have been joined.
- Turn bag so that right side of squares are facing outside and seams are on inside.

- As soon as all your squares are joined, you can add the handles! I’ve got some tips to help you get started.
- Add progress pics to your ravelry project, share them in the community #BattenbergCAL
Handles:
Handle (repeat on both sides of bag)
Row 1: Ch 10, Sc into first unworked Ch space of top right square, Sc along side of square until Ch-3 space is reached, Ch 50 (handle), Sc into Ch-3 space of top left square, Sc along side of square until Ch-3 space is reached, Ch 10 – 112 Sts; 70 Ch + 42 Sc
Row 2: Ch 1 (not a St), turn, work 1 Sc into each St across – 112 Sc
Row 3: Ch 1 (not a St), turn, Sl St into each St across, fasten off – 112 Sl Sts
Fringe Bundle = 5 strands of yarn, 12” each.
- Pull half of fringe bundle through side of Row 2 from Handle, fold in half evenly (repeat for all 4).
- Hold 2 adjacent bundles and knot both together, covering the ends of handle rows (repeat for both sides).
Finishing
Sew in all ends, trim excess.

Join Salena Baca from the American Crochet Association to browse all finished projects for this CAL posted to Ravelry & in the community using #BattenbergCAL
Congratulations to Susan M., our giveaway winner! Thank you to all who entered and participated in this CAL!

View this post on Instagram
Hi, I’m now ready to join the squares. Is there a picture of them all pinned together before joining? How do I know how to lay them out? Thanks!
Hi Melissa, we don’t seem to have a picture of them laid out, but you can use the final bag photos as a guide. – Nicola, Editor
Hi! If I wanted to use a leather bag base for this bag, how would I incorporate it?
Thanks!
Hello Caroline! I’ve reached out to the designer for advice and she or I will reply as soon as possible. Thanks! – Nicola, Editor
What an interesting concept, Caroline!
I’ve not yet tried to incorporate a leather bag base into a crochet project, so I don’t have any tips to share. Because this design is made with joined motifs at a diagonal angle (especially at the base), I’m not certain how that could work. If you come up with something, we’d love to see and hear your process. Enjoy!
Hi Nicola and Selena! I’ve just finished making the bag and just love it. Am about to start on the tassels but am a bit confused so have a few questions:
1. How many fringe bundles of five 12 inch strands are to be used? 2?
2. Where is the “side of row 2”?
3. Where it says “(repeat for all 4),” it’s 4 of what?
Can’t wait to finish the bag!
Thanks!
Hello Caroline! I’ve reached out to the designer for advice and she or I will reply as soon as possible. Thanks! – Nicola, Editor
I am a new crocheter, so I like the look of this
I love the look of this bag, I am excited to crochet the Granny Squares. I have not put together a bag yet so this will be my first time. I’m used to crocheting baby blankets. Wish me luck at my first attempt.