


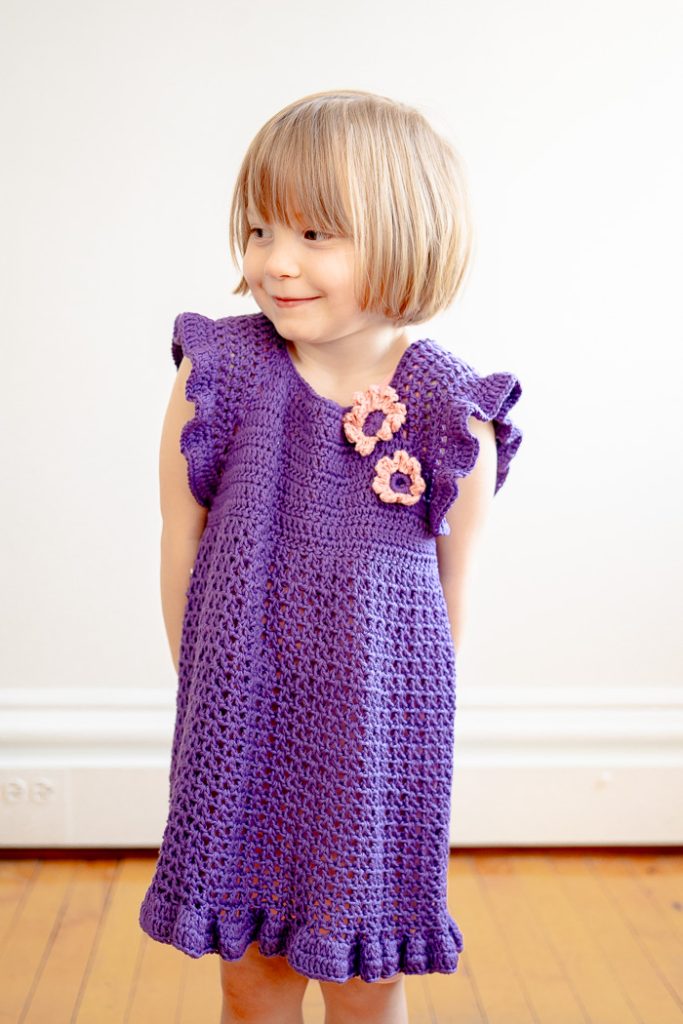
Indulge in the charm of the Paradise Blooms Little Girl’s Dress, a seamless, raglan top adorned with delightful ruffle sleeves and a peplum body. The yoke features adorable flower appliqués, adding an extra touch of cuteness. This versatile piece also pairs well with skinny jeans or leggings as she grows older. Choose her favorite color and she’s sure to adore it.
Time: Day Project
Skill Level: Intermediate
SIZES:
2 (4, 6, 8) (10, 12): Finished Bust Size 22.5 (24.5, 26.5, 28.5) (29.5, 31.5)” to fit bust 21 (23, 25, 27) (28, 30)”
1.5” positive ease recommended.
Shown in size 26.5”
Gauge: 16 sts and 8 rows = 4” [10 cm] in dc
Materials
 Yarn: Nako Calico (50% Cotton, 50% Manufactured Fibers – Acrylic; 267 yards [244 meters] / 3.53 ounces [100 grams]): 10287 Purple 2 (2, 3, 3) (3, 4) balls, plus DK weight scrap yarn in contrasting color for flower appliques.
Hook: US size 7, 4.5 mm
Notions: Tapestry needle, measuring tape
Special Stitches
Shell: (2 dc, ch 2, 2 dc) all in same st/ch-sp
V stitch: (dc, ch 1, dc) all in same st/ch-sp
Joining dc: Yo, insert hook through ch-2 sp of shell st and ch-2 sp of next shell st, skipping all the sts in between, pull up a loop (3 loops on the hook), finish as regular dc.
Pattern Notes
- This pattern is worked in rounds from top-down in raglan style.
- Yoke is made in rounds, joined, and turned after each round. For yoke, ch-1 does not count as a stitch. Pull up beg ch-1 a little bit and then start working.
- For yoke, 4 sts will be increased for each section (front, back and sleeves) i.e., total 16 sts will be increased every round.
- Body V stitch pattern is worked in rounds, joined, not turned after every round. For this section, ch-4 counts as a dc and ch-1.
- To make a dress, continue working V stitch pattern to desired length, before adding hem ruffle.
Pattern
Yoke
Ch 69 (69, 73, 73) (77, 77)
Round 1 (RS): Working in back bumps, sc in 2nd ch from hook and in each ch, join to first st with sl st. 68 (68, 72, 72) (76, 76) sts
Round 2: Ch 1 (does not count as a st here and throughout), turn, dc in 10 (10, 10, 10) (11, 11) sts, shell in next st, dc in 12 (12, 14, 14) (14, 14) sts, shell in next st, dc in 20 (20, 20, 20) (22, 22) sts, shell in next st, dc in 12 (12, 14, 14) (14, 14) sts, shell in next st, dc in rem 10 (10, 10, 10) (11, 11) sts, join to first st with sl st. 80 (80, 84, 84) (88, 88) sts and 4 ch-2 sps
Round 3 – 5 (6, 7, 8) (8, 9): Ch 1, turn, *dc in each st to ch-2 sp, shell in ch-2 sp, repeat from* 3 more times, dc in rem sts, join to first st with sl st. 128 (144, 164, 180) (184, 200) sts and 4 ch-2 sps, Detailed instruction of each round is provided at the end of the pattern.
Round 6 (7, 8, 9) (9, 10): Ch 1, turn, *dc in each st to ch-2 sp, shell in ch-2 sp, 2 dc in each st to next ch-2 sp, shell in ch-2 sp, rep from * 1 more time, dc in rem sts, join to first st with sl st. 200 (224, 256, 280) (284, 308) sts and 4 ch-2 sps. Detailed instruction of each round is provided at the end of the pattern.
Round 7 (8, 9, 10) (10, 11): Ch 1, turn, [dc in each st to ch-2 sp, shell in ch-2 sp, *1 dc in next st, 2 dc in next st, rep from * to ch-2 sp, shell in ch-2 sp], rep instructions in brackets 1 more time, dc in rem sts, join to first st with sl st. 276 (308, 352, 384) (388, 420) sts and 4 ch-2 sps
Proceed to ‘divide for front, back and sleeves’ section.
Divide for front, back and sleeves
Round 8 (9, 10, 11) (11, 12): Ch 1, turn, dc in 22 (24, 26, 28) (29, 31) sts, joining dc (see special stitches) in next 2 ch-2 sps skipping all the ruffle section sts, dc2tog over same ch-2 sp as joining dc and next st, dc in next 43 (47, 51, 55) (57, 61) sts, joining dc in next 2 ch-2 sps, skipping all the ruffle section sts, dc2tog over same ch-2 sp as joining dc and next st, dc in rem 21 (23, 25, 27) (28, 30) sts, join to first st with sl st. 90 (98, 106, 114) (118, 126) sts
Sizes 2 (-, 6, -) (-, 12) turn before proceeding for body section. Sizes – (4, -, 8) (10, -) continue without turning after sl st.
Body V stitch pattern
Round 9 (10, 11, 12) (12, 13): Ch 4, dc in same st as ch-4 (first V st made), skip next st, *V st in next st, skip next st, rep from * around, join with sl st in third ch of beg ch-4. 45 (49, 53, 57) (59, 63) V sts
Round 10 (11, 12, 13) (13, 14): Sl st to ch-1 sp, ch 4, dc in same ch-sp (first V st made), V st in ch-1 sp of each V st from prev row, join with sl st in third ch of beg ch-4. 45 (49, 53, 57) (59, 63) V sts
Repeat last row until top measures 13 (14, 15, 16) (18, 19)” from the shoulder. To make a dress, continue working V stitch pattern until it measures 18 (20, 22, 24) (27, 29)” from the shoulder or to 1 inch shorter than desired length.
Hem Ruffles
Round 1: Ch 1, 2 dc in each st and each ch-1 sp, join with sl st to first st. 270 (294, 318, 342) (354, 378) sts
Round 2: Ch 1, dc in each st, join with sl st to first st. 270 (294, 318, 342) (354, 378) sts
Fasten off.
Large Flower Applique
Round 1: With MC, ch 2, 12 dc in 2nd ch from the hook. Join with sl st to first st. 12 sts
Fasten off, leaving a long tail to sew the applique onto yoke.
Attach CC yarn to any st with sl st.
Round 2: Ch 3, 1 tr in same st where you joined, ch 3, sl st in same st, *(sl st, ch 3, 1 tr, ch 3, sl st) in next st, rep from * to end. 12 petals
Fasten off.
Small Flower Applique
Round 1: With MC, ch 4, join in first ch with sl st to form a ring, ch 1, 14 sc in the ring, join with sl st to first st.14 sts
Fasten off, leaving a long tail to sew the applique onto yoke.
Attach CC yarn to any st with sl st.
Round 2: Ch 2, 1 dc in same st, (dc, ch 2, sl st) in next st, * (sl st, ch 2, 1 dc) into next st, (dc, ch 2, sl st) in next st, * rep from * to end. 7 petals
Fasten off.
Finishing
Align the flower appliques diagonally, along the raglan line on wearer’s left side, with larger applique on top and overlapping smaller applique. Attach the appliques to the yoke with tapestry needle.
Weave in the ends.
Addendum
Detailed Instructions of increasing raglan rounds:
Round 3: Ch 1, turn, dc in 12 (12, 12, 12) (13, 13) sts, shell in ch-2 sp, dc in 16 (16, 18, 18) (18, 18) sts, shell in next st, 24 (24, 24, 24) (26, 26) sts, shell in ch-2 sp, dc in 16 (16, 18, 18) (18, 18) sts, shell in ch-2 sp, dc in rem 12 (12, 12, 12) (13, 13) sts, join to first st with sl st. 96 (96, 100, 100) (104, 104) sts and 4 ch-2 sps
Round 4: Ch 1, turn, dc in 14 (14, 14, 14) (15, 15) sts, shell in ch-2 sp, dc in 20 (20, 22, 22) (22, 22) sts, shell in next st, 28 (28, 28, 28) (30, 30) sts, shell in ch-2 sp, dc in 20 (20, 22, 22) (22, 22) sts, shell in ch-2 sp, dc in rem 14 (14, 14, 14) (15, 15) sts, join to first st with sl st. 112 (112, 116, 116) (120, 120) sts and 4 ch-2 sps
Round 5: Ch 1, turn, dc in 16 (16, 16, 16) (17, 17) sts, shell in ch-2 sp, dc in 24 (24, 26, 26) (26, 26) sts, shell in next st, 32 (32, 32, 32) (34, 34) sts, shell in ch-2 sp, dc in 24 (24, 26, 26) (26, 26) sts, shell in ch-2 sp, dc in rem 16 (16, 16, 16) (17, 17) sts, join to first st with sl st. 128 (128, 132, 132) (136, 136) sts and 4 ch-2 sps
Size 2 stop here and proceed to sleeve ruffles section.
Round 6: Ch 1, turn, dc in x (18, 18, 18) (19, 19) sts, shell in ch-2 sp, dc in x (28, 30, 30) (30, 30) sts, shell in next st, x (36, 36, 36) (38, 38) sts, shell in ch-2 sp, dc in x (28, 30, 30) (30, 30) sts, shell in ch-2 sp, dc in rem x (18, 18, 18) (19, 19) sts, join to first st with sl st. – (144, 148, 148) (152, 152) sts and 4 ch-2 sps
Size 4 stop here and proceed to sleeve ruffles section.
Round 7: Ch 1, turn, dc in x (x, 20, 20) (21, 21) sts, shell in ch-2 sp, dc in x (x, 34, 34) (34, 34) sts, shell in next st, x (x, 40, 40) (42, 42) sts, shell in ch-2 sp, dc in x (x, 34, 34) (34, 34) sts, shell in ch-2 sp, dc in rem x (x, 20, 20) (21, 21) sts, join to first st with sl st. – (-, 164, 164) (168, 168) sts and 4 ch-2 sps
Size 6 stop here and proceed to sleeve ruffles section.
Round 8: Ch 1, turn, dc in x (x, x, 22) (23, 23) sts, shell in ch-2 sp, dc in x (x, x, 38) (38, 38) sts, shell in next st, x (x, x, 44) (46, 46) sts, shell in ch-2 sp, dc in x (x, x, 38) (38, 38) sts, shell in ch-2 sp, dc in rem x (x, x, 22) (23, 23) sts, join to first st with sl st. – (-, -, 180) (184, 184) sts and 4 ch-2 sps
Size 8 and 10 stop here and proceed to sleeve ruffles section.
Round 9: Ch 1, turn, dc in x (x, x, x) (x, 25) sts, shell in ch-2 sp, dc in x (x, x, x) (x, 42) sts, shell in next st, x (x, x, x) (x, 50) sts, shell in ch-2 sp, dc in in x (x, x, x) (x, 42) sts, shell in ch-2 sp, dc in rem x (x, x, x) (x, 25) sts, join to first st with sl st. – (-, -, -) (-, 200) sts and 4 ch-2 sps
Size 12 proceed to sleeve ruffles section.
Sleeves Ruffles
Round 6 (7, 8, 9) (9, 10): Ch 1, turn, dc in 18 (20, 22, 24) (25, 27) sts, shell in ch-2 sp, 2 dc in each of next 28 (32, 38, 42) (42, 46) sts, shell in ch-2 sp, dc in 36 (40, 44, 48) (50, 54) sts, shell in ch-2 sp, 2 dc in each of next 28 (32, 38, 42) (42, 46) sts, shell in ch-2 sp, dc in rem 18 (20, 22, 24) (25, 27) sts, join to first st with sl st. 200 (224, 256, 280) (284, 308) sts and 4 ch-2 sps
Round 7 (8, 9, 10) (10, 11): Ch 1, turn, dc in 20 (22, 24, 26) (27, 29) sts, shell in ch-2 sp, *1 dc in next st, 2 dc in next st*, rep from * to * to ch-2 sp, shell in ch-2 sp, dc in 40 (44, 48, 52) (54, 58) sts, shell in ch-2 sp, rep from * to * to ch-2 sp, shell in ch-2 sp, dc in rem 20 (22, 24, 26) (27, 29) sts, join to first st with sl st. 276 (308, 352, 384) (388, 420) sts and 4 ch-2 sps
Hi , I am making this cute dress and I think the chest area is too short for me
After closing the sleeve can I make more dc rounds to make it a little tall !!! Thank you so much
Thanks for your effort to find us assistance. I do wonder the pattern can jump in the Yoke area: for size 4: from Round 2 = 80 stitches, to Round 7 = 224 stitches; it simply does not seem possible. Please Advise, and thanks!
From the designer regarding the stitch count: “There is a huge increase in stitch count because for sleeve ruffle section, we add double sts (2 dc in each sleeve section st) and on next round, alternate 1 dc and 2 dc. This increases the stitch count.” -Dana, Editor
I purchased this pattern. All going good until this spot:
Round 8 (9, 10, 11) (11, 12): Ch 1, turn, dc in 22 (24, 26, 28) (29, 31) sts, joining dc (see special stitches) in next 2 ch-2 sps skipping all the ruffle section sts, dc2tog over same ch-2 sp as joining dc and next st, dc in next 43 (47, 51, 55) (57, 61) sts, joining dc in next 2 ch-2 sps, skipping all the ruffle section sts, dc2tog over same ch-2 sp as joining dc and next st, dc in rem 21 (23, 25, 27) (28, 30) sts, join to first st with sl st. 90 (98, 106, 114) (118, 126) sts
Can you provide more detailed instructions? Or better yet, do you have or can you source a short video demonstrating this step?
Many thanks
Hello! I’ve reached out to the designer for advice and she or I will reply as soon as possible. Thanks! – Dana, Editor
Hi Randee, I’ve heard back from the designer. Here is her reply:
—
You will work dc in each st to ch-2 sp of shell.
Then to work the joining dc, yarn over and insert hook through the ch-2 sp of the shell AND ch-2 sp of the next shell (skipping all the ruffle sleeve section stitches in between, as you do for regular raglan sleeve), pull up a loop, (3 loops on the hook) and finish the stitch as regular st.
(Basically it is just a dc, but worked through the ch-2 sps of both the 2 corner shell sts)
Next dc2tog is worked over the ch-2 sp of 2nd shell and the next dc st (dc2tog is worked to avoid a gap. So instead of dc2tog, regular dc can also be worked over next st.)
—
I’ve also added a stitch diagram for that section to the downloads section that the designer sent along.
I hope that helps! -Dana, Editor
Very cute!