


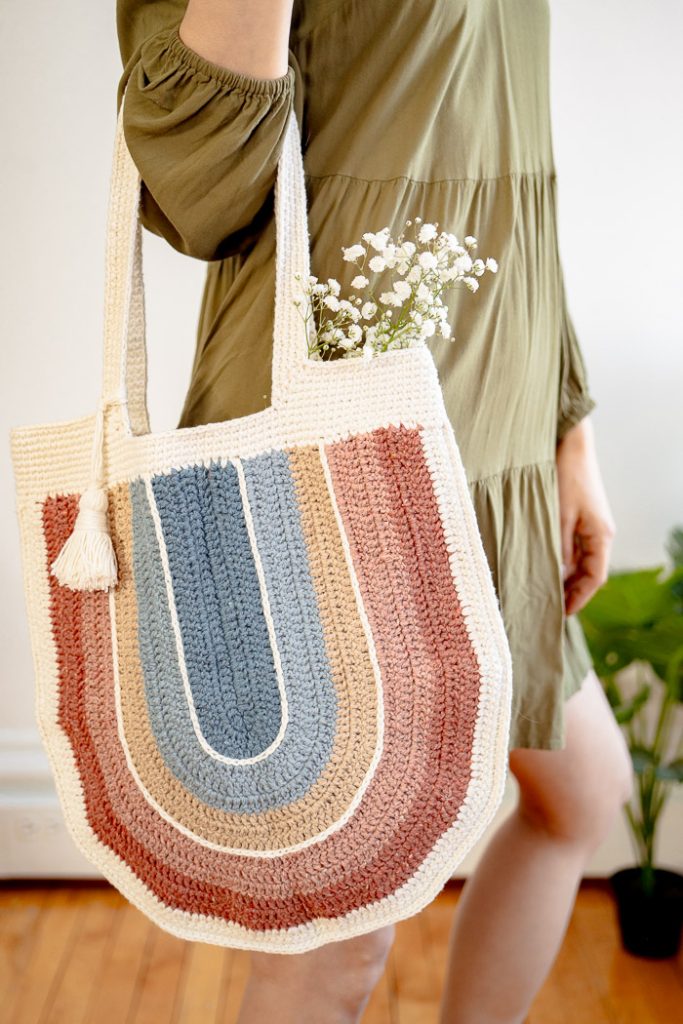
Elevate your style with this tote boasting a captivating rainbow shape, adorned with a charming tassel attached to the handle and intricate surface detailing. Perfect for a weekend project, this design is tailored for those with an intermediate skill level. Create a trendy accessory that combines functionality with artistic and sustainable flair.
Time: Weekend Project
Skill Level: Intermediate
14” w × 16” h without straps
Gauge: 19 sts and 10 rows = 4” [10 cm] in dc
Materials
 Yarn: Hobby Store’s Recycled Cotton Yarn (70% Cotton, 25% Polyester, 5% Other fibres; 328 yards [300 meters] / 3.52 ounces [100 grams]): 8310 Snow white (MC, 1 skein), 8020 Vintage (CC1, 1 skein), 8010 Faded (CC2, 1 skein), 8313 Camel brown (CC3, 1 skein), 8920 Light brick melange (CC4, 1 skein), 8903 Brick melange (CC5, 1 skein)
Hook: US size D/3, 3.25 mm
Notions: Removable stitch markers, tapestry needle, a pair of scissors, cardboard.
Special Stitches
Invisible sc2tog: Insert hook through front loop of the st and front loop of the next indicated st, yo, pull through 2 loops (2 loops rem on the hook), yo, pull through rem 2 loops.
Pattern Notes
- The pattern is worked holding 2 strands of sport weight yarn together. Instead, you can also use single strand of worsted weight yarn.
- The front and back panels are worked in rows and then joined together.
- Top portion of the bag is worked in continuous spiral rounds and the handles are done at the same time. Use a stitch marker or a piece of scrap yarn to indicate first stitch of each round.
- Ch-1 does not count as a stitch. Pull up beg ch-1 a little bit and then start working dc rows.
- When working bag handles, work invisible sc2tog where sc2tog is mentioned, for more finished look.
- When changing colors, start the stitch as normal, but stop before the last yarn over. Pick up the new color and finish the stitch. Tie the yarn ends together twice into a knot and then work over the yarn tails to hide them. Pull the yarn ends slightly to hide the knot under first few stitches of new row.
- Surface slip stitching is done after joining both the panels, but it can be done before joining too.
- Pattern is designed to create sturdy fabric and bag can be used without lining. If you wish, you can always add fabric lining for extra finishing and strength.
Pattern
Front and Back Panels
Make 2.
With CC1 and holding 2 strands together, ch 32
Row 1 (RS): Dc in 2nd ch from hook, dc in each ch to last ch, 6 dc in last ch, pm in last st made, rotate to work opposite side of starting ch, dc in each ch. (66 sts)
Row 2: Ch 1, turn, dc in each st to marked st, 2 dc in each of next 6 sts, pm in last st made, dc in each st across. (72 sts)
Row 3: Ch 1, turn, dc in each st to marked st, *2 dc in next st, dc in next st, rep from * 5 more times, pm in last st made, dc in each st across. (78 sts)
Fasten off CC1.
Row 4: With CC2, ch 1, turn, dc in each st to marked st, *2 dc in next st, dc in each of next 2 sts, rep from * 5 more times, pm in last st made, dc in each st across. (84 sts)
Row 5: Ch 1, turn, dc in each st to marked st, *2 dc in next st, dc in each of next 3 sts, rep from * 5 more times, pm in last st made, dc in each st across. (90 sts)
Row 6: Ch 1, turn, dc in each st to marked st, *2 dc in next st, dc in each of next 4 sts, rep from * 5 more times, pm in last st made, dc in each st across. (96 sts)
Fasten off CC2.
Row 7: With CC3, ch 1, turn, dc in each st to marked st, *2 dc in next st, dc in each of next 5 sts, rep from * 5 more times, pm in last st made, dc in each st across. (102 sts)
Row 8: Ch 1, turn, dc in each st to marked st, *2 dc in next st, dc in each of next 6 sts, rep from * 5 more times, pm in last st made, dc in each st across. (108 sts)
Row 9: Ch 1, turn, dc in each st to marked st, *2 dc in next st, dc in each of next 7 sts, rep from * 5 more times, pm in last st made, dc in each st across. (114 sts)
Fasten off CC3.
Row 10: With CC4, ch 1, turn, dc in each st to marked st, *2 dc in next st, dc in each of next 8 sts, rep from * 5 more times, pm in last st made, dc in each st across. (120 sts)
Row 11: Ch 1, turn, dc in each st to marked st, *2 dc in next st, dc in each of next 9 sts, rep from * 5 more times, pm in last st made, dc in each st across. (126 sts)
Row 12: Ch 1, turn, dc in each st to marked st, *2 dc in next st, dc in each of next 10 sts, rep from * 5 more times, pm in last st made, dc in each st across. (132 sts)
Fasten off CC4.
Row 13: With CC5, ch 1, turn, dc in each st to marked st, *2 dc in next st, dc in each of next 11 sts, rep from * 5 more times, pm in last st made, dc in each st across. (138 sts)
Row 14: Ch 1, turn, dc in each st to marked st, *2 dc in next st, dc in each of next 12 sts, rep from * 5 more times, pm in last st made, dc in each st across. (144 sts)
Row 15: Ch 1, turn, dc in each st to marked st, *2 dc in next st, dc in each of next 13 sts, rep from * 5 more times, pm in last st made, dc in each st across. (150 sts)
Fasten off CC5.
Row 16: With MC, ch 1, turn, dc in each st to marked st, *2 dc in next st, dc in each of next 14 sts, rep from * 5 more times, pm in last st made, dc in each st across. (156 sts)
Row 17: Ch 1, turn, sc in each st to marked st, *2 sc in next st, sc in each of next 15 sts, rep from * 5 more times, pm in last st made, sc in each st across. (162 sts)
Fasten off MC.
Joining the panels together
If you want, you can add surface slip stitching before joining the panels together.
Holding WS of both the panels together and inserting hook through both layers, attach MC in left corner. Working through both layers, sc in each st across to right corner.
Do NOT fasten off.
Proceed to top portion and handles section.
Top portion and handles
For this section, work in spiral without joining. Always use a stitch marker or a scrap piece of yarn to indicate first st of each round.
Round 1: Ch 1, add sc evenly around top edge of bag. (I worked approx 13 sts per 7 rows, ending with 124 sts.)
Round 2-5: Sc around in each st.
Pm in 4 sts of last round, corresponding to join of CC2 and CC3 rows (i.e., row 6 and 7) on both panels. My markers were in 21st, 42nd, 83rd and 104th sts. Move markers up as you work next rounds.
Round 6: Sc in each st to first marked st, sc in first marked st, loosely ch 100 (or adjust to desired length), sk sts to 2nd marker, sc in 2nd marked st, sc in each st to 3rd marked st, sc in 3rd marked st, loosely ch 100 (or adjust to desired length), sk sts to 4th marker, sc in 4th marked st, sc in each st to end. (284 sts)
Round 7: Sc in each st and each ch, working through back bumps of ch.
From round 8 onwards, move markers to sc2tog st (round 8-10).
Rounds 8-10: Sc in each st to 1 st before first marked st, sc2tog in st before and after first marked st, skipping the marked st, *sc in each st to 1 st before next marked st, sc2tog in st before and after marked st, skipping the marked st, rep from * 2 more times, sc in rem sts.
Fasten off.
Surface slip stitching
With MC yarn, make surface sl sts evenly along the joint of CC1 and CC2 (row 3 and 4) as well as CC3 and CC4 (row 9 and 10), on both the panels.
Making and Attaching Tassels
Make a tassel with MC yarn.
Wrap the yarn around a winding board, cut from a cardboard (the board should be double the length of tassel length).
Continue wrapping until you reach the desired fullness.
Slide the wound yarn off the board, and center it on other 8” yarn laying horizontally. Tie the 8” yarn into a tight knot around the middle of the yarn bundle.
Cut through the looped ends of the bundle.
Pull the ends of the yarn bundle downward and the 8” yarn upward.
Cut a 12” piece of yarn and wrap it tightly around the tassel top slowly and evenly.
Pass the end of the yarn through the loop and gently close the loop, tucking the ends into the head of the tassel.
Trim tassel ends to even them. Use the tie-off yarns on top of the tassel to attach it to your bag handle.
Finishing
Weave in the yarn tails.
Effortlessly stylish and endlessly versatile, boho-inspired crochet bags are the perfect way to add a handmade touch to your wardrobe. Boho Bags is a collection of free-spirited designs, featuring intricate textures, playful fringe, eye-catching motifs, and natural fibers that embody laid-back charm. Whether you need a roomy market tote, a chic crossbody, or a statement piece with mandala or granny square details, this collection has something for every adventure.
View this post on Instagram
Dumb me figured it out. Place Marker. How stupid could I have been. Sorry to have bothered you. But thank you for the expert help you always help with. Thanks again.
Happy Stitches, Beverly
In the beginning of rows 2-5 it says to PM in 4 stitches of last round. What does this mean? I am just beginning to crochet again and I am not familiar with this term. Your help would be greatly appreciated. Thank you Beverly