


Putting a zipper into crocheted fabric is always a little tricky. In my “Ring Around the Posies Skirt” design I used an invisible zipper for the closure at the center back waist. I chose an invisible zipper because it doesn’t show as much in the finished project. It is also less likely to snag the fabric when being opened and closed.
Let’s Get Started!
Picking your Zipper
 When you are shopping for your zipper it is best to bring a swatch of your fabric in the color yarn you are going to be using for your final project. You will want to match the color zipper to the yarn, if there isn’t a zipper available in the exact shade of your yarn color it is better to pick a color slightly darker instead of lighter. You want to use the same criteria when picking out the color of sewing thread to use.
Be sure that the zipper you have purchased is an “invisible” style zipper. The packaging will be marked accordingly, but you can also tell by looking at the front of the zipper. From the front an invisible zipper doesn’t have any teeth or coils showing when closed.
Measure and cut zipper
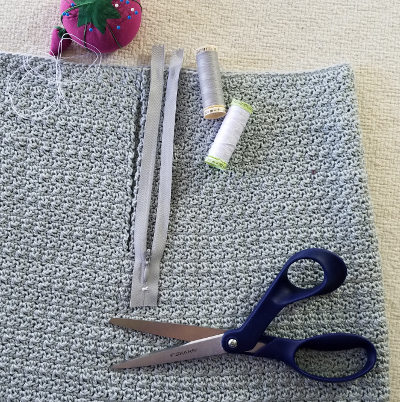 Your zipper package will come with instructions on how to shorten the zipper. It is always better to purchase a zipper that is longer than needed rather than too short as you can cut it to fit. Open the zipper to the length of the opening you will be placing it in. Sew with heavy duty sewing thread around the coil about 1 inch below the zipper pull, then cut thru the coil and tape half an inch below that. You’ll want sharp sewing scissors to cut thru the zipper coil.
Baste opening with single crochet stitching
Now that your zipper is the right size you need to prepare your project. Baste the zipper opening closed on your project with the edges flush. I use a “sloppy” single crochet holding the wrong sides together. Pull up each single crochet stitch so there is extra yarn in the legs of your stitches. When you flatten out the seam created you will have a laddered basting line on the wrong side and a ridge along the seam from the single crochets on the right side.
Placement of the zipper
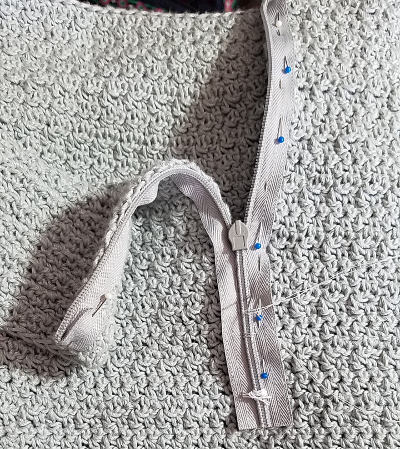
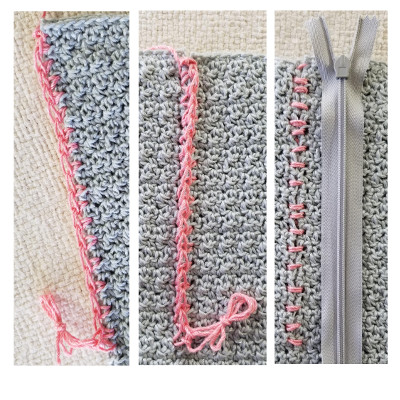 Lay the closed zipper facing down on the wrong side of the basted seam. You want the zipper pull to be just at the top of the opening and the coil of the zipper to align with the basted seam. You can feel the ridge of the single crochets along the seam to help you with aligning the zipper. Pin the zipper tape to the fabric making sure not to overstretch or wrinkle the fabric. Once you have the zipper pinned in place pull out the single crochet basting. Gently open the zipper to check that it is aligned correctly. Adjust and re-pin as needed.
Hand sewing the zipper
Hand sewing is a time-consuming way to finish your crochet project, but I have found that it actually saves time over using a sewing machine on crocheted fabric. Sewing by hand allows you to check the placement of each stitch and to insure that you haven’t missed catching the crocheted fabric. With a machine you often won’t know that your fabric has shifted until you’ve finished the seam, and it is much more challenging to rip out a machine stitched seam.
Keep your doubled thread length under 20”. Cut a length of 36-40” and thread thru your sewing needle, pull to get the ends even and tie a knot. Start at the top of your zipper and sew down the length of the zipper opening and beyond. Sew as close to the coils as possible without catching the coils with your sewing needle. Open the zipper regularly while sewing, to check that you haven’t caught the coils.
Sewing thread can cut your yarn so work slow and steady with even length stitches (1/8 – 1/4 inch). Check that you are catching the crochet fabric well and that the rows of your fabric are still aligned on both sides of the zipper seam as you work. You may find it easier to adjust the fabric edge if you remove the pins as you go. Be sure that you have completely pulled the thread thru with each stitch before going on to the next stitch.
Once the zipper is sewn in open the zipper to the base of your opening and sew over the coils catching the backside of your crochet fabric under the zipper pull. This will keep the zipper pull from working down below the seam opening.
After both sides of the zipper are sewn in place, fold down the top of the zipper tape to the wrong side of your project. The fold should be even with the top edge of your fabric. Sew down the tape ends to the zipper tape and to the fabric below. Use small stitches to tack down the zipper tape edge along the length of your zipper.
Don’t worry if your stitches aren’t perfect looking. The main points are to secure the zipper so it works properly and to keep the sewn stitches from being obvious on the right-side of your project.
Perfect timing! My aunt lives in assisted living community
and enjoys fashion styling. I chose a turtleneck capelet for a gift. It needs a zipper at the neck which would make it
Easier for her 94 -year arms to negotiate .
The last time I used a zipper, invisible zips didn’t exist for
Home sewers. Thanks for detailed instructions and photos.
Deborah