


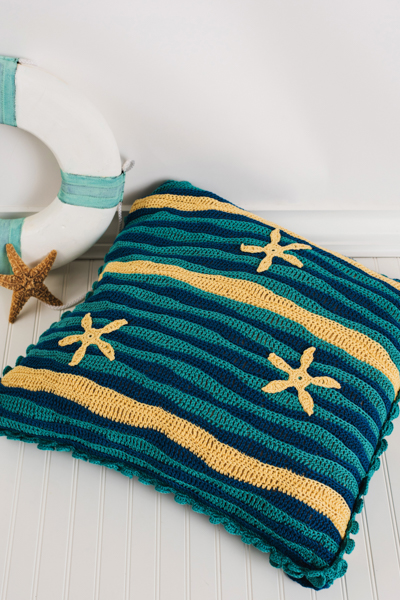
Take the sea’s beauty into your home by crocheting up this adorable pillow. Featuring a gentle wave pattern using blue tones to represent sea water lapping against the yellow sands coastline, this unique piece will fit effortlessly into your home décor.
Skill Level: Easy
Sizes: 26” x 26”
Gauge: 16 sts and 12 rows = 4” [10 cm]; 4 trim shells = 4”; Starfish Motif = 5”
Materials
 Yarn: Berroco Modern Cotton (60% Pima Cotton, 40% Modal Rayon; 209 yards [191 meters]/ 100 grams): #1665 Wetherill (MC, 3 skeins), #1652 Matunuck (CC1, 4 skeins), #1627 Del (CC2, 2 skeins).
Hook: US size H/8 (5.0 mm)
Notions: Large tapestry needle, removable stitch markers, embroidery needle, six yellow 7/8” buttons, cream color embroidery thread, ¾ yds of fleece or muslin fabric for pillow insert, 23 oz Poly-fil (safe for children) for stuffing pillow insert.
Abbreviations
dcdtrtog – double crochet, double treble together
Pattern Notes
Stitches are worked in back loops only for the front and back panels of pillow cover.
Work through both loops for Star Fish Motifs and Sea Shell Trim.
There are 2 separate pillow panels. The front panel is approximately 5 inches wider. The extra inches are for the fold over button band.
When changing colors, do not fasten off but, drop the color to the back of the working and begin to work with the next color. If there are more than 4 rows between color change, you can choose to fasten that color off. Weave in loose ends as you go.
The Sea Shells pillow trim are connected to one another and made in one long strand. You will work in a clockwise and counter clockwise direction to create each shell.
Pattern
Large Front Panel of Pillow Cover
Row 1 (RS): Begin with MC, ch 122, turn, hdc in 3rd ch from hook and in next 4 ch, sc in next 5 ch, *hdc in next 5 ch, sc in next 5 ch; rep from * across to end of row, ch 1, turn. (120 sts)
Row 2: Working in bl, *tr in next 5 sts, dc in next 5 sts, hdc in next 5 sts, sc in next 5 sts, hdc in next 5 sts, dc in next 5 sts; rep from * across to last st, change to CC1, ch 1, turn. (120 sts)
Row 3: *Hdc in next 5 sts, sc in next 5 sts; rep from * across to end of row, ch 1, turn.
Row 4: *Hdc in next 5 sts, dc in next 5 sts, tr in next 5 sts, dc in next 5 sts, hdc in next 5 sts, sc in next 5 sts; rep from * across to last st, change to MC, ch 1, turn. (120 sts)
Row 5: With MC, rep Row 3.
Row 6: Rep Row 2, change to CC1 in last st, ch 1, turn.
Row 7: *Sc in next 5 sts, hdc in next 5 sts; rep from * across to end of row.
Row 8: *Sc in next 5 sts, hdc in next 5 sts, dc in next 5 sts, tr in next 5 sts, dc in next 5 sts, hdc in next 5 sts; rep from * across to last st, change to MC, ch 1, turn.
Row 9: Rep Row 7.
Row 10: *Dc in next 5 sts, hdc in next 5 sts, sc in next 5 sts, hdc in next 5 sts, dc in next 5 sts, tr in next 5 sts; rep from * across to the last st, change to CC2, ch 1, turn.
Row 11: Cont with CC2, rep Row 3.
Row 12: Cont with CC2, rep Row 4.
Row 13: Cont with CC2, rep Row 3.
Row 14: Cont with CC2, rep Row 2, change to MC in last st, ch 1, turn.
Row 15: Rep Row 3.
Row 16: Rep Row 4, change to CC1 in last st, ch 1, turn.
Row 17: Rep Row 3.
Row 18: Rep Row 4, change to MC in last st, ch 1, turn.
Row 19: Rep Row 7.
Row 20: Rep Row 8, change to CC1 in last st, ch 1, turn.
Row 21: Rep Row 7.
Row 22: Rep Row 10, change to MC in last st, ch 1, turn.
Row 23: Rep Row 3.
Row 24: Rep Row 2, change to CC1 in last st, ch 1, turn.
Row 25: Rep Row 3.
Row 26: Rep Row 4, change to MC in last st, ch 1, turn.
Row 27: Rep Row 3.
Row 28: Rep Row 2, change to CC1 in last st, ch 1, turn.
Row 29: Rep Row 7.
Row 30: Rep Row 8, change to MC in last st, ch 1, turn.
Row 31: Rep Row 7.
Row 32: Rep Row 10, change to CC1 in last st, ch 1, turn.
Row 33: Rep Row 3.
Row 34: Rep Row 2, change to MC in last st, ch 1, turn.
Row 35: Rep Row 3.
Row 36: Rep Row 4, change to CC1 in last st, ch 1, turn.
Row 37: Rep Row 3.
Row 38: Rep Row 2, change to CC2 in last st, ch 1, turn.
Row 39: Cont with CC2, rep Row 7.
Row 40: Rep Row 8.
Row 41: Cont with CC2, rep Row 7.
Row 42: Rep Row 10, change to CC1 in last st, ch 1, turn.
Row 43: Rep Row 3.
Row 44: Rep Row 2, change to MC in last st, ch 1, turn.
Row 45: Rep Row 3.
Row 46: Rep Row 4, change to CC1 in last st, ch 1, turn.
Row 47: Rep Row 3.
Row 48: Rep Row 2, change to MC in last st, ch 1, turn.
Row 49: Rep Row 7.
Row 50: Rep Row 8, change to CC1 in last st, ch 1, turn.
Row 51: Rep Row 7.
Row 52: Rep Row 10, change to MC in last st, ch 1, turn.
Row 53: Rep Row 3.
Row 54: Rep Row 2, change to CC1 in last st, ch 1, turn.
Row 55: Rep Row 3.
Row 56: Rep Row 4, change to MC in last st, ch 1, turn.
Row 57: Rep Row 3.
Row 58: Rep row 2, change to CC2 in last st, ch 1, turn.
Row 59: Cont with CC2, rep Row 7.
Row 60: Cont with CC2, rep Row 8.
Row 61: Cont with CC2, rep Row 7.
Row 62: Rep Row 10, change to MC in last st, ch 1, turn.
Row 63: Rep Row 3.
Row 64: Rep Row 2, change to CC1 in last st, ch 1, turn.
Row 65: Rep Row 3.
Row 66: Rep Row 4, change to MC in last st, ch 1, turn.
Row 67: Rep Row 3.
Row 68: Rep Row 2, change to CC1 in last st, ch 1, turn.
Row 69: Rep Row 7.
Row 70: Rep Row 8, change to MC in last st, ch 1, turn.
Row 71: Rep Row 7.
Row 72: Rep Row 10.
Fasten off. Weave in any loose ends.
Small Back Panel of Pillow Cover
Row 1 (RS): Begin with MC, ch 102, turn, hdc in 3rd ch from hook and in next 4 ch, sc in next 5 ch, *hdc in next 5 ch, sc in next 5 ch; rep from * across to end of row, ch 1, turn. (100 sts)
Row 2: Work in bl*Tr in next 5 sts, dc in next 5 sts, hdc in next 5 sts, sc in next 5 sts, hdc in next 5 sts, dc in next 5 sts; rep from * across to the last 10 sts, tr in next 5 sts, dc in last 5 sts, change to CC1 in last st, ch 1, turn. (100 sts)
Row 3: *Hdc in next 5 sts, sc in next 5 sts; rep from * across to end of row, ch 1, turn.
Row 4: *Hdc in next 5 sts, dc in next 5 sts, tr in next 5 sts, dc in next 5 sts, hdc in next 5 sts, sc in next 5 sts; rep from * across to the last 10 sts, hdc in next 5 sts, dc in each of last 5 sts, change to MC in last st, ch 1, turn.
Row 5: Rep Row 3.
Row 6: Rep Row 2, change to CC1 in last st, ch 1, turn.
Row 7: *Sc in next 5 sts, hdc in next 5 sts; rep from * across to end of row.
Row 8: *Sc in next 5 sts, hdc in next 5 sts, dc in next 5 sts, tr in next 5 sts, dc in next 5 sts, hdc in next 5 sts; rep from * across to last 10 sts, sc in next 5 sts, hdc in last 5 sts, change to MC in last st, ch 1, turn.
Row 9: Rep Row 7.
Row 10: *Dc in next 5 sts, hdc in next 5 sts, sc in next 5 sts, hdc in next 5 sts, dc in next 5 sts, tr in next 5 sts; rep from * across to the last 10 sts, dc in next 5 sts, hdc in each of last 5 sts, change to CC2 in last st, ch 1, turn.
Row 11: Cont with CC2, rep Row 3.
Row 12: Cont with CC2, rep Row 4.
Row 13: Cont with CC2, rep Row 3.
Row 14: Cont with CC2, rep Row 2, change to MC in last st, ch 1, turn.
Row 15: Rep Row 3.
Row 16: Rep Row 4, change to CC1 in last st, ch 1, turn.
Row 17: Rep Row 3.
Row 18: Rep Row 2, change to MC in last st, ch 1, turn.
Row 19: Rep Row 7.
Row 20: Rep Row 8, change to CC1 in last st, ch 1, turn.
Row 21: Rep Row 7.
Row 22: Rep Row 10, change to MC in last st, ch 1, turn.
Row 23: Rep Row 3.
Row 24: Rep Row 4, change to CC1 in last st, ch 1, turn.
Row 25: Rep Row 3.
Row 26: Rep Row 2, change to MC in last st, ch 1, turn.
Row 27: Rep Row 3.
Row 28: Rep row 4, change to CC1 in last st, ch 1, turn.
Row 29: Rep Row 3.
Row 30: Rep Row 2, change to MC in last st, ch 1, turn.
Row 31: Rep Row 7.
Row 32: Rep Row 8, change to CC1 in last st, ch 1, turn.
Row 33: Rep Row 7.
Row 34: Rep Row 10, change to MC in last st, ch 1, turn.
Row 35: Rep Row 3.
Row 36: Rep Row 4, change to CC1 in last st, ch 1, turn.
Row 37: Rep Row 3.
Row 38: Rep Row 2, change to CC2 in last st, ch 1, turn.
Row 39: Cont with CC2, rep Row 3.
Row 40: Cont with CC2, rep Row 4.
Row 41: Cont with CC2, rep Row 3.
Row 42: Rep Row 2, change to CC1 in last st, ch 1, turn.
Row 43: Rep Row 7.
Row 44: Rep Row 8, change to MC in last st, ch 1, turn.
Row 45: Rep Row 7.
Row 46: Rep Row 10, change to CC1 in last st, ch 1, turn.
Row 47: Rep Row 3.
Row 48: Rep Row 4, change to MC in last st, ch 1, turn.
Row 49: Rep Row 3.
Row 50: Rep Row 2, change to CC1 in last st, ch 1, turn.
Row 51: Rep Row 3.
Row 52: Rep Row 4, change to MC in last st, ch 1, turn.
Row 53: Rep Row 3.
Row 54: Rep Row 2, change to CC1 in last st, ch 1, turn.
Row 55: Rep Row 7.
Row 56: Rep Row 8, change to MC in last st, ch 1, turn.
Row 57: Rep Row 7.
Row 58: Rep Row 10, change to CC2 in last st, ch 1, turn.
Row 59: Cont with CC2, rep Row 3.
Row 60: Cont with CC2, rep Row 4.
Row 61: Cont with CC2, rep Row 3.
Row 62: Cont with CC2, rep Row 2, change to MC in last st, ch 1, turn.
Row 63: Rep Row 3.
Row 64: Rep Row 4, change to CC1 in last st, ch 1, turn.
Row 65: Rep Row 3.
Row 66: Rep Row 4, change to MC in last st, ch 1, turn
Row 67: Rep Row 3.
Row 68: Rep Row 2, change to CC1 in last st, ch 1, turn.
Row 69: Rep Row 7.
Row 70: Rep Row 8, change to MC in last st, ch 1, turn.
Row 71: Rep Row 7.
Row 72: Rep Row 10.
Fasten off. Weave in any loose ends
Edge Stitching for Front and Back Pillow Panels
Small Panel
Attach CC1 with sl st along left corner of Pillow edge, ch 1, work 78 sc evenly along the side.
Fasten off, leaving a long tail for stitching panels together later.
Rep the same for right corner and along the side.
Buttonband for Front Pillow Panel
Row 1: Attach CC1 with sl st along left corner of Pillow edge, ch 1, work 78 sc evenly along the side, ch 1, turn.
Rows 2-3: Sc in each of 78 sts along edge, ch 1, turn.
Row 4: Sc in next 6 sts, ch 2, sk next 2 sts, *sc in next 11 sts, ch 2, sk next 2 sts; rep from *4 more times, sc in last 6 sts, ch 1, turn.
Row 5: Sc in each st, working 2 sc into ch-2 sp across to next corner. (78 sc)
Fasten off.
Attach Front and Back Pillow Panels together with sc along 3 sides.
Leave buttonband edge open to insert pillow.
Starfish Motifs (make 6)
Rnd 1: Make a magic ring, ch 1, work 15 sc into center of ring, tighten to close, sl st in beg sc.
Rnd 2: *Ch 10, turn, sc in 2nd ch from hook and in next ch, dc in next 2 ch, tr in next ch, dc in next 2 ch, sc in last 2 ch, sc in next 3 sc in Rnd 1; rep from * around to beg ch-10, sl st in base of ch.
Fasten off, leaving a long tail to stitch to pillow cover.
Use embroidery needle and thread to attach 2 motifs with basting st to wider blue section of front panel. Attach third motif to narrow blue section below. Follow the same instructions for back panel motifs.
Sea Shell Strand Trim (make 79)
First Sea Shell
Rnd 1: Begin a cluster with, ch 4, dcdtrtog into base of ch 4.
Rnd 2: Working counter clockwise make 5 sc around the dtr st of the cluster, work 5 sc into the ch 4 sp, work 3 sc around dc section, which is in the center part of cluster, ch 1, turn.
Rnd 3: Working clockwise, sc in next 3 sc in center of cluster, work sc into next 5 sc of ch 4 sp, work increase of (hdc, dc) in next st at the top of dcdtrtog, work an increase of 2 dc in next 5 sc worked around dtr.
All Following Sea Shells
Rnd 1: Begin 2nd cluster with ch 3, dcdtrtog into the top of the last dc of previous shell.
Rnd 2: Rep Rnd 2 of First Sea Shell.
Rnd 3: Rep Rnd 3 of First Sea Shell.
Finishing
Use the tapestry needle to sew the shell trim into scs along the edge of 3 sides. Count 20 sts in from the beg of the buttonband edge. This should measure about 5”.
Pin trim in place here and baste back side of trim onto Front Panel.
Insert
Cut 2 pieces of muslin or fleece 26.5” x 26.5”. Sew up 3 sides using a 0.5” seam allowance.
Place 23 oz of poly-fil inside and sew up rem side seam.
Place inside completed pillow cover.