


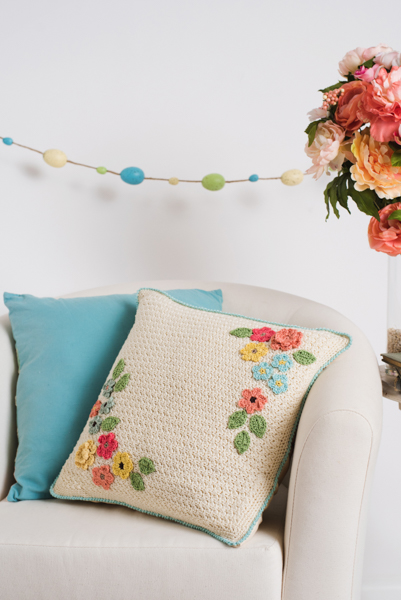
Inspired by the many flowers of spring, this pillow is a chic update to your home. An easy textured stitch pattern makes this pillow a pleasure to crochet. Make some sweet flowers and leaves to embellish and you’ll be ready for the new season.
Skill Level: Beginner
Size: 17” square
Gauge: 18 sts and 16 rows = 4” [10 cm] in pattern stitch
Materials
 Yarn: Cascade Yarns Ultra Pima Fine (100% Cotton; 136 yards [125 meters]/50 grams): 3718 Natural (MC, 3 balls), 3762 Spring Green (CC1, 1 ball), 3736 Ice (CC2, 1 ball), 3752 Coral (CC3, 1 ball), 3767 Deep Coral (CC4, 1 ball), 3743 Yellow Rose (CC5, 1 ball), 3720 Sage (CC6, 1 ball), 3716 Chocolate (CC7, 1 ball), 3717 Sand (CC8, 1 ball)
Hook: US size E/4 (3.5 mm); UK size 11 (3.00 mm)
Notions: 17” Pillow, tapestry needle, removable stitch marker, matching sewing thread
Special Stitches
Reverse single crochet
Ch 1, working from left to right, sk first sc, insert hook from front to back in next sc to the right, yo, pull lp through st, yo, pull through 2 lps on hook. Repeat as indicated in pattern.
Pattern Notes
Pillow front is attached to a readymade pillow to save time. The flowers are made separately and attached to the pillow by seaming. Any scraps of cotton yarn can be used for the flowers.
Design uses vintage inspired shades of coral and yellow for the flowers with accents of brown, sage and cream. You could choose to make flowers to match your décor!
Pattern
Pillow Front (make 1)
With MC and larger hook, ch 67.
Row 1: Dc in 3rd ch from hook (counts as sc, dc), *sk next ch, (sc, dc) in next ch; rep from * across to last 2 ch, sk next ch, sc in last ch, turn. (65 sts)
Rows 2-65: Ch 1 (counts as sc), dc in first st, *sk next st, (sc, dc) in next sc; rep from * across to last 2 sts, sk next dc, sc in t-ch, turn.
Note: On last row, do not turn. Continue to Border.
Border
Rnd 1: Cont with MC, ch 1, work sc evenly spaced around all edges of Pillow, working 3 sc in each corner, join with sl st in first sc.
Note: Mark centre st of each 3-sc corner with a stitch marker.
Rnds 2-3: Rep Rnd 1. Fasten off.
Rnd 4: With CC2, ch 1 and work Reverse Single Crochet around edge of Pillow.
Fasten off. Weave in all ends.
Flowers and Leaves
With smaller hook, make flowers and leaves in 3 sizes using photo as guide.
Small Flower (make approx. 7)
Ch 2.
Rnd 1: Work 5 sc in 2nd ch from hook, sl st in first st. Fasten off. (5 sts)
Change color and join in any st.
Rnd 2: Ch 2, (2 dc, ch 2, sl st) in first st, (sl st, ch 2, 2 dc, ch 2, sl st) in each sc around, join with sl st to first ch to join. Fasten off. (5 petals)
Medium Flower (make approx. 6)
Ch 2.
Rnd 1: Work 5 sc in 2nd ch from hook, sl st in first st. Fasten off. (5 sts)
Change color and join in any st.
Rnd 2: Ch 3, (3 tr, ch 3, sl st) in first sc, (sl st, ch 3, 3 tr, ch 3, sl st) in each sc around, join with sl st to first ch to join. Fasten off. (5 petals)
2-layer Flower (make 2)
Ch 4 and sl st to first ch to join.
Rnd 1: Work 14 sc into ring, join with sl st to first sc to join.
Rnd 2: Ch 2, dc in same sc, (dc, ch 2, sl st) in next sc, *ch 2, dc in next sc, (dc, ch 2, sl st) in next sc; rep from * 5 more times. (7 petals)
Rnd 3: Working behind Rnd 2, sl st into sp between 2 petals (insert hook into 2 lps to create a stable base to work from), ch 3, *sl st into sp between next 2 petals, ch 3; rep from * 5 more times, join to first sl st.
Rnd 4: Sl st into first ch-3 sp, (ch 2, 3 dc, ch 2, sl st) in same sp, (sl st, ch 2, 3 dc, ch 2, sl st) in each ch-3 sp around. Fasten off. (7 petals)
Leaves (make 10)
Using CC1, ch 7
Rnd 1: Sc in 2nd ch from hook, hdc in next ch, dc in next 3 ch, (2 hdc, ch 2, sc in 2nd ch from hook, 2 hdc) in last ch. Working on opposite side of beg ch-7, dc in next 3 ch, hdc in next ch, sc in last ch, join with sl st to first sc. Fasten off.
Finishing
Weave in all ends on Flowers and Leaves.
Using picture as a guide, sew all Flower applique in place on Pillow Front.
Lay pillow piece on readymade pillow and pin in place, stretching where needed. Using matching sewing thread, whip-stitch around.
I need a pdf. How do I print this pattern?
Hello! At this time we do not offer PDFs of our individual patterns. However, you are welcome to print the patterns you would like to crochet by using the printer icon on the left side of the screen. Let me know if you have any questions! – Nicola
This magazine seems to only get able view from this page only, does not show up on the magazine site
I was wondering where to find the pictures of the items too. I have been around and around in circles trying to find any pictures!
It seems like common sense to have a picture with the actual pattern.
Hello. If you are viewing on your desktop, photos are on the lower right side of the written instructions. This photo problem is being reviewed and hope to be fixed soon. I hope this helps. Thank you!
Where would It find a photo of the pillow?
I used to be able to to go each section and there see a photo and if I was interested click on it and see the pattern. Now I can only click on the pattern and see the item down at the bottom.
I was unable to print more than the leading part (page 1) of this pattern. How do I go about accessing the entire pattern to print?