


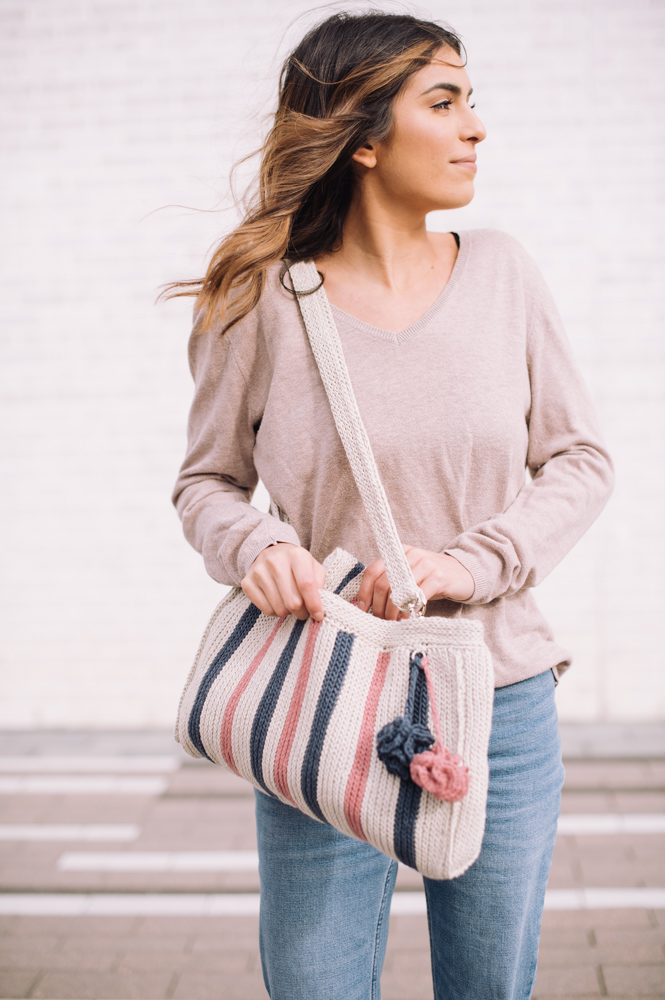
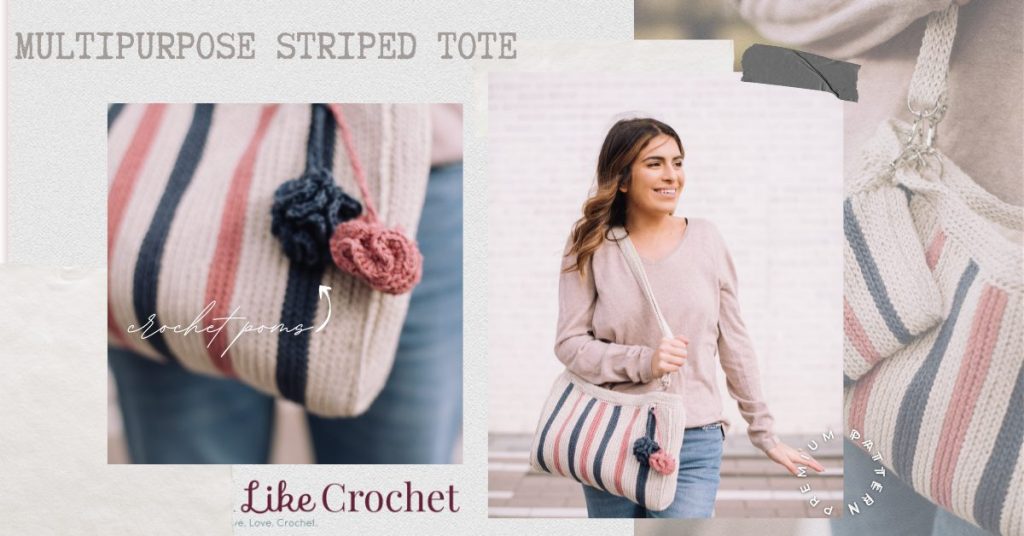
This multipurpose tote allows you to wear it as a shoulder or a handbag, depending on the strap length you choose. It includes a small detachable pocket to easily access your essentials, and a couple of decorative pom-poms made with left-over yarn. The size allows one to carry a 13” computer, without being too big to look like a shopping bag.
Time: 1 Week Project
Skill Level: Intermediate
Size: Tote: 14” wide and 10” tall. Small bag: 7” wide and 5” tall.
Gauge: 22 sts and 32 rows = 4″ [10cm] in pattern stitch after blocking (although due to the lack of elasticity of the chosen yarn combination, blocking is optional).
Materials
Yarns:
 Garnstudio DROPS Bomull-Lin (53% cotton, 47% linen; 93 yards [85 meters]/50 grams): 03 light beige (MC, 7 balls), 21 dark blue (CC1, 2 balls)

Garnstudio DROPS Belle (53% cotton, 33% viscose, 14% linen; 131 yards [120 meters]/50 grams): 11 old pink (CC2, 2 balls)
Hook: US size H/8 (5.00 mm)
Notions: Tapestry needle, sewing needle, sewing thread, 9 key chain hooks, 5 D-rings, 3 pairs of magnets.
One 20” high and 16” wide, and two 10” high and 4” wide rectangles of linen (or any other fabric to make the lining) for the tote.
One 10” high and 8” wide rectangle of linen (or any other fabric to make the lining) for the small bag.
Special Stitches
Back Loop Slip Stitch (blslst): Insert hook into the next st but only in the BL, yo, pull back through that st and also through lp on hook.
Pattern Notes
The pattern is mainly worked flat in rows, with a round finishing on the top.
The three rectangles are worked in blslst seamed by a sl st. with a round finishing in the top. The straps (2 pairs of different lengths) are attached by removable key chain hooks to 4 D-rings placed inside the top edge. Two inside magnets will serve as a closure.
The small detachable pocket has a similar construction, with only one inside magnet and one key chain hook.
An additional D-ring outside the bag allows to attach 2 decorative crochet pom-poms.
Chains at the beginning of rows/rounds do not count as sts.
Sometimes, and depending on how tight you work the sts, inserting the hook in the back loop may be hard. I suggest to use the point of the hook to open/enlarge the back loop before inserting the hook and yo.
Blocking/ironing is optional, but I recommend it before assembling for a better finish.
Pattern
TOTE
Body
The tote body is worked side to side in 1 piece alternating colors in the following sequence:

With MC, ch 94.
Row 1 (RS): Ch 1, sl st to end, turn. (94 sts)
Row 2 (WS): Ch 1, blslst to end, turn.
Rows 3-10: Rep Row 2
Rows 11-16: With CC1, rep Row 2.
Rows 17-26: With MC, rep Row 2.
Rows 27-32: With CC2, rep Row 2.
Rows 33-42: With MC, rep Row 2.
Rows 43-48: With CC1, rep Row 2.
Rows 49-54: With MC, rep Row 2.
Rows 55-60: With CC2, rep Row 2.
Rows 61-66: With MC, rep Row 2.
Rows 67-72: With CC1, rep Row 2.
Rows 73-82: With MC, rep Row 2.
Rows 83-88: With CC2, rep Row 2.
Rows 89-98: with MC, rep Row 2.
Rows 99-104: with CC1, rep Row 2.
Rows 105-114: with MC, rep Row 2. Fasten off at end of last row.
Sides (make 2)
With MC, ch 40.
Row 1 (RS): Ch 1, sl st to end, turn. (40 sts)
Row 2 (WS): Ch 1, blslst to end, turn.
Rows 3-16: Rep Row 2. Fasten off at end of last row.
Assembling body and sides:
Blocking/ironing is optional, but I recommend it before assembling for a better finish.
With MC and using tapestry needle and tapestry st, sew body and sides. Then work 1 row of slst over this tapestry st.
Top Border
Rnd 1: With MC, ch 1, work 36 sl st evenly distributed along the top edge of body and sides, sl st in top of first ch to join, turn.
Rnd 2: Ch 1, blslst to end, sl st in top of first ch to join, turn.
Rnds 3-10: Rep Rnd 2. Fasten off at end of last rnd.
Straps
Long (make 2)
With MC, ch 140.
Row 1 (RS): Ch 1, sl st to end, turn. (140 sts)
Row 2 (WS): Ch 1, blslst to end, turn.
Rows 3-10: Rep Row 2. Fasten off at end of last row.
Short (make 2)
With MC, ch 70.
Row 1 (RS): Ch 1, sl st to end, turn. (70 sts)
Row 2 (WS): Ch 1, blslst to end, turn.
Rows 3-10: Rep Row 2. Fasten off at end of last row.
Pom-poms (make 2)
You can use your left over yarns from CC1 and/or CC2.
Make a magic ring.
Rnd 1: Ch 1, 6 sc into magic ring, sl st in ch 1 to join.
Rnd 2: Ch 1, 2 sc in same st as join, 3 sc in next st to end, sl st in ch 1 to join.
Rnds 3-4: Rep Rnd 2. Cut yarn and weave ends.
Make a chain twice as large as the desired length. Attach both edges of the chain to the magic ring.
Finishing
Weave in all ends.
Sew the 4 D-rings inside the first row the top border of the tote, approximately 2” from the lateral sides.
Sew the key chains to the edges of the strap by folding the end of the straps into the ring. Attach the straps (long, short or all together) to the 4 D-rings.
Sew 1 D-ring outside the first row the front top border of the tote, to allow adding the decorative pom-poms.
To form lining, sew both short side edges to the main rectangle. Turn bag WS out and insert into lining with both WS together. Whipstitch top edge to the second row of the top border with matching color thread and sewing needle, paying attention to hide the bottom part of the D-rings for a better finishing.
If desired, place a plastic canvas or a flexible plastic cutting board along bottom of bag for reinforcement.
SMALL BAG
Body
The small bag body is worked side to side in 1 piece alternating colors in the following sequence:
| Color | MC | CC1 | MC | CC2 | MC | CC1 | MC | CC2 | MC | CC1 | MC |
| # of rows | 6 | 4 | 6 | 4 | 6 | 4 | 6 | 4 | 6 | 4 | 6 |
With MC, ch 50.
Row 1 (RS): Ch 1, sl st to end, turn. (50 sts)
Row 2 (WS): Ch 1, blslst to end, turn.
Rows 3-6: Rep Row 2.
Rows 7-10: With CC1, rep Row 2.
Rows 11-16: With MC, rep Row 2.
Rows 17-20: With CC2, rep Row 2.
Rows 21-26: With MC, rep Row 2.
Rows 27-30: With CC1, rep Row 2.
Rows 31-36: With MC, rep Row 2.
Rows 37-40: With CC2, rep Row 2.
Rows 41-46: With MC, rep Row 2.
Rows 47-50: With CC1, rep Row 2.
Rows 51-56: With MC, rep Row 2. Fasten of at the end of last row.
Sides (make 2)
With MC, ch 22.
Row 1 (RS): Ch 1, sl st to end, turn. (22 sts)
Row 2 (WS): Ch 1, blslst to end, turn.
Rows 3-6: Rep Row 2. Fasten off at the end of last row.
Assembling body and sides:
Blocking/ironing is optional, but I recommend it before assembling for a better finish.
With MC and using tapestry needle and tapestry st, sew body and sides. Then, work 1 row of slst over this tapestry st.
Top Border
Rnd 1: With MC, ch 1, work 66 sl st evenly distributed along the top edge of body and sides, sl st in top of first ch to join, turn.
Rnd 2: Ch 1, blslst to end, sl st in top of first ch to join, turn.
Rnds 3-6: Rep Rnd 2. Fasten off at the end of last rnd.
Finishing
Weave in all ends.
Sew the key chain hook inside the first row the top border of the tote, approximately ½” from one lateral side.
To form lining, sew side edges of the rectangle. Turn bag WS out and insert into lining with both WS together. Whipstitch top edge to the second row of the top border with matching color thread and sewing needle, paying attention to hide the bottom part of the D-rings for a better finishing.