


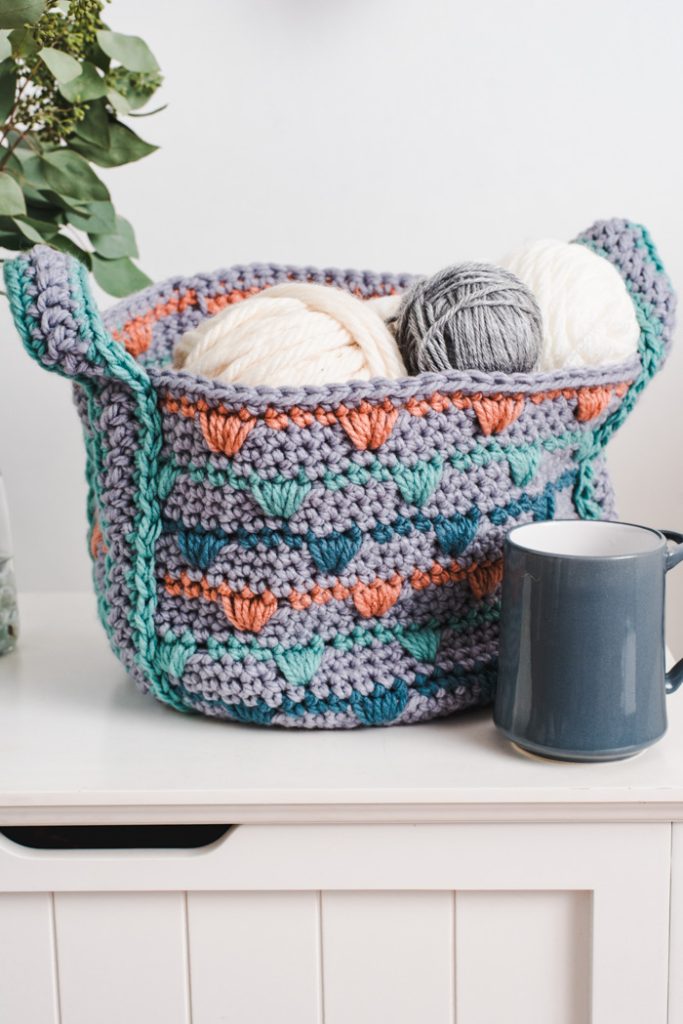
Organize your home with handmade style using the Emerson V Stitch Basket. Designed with durability and versatility in mind, this basket features heavy yarn and a thick, textured V stitch that creates a strong yet collapsible structure—ideal for holding everything from magazines and books to yarn skeins, toys, or crafting supplies.
What sets this design apart is its thoughtfully crafted one-piece handle, seamlessly integrated for added support across the bottom and sides, ensuring both function and durability. The Emerson Basket is as practical as it is beautiful, and its sturdy form is easily adaptable to your preferred colors and sizes to match any home décor.
Skill Level: Easy
Size: 11” tall x 10” in diameter
Gauge: 5 sts and 6 rows = 2” [5 cm] in sc
Materials
 Yarn: Bernat Softee Chunky (100% Acrylic, 431 yards [394 meters]/400grams): Pony Gray (MC, 1 ball), Velvet Teal (C1, 1 ball), Mineral Teal (C2, 1 ball), Clay Dust (C3, 1 ball).
Hook: US size M/N (9.00 mm)
Notions: Tapestry needle, pins
Pattern Stitches
Inc: Work 2 sc in st indicated
Spike V Stitch (Spike V-st): *Insert hook in st 2 rows below, draw up a lp, yo, pull through both lps on hook; rep from * in same st twice more.
Single Crochet Join (Sc join): Put slip knot over hook, insert hook into st, draw up a lp, yo, pull through both lps on hook.
Pattern
Basket
With MC, ch 2.
Rnd 1: Work 8 sc in 2nd ch from hook, sl st in first st to join. (8 sts)
Rnd 2: Ch 1, inc in each st around, sl st in first st to join. (16 sts)
Rnd 3: Ch 1, sc in same st, inc, (sc in next st, inc) 7 times, sl st in first st. (24 sts)
Rnd 4: Ch 1, sc in same st, sc in next st, inc, (sc in next 2 sts, inc) 7 times, sl st in first st. (32 sts)
Rnd 5: Ch 1, sc in same st, sc in next 2 sts, inc, (sc in next 3 sts, inc) 7 times, sl st in first st. (40 sts)
Rnd 6: Ch 1, sc in same st, sc in next 3 sts, inc, (sc in next 4 sts, inc) 7 times, sl st in first st. (48 sts)
Rnd 7: Ch 1, sc in same st, sc in next 4 sts, inc, (sc in next 5 sts, inc) 7 times, sl st in first st. (56 sts)
Rnd 8: Ch 1, sc in same st, sc in next 5 sts, inc, (sc in next 6 sts, inc) 7 times, sl st in first st. (64 sts)
Rnd 9: Ch 1, sc in same st, sc in next 6 sts, inc, (sc in next 7 sts, inc) 7 times, sl st in first st. (72 sts)
Rnd 10: Ch 1, working in BL, sc in same st, sc in each st around, sl st in first st. (72 sts)
Rnds 11-13: Ch 1, working in both loops, sc in same st, sc in each st around, sl st in first st.
Rnd 14: Change to C1, ch 1, sc in same st, sc in next 2 sts, sk next st, Spike V-st, sk next st, (sc in next 3 sts, sk next st, Spike V-st, sk next st) 11 times, sl st in first st to join. (12 Spike V-sts, 36 sc)
Rnds 15-17: Change to MC, ch 1, sc in same st, sc in each st around, sl st in first st. (72 sts)
Rnd 18: Change to C2, ch 1, Spike V-st, sk next st, sc in next 3 sts, (sk next st, Spike V-st, sk next st, sc in next 3 sts) 11 times, sl st in first st to join. (12 Spike V-sts, 36 sc)
Rnds 19-21: Change to MC, ch 1, sc in same st, sc in each st around, sl st in first st. (72 sts)
Rnd 22: Change to C3, ch 1, sc in same st, sc in next 2 sts, sk next st, Spike V-st, sk next st, (sc in next 3 sts, sk next st, Spike V-st, sk next st) 11 times, sl st in first st to join. (12 Spike V-sts, 36 sc)
Rnds 23-25: Change to MC, ch 1, sc in same st, sc in each st around, sl st in first st. (72 sts)
Rnds 26-34: Rep Rows 14-22.
Rnds 35: Change to MC, ch 1, sc in same st, sc in each st around, sl st in first st. (72 sts)
Fasten off.
Weave in ends.
Handles
With MC, ch 140. Being careful not to twist, sl st in first ch to form a loop.
Rnd 1: Ch 3, dc in next 139 chs, sl st in top of ch-3 to join.
Rnd 2: Change to C2, ch 1, sc in same st, sc in next 139 sts, sl st in first st to join.
Fasten off. Weave in ends.
Rnd 3: Sc join in underside of starting ch, sc in next 139 sts working on underside of ch, sl st in first st to join.
Fasten off. Weave in ends.
Finishing
Lay Handles loop out flat on table with WS up. Do not fold ends. Align so that straight sections are about 3” apart.
Place Basket in the center of the loop and pull sides of the loop up to the top edge of Basket. Move Basket on loop until Handles are even. Make sure Handles are 3” apart at the top edge. Pin into place.
Using tapestry needle and C2, sew Handles to Basket behind sc sts so they still show.
Weave in all ends.
Can this be increased, in size?
Hi Sue! We’ve reached out to the designer for advice and she or I will reply as soon as possible. Thanks! – Nicola
Hello! Update: Yes. The base of the basket can be increased in size by adding increase rounds. Just make sure the final round before you begin to go up the sides is a multiple of 6.
Since the increase are done in factors of 8, you would need to add three increase rounds each time you increased the size for the pattern to come out right on the sides. (96, 120, 144…)
Hope this helps! – Nicola
I am having an issue with the handles. Am I supposed to make two loops, because I didn’t see that in the pattern ? Also I am not sure how to attach. Do you have a tutorial? Great pattern thank you. Just a little ????????♀️
Hello Janice! We’ve reached out to the designer for clarification and she or I will reply as soon as possible. Thanks! – Nicola
Hello Janice! The handles are all one piece, long enough to reach under the basket and create a handle on either side of the basket. The loop is laid on a flat surface in a long oval. Place the basket on the center of the oval and pull each of the sides of the handles up on either side of the basket and pin into place. Sew the handles to the sides and the bottom of the basket. Hope that helps! – Nicola
I’ve made a basket before. I l over the pattern on this one, may be making me another basket.
Glad you like the pattern!