


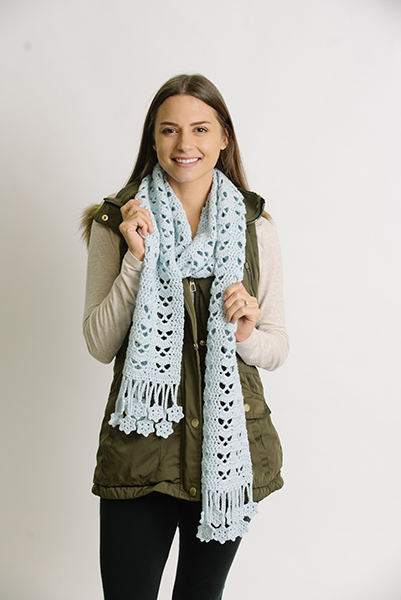
If you’re a fan of our October Blossoms Scarf, then you’ll love this winter friendly rendition. December Snowflakes is a worsted-weight scarf featuring an overall lacy stitch pattern with a flurry of snowflakes fringe at each end. With easy size adjustments, it can also be made into a wrap to toss around your shoulders for those frosty winter days and evenings.
Time: Weekend Project
Skill Level: Easy
Size: Approximately 7¾” wide x 76” long, excluding fringe.
Gauge: 17 sts and 9 rows = 4” [10 cm] after steam blocking. Gauge is not crucial to this design.
Materials
 Yarn: Sugar Bush Bold (100% extra fine superwash merino; 190 yards [174 meters]/100 grams): 3016 Artic Sky (3 balls)
Hook: US size G/6 (4.25 mm); US size I/9 (5.5 mm)
Notions: Removable marker (1); tapestry needle
Abbreviations
Pm – place marker
Special Stitches
Beg 2-dc cl (beginning 2-double crochet cluster): (Ch 2, dc) in place indicated.
Cl (cluster): *Yo, insert hook in place indicated, yo, pull up lp, yo, draw through 2 lps; rep from * once more, yo, draw through remaining 3 lps on hook.
Picot: Ch 2, hdc in second ch from hook.
Attach snowflake motif: Insert hook from back to front through ch-3 sp of snowflake motif, yo, pull lp through ch-3 sp, yo, draw through remaining 2 lps.
Pattern Notes
Scarf is worked in two halves from a center Foundation Row out to each end.
Work stitch pattern over a multiple of 10 sts + 5 to adjust width from a scarf to a wrap.
On Row 1 of Second Half of Scarf, when directed to work in base of dc, you will separate the legs at the base of dc and work simultaneously between the legs and over foundation ch. You will also do the same thing when working in the base of the last cl of this row. This will prevent gaping holes in the center back where scarf halves come together.
Pattern
Snowflake Motif (make 22)
Rnd 1: Using smaller hook, ch 5 (last 4 ch count as beg hdc + ch-2), (hdc, ch 2) in 5th ch from hook 5 times, join with sl st in third ch of beg ch-5. (6 hdc, 6 ch-2 sp)
Rnd 2: (Sc, picot, sc) in next 5 ch-2 sp, (sc, ch 3, sc) in last ch-2 sp, join with sl st to beg sc. Fasten off and weave in ends. (5 picots, 12 sc, 1 ch-3)
First Half of Scarf
Foundation Row: Using larger hook, ch 35, turn to work on back side under top 2 lps as follows: dc in 3rd ch from hook (last 2 ch + dc count as beg cl), pm in base of dc just made (this is where you will begin second half of scarf), dc in next 2 ch, ch 3, sk next 3 ch, sc in next ch, ch 3, sk next 3 ch, *dc in next 3 ch, ch 3, sk next 3 ch, sc in next ch, ch 3, sk next 3 chs rep from * across to last 3 ch, dc in next 2 ch, cl in last ch, turn. (2 cl, 10 dc, 6 ch-3 sp, 3 sc)
Row 1: Beg cl in first cl, dc in next 2 dc, ch 1, sc in next ch-3 sp, ch 3, sc in next ch-3 sp, ch 1, *dc in next 3 dc, ch 1, sc in next ch-3 sp, ch 3, sc in next ch-3 sp, ch 1; rep from * across to last 3 sts, dc in next 2 dc, cl in last cl, turn. (2 cl, 10 dc, 3 ch-3 sp, 6 ch-1 sp, 6 sc)
Row 2: Beg cl in first cl, 1 dc in next 2 dc, sk next ch-1 sp, 7 dc in next ch-3 sp, sk next ch-1 sp, *dc in next 3 dc, sk next ch-1 sp, 7 dc in next ch-3 sp, sk next ch-1 sp; rep from * across to last 3 sts, dc in next 2 dc, cl in last cl, turn. (2 cl, 31 dc)
Row 3: Beg cl in first cl, dc in next 2 dc, ch 3, sk next 3 dc, sc in next dc, ch 3, sk next 3 dc, *dc in next 3 dc, ch 3, sk next 3 dc, sc in next dc, ch 3, sk next 3 dc; rep from * across to last 3 sts, dc in next 2 dc, cl in last cl, turn. (2 cl, 10 dc, 6 ch-3 sp, 3 sc)
Row 4: Beg cl in first cl, dc in next 2 dc, ch 1, sc in next ch-3 sp, ch 3, sc in next ch-3 sp, ch 1, *dc in next 3 dc, ch 1, sc in next ch-3 sp, ch 3, sc in next ch-3 sp, ch 1; rep from * across to last 3 sts, dc in next 2 dc, cl in last cl, turn. (2 cl, 10 dc, 3 ch-3 sp, 6 ch-1 sp, 6 sc)
Row 5: Beg cl in first cl, dc in next 2 dc, sk next ch-1 sp, 7 dc in next ch-3 sp, sk next ch-1 sp, *dc in next 3 dc, sk next ch-1 sp, 7 dc in next ch-3 sp, sk next ch-1 sp; rep from * across to last 3 sts, dc in next 2 dc, cl in last cl, turn. (2 cl, 31 dc)
Rows 6-86: Rep Rows 3-5, 27 more times or until length desired before working Snowflake Fringe.
Second Half of Scarf
Row 1: Attach yarn with sl st on opposite side of Foundation Row at base of dc where marker was placed, beg cl in same place as sl st, dc in base of next 2 dc, ch 1, sc in next ch-3 sp, ch 3, sc in next ch-3 sp, ch 1, *dc in base of next 3 dc, ch 1, sc in next ch-3 sp, ch 3, sc in next ch-3 sp, ch 1; rep from * across to last 3 sts, dc in base of next 2 dc, cl in base of last cl, turn. (2 cl, 10 dc, 3 ch-3 sp, 6 ch-1 sp, 6 sc)
Row 2: Beg cl in first cl, dc in next 2 dc, sk next ch-1 sp, 7 dc in next ch-3 sp, sk next ch-1 sp, *dc in next 3 dc, sk next ch-1 sp, 7 dc in next ch-3 sp, sk next ch-1 sp; rep from * across to last 3 sts, dc in next 2 dc, cl in last cl, turn. (2 cl, 31 dc)
Row 3: Beg cl in first cl, dc in next 2 dc, ch 3, sk next 3 dc, sc in next dc, ch 3, sk next 3 dc, *dc in next 3 dc, ch 3, sk next 3 dc, sc in next dc, ch 3, sk next 3 dc; rep from * across to last 3 sts, dc in next 2 dc, cl in last cl, turn. (2 cl, 10 dc, 6 ch-3 sp, 3 sc)
Row 4: Beg cl in first cl, dc in next 2 dc, ch 1, sc in next ch-3 sp, ch 3, sc in next ch-3 sp, ch 1, *dc in next 3 dc, ch 1, sc in next ch-3 sp, ch 3, sc in next ch-3 sp, ch 1; rep from * across to last 3 sts, dc in next 2 dc, cl in last cl, turn. (2 cl, 10 dc, 3 ch-3 sp, 6 ch-1 sp, 6 sc)
Row 5: Beg cl in first cl, dc in next 2 dc, sk next ch-1 sp, 7 dc in next ch-3 sp, sk next ch-1 sp, *dc in next 3 dc, sk next ch-1 sp, 7 dc in next ch-3 sp, sk next ch-1 sp; rep from * across to last 3 sts, dc in next 2 dc, cl in last cl, turn. (2 cl, 31 dc)
Rows 6-86: Rep Rows 3-5, 27 more times or until length desired before working Snowflake Fringe.
Snowflake Fringe
Row 1: Ch 1, sc in each st across, turn. (33 sc)
Row 2: Ch 1, sc in first sc, *ch 7, attach snowflake motif, ch 7, sk next sc on scarf edge, sc in next sc**, sc in next sc, ch 14, attach snowflake motif, ch 14, sk next sc on scarf edge, sc in next 2 sc; rep from * across, ending last rep at **. Fasten off. (11 snowflake motifs)
Finishing
Weave in ends. Spritz with water and steam block to given measurements, opening up lace pattern.
Hi there
This scarf looks really pretty but I’m a little confused . It’s says there are 2 half’s . Do you start out going one way then go to the other end and go that way. Do you have a video so I can see exactly what to do ? The pattern to me looks like butterflies. I made a shawl similar to it thank you Margie dela torre
Scarf is worked in two halves from a center Foundation Row out to each end.
Work stitch pattern over a multiple of 10 sts + 5 to adjust width from a scarf to a wrap.
On Row 1 of Second Half of Scarf, when directed to work in base of dc, you will separate the legs at the base of dc and work simultaneously between the legs and over foundation ch. You will also do the same thing when working in the base of the last cl of this row. This will prevent gaping holes in the center back where scarf halves come together.
Second Half of Scarf
Row 1: Attach yarn with sl st on opposite side of Foundation Row at base of dc where marker was placed
Hi, I am a beginner crocheted, although I’ve made a lot of Santa stockings. I don’t understand all the abbreviations ie. sp, hex, picot, etc.
I know sc = single chain and dc = double chain, but I’m not familiar with these other stitch’s. Is there a video I can watch how to do these stitches or the whole scarf? Thank you for your time.
We have a lot of info on this page: https://www.ilikecrochet.com/daily/beginner-crochet/tips-tutorials-and-abbreviations/crochet-abbreviations-and-special-stitches/
sp = space
picot = picot stitch
hex = hexagon
Hope this helps!
I would love to see a favorites tab where you could save or bookmark favorite patterns. I love this fringe!
Hello! Glad you like the fringe – be sure to check out the autumn version of this scarf too! https://www.ilikecrochet.com/magazine/crochet-scarf-patterns/october-blossoms-scarf/
A Favorites tab is currently a function we are working on implementing in the near future. In the meantime, we recommend using your web browser’s book mark tool or Pinterest for saving your favorite patterns. Hope this helps for now! – Nicola
This is beautiful.
Ronettaf – nope, you’re not the only one who sees skulls. In fact, I made this pattern without the fringe for Halloween because the pattern looks like skulls. 🙂
Love the snowflake fringe! Am I the only one that sees skulls tho?
I’m so glad you said it – I see skulls too!!! I happen to love skulls though so I’d probably make this in white and figure out how to emphasize row upon row of skulls…
Wish you could do a walk through you don’t get to see much of the pattern in the pictures