


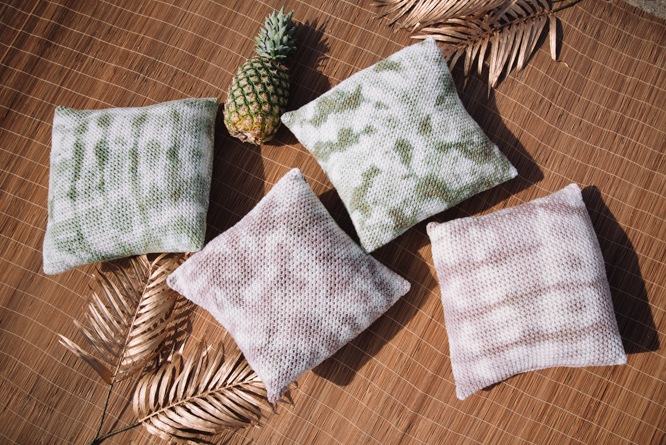
Update your home décor with these trendy, tie-dyed pillows. Using only simple household supplies, you can dye your own unique pillows in an hour or less. Can you believe all these pillows were dyed using the same black food coloring? Differences in the final result were achieved through several tie-dying techniques and the use of two different yarns: 100% superwash wool and an acrylic/wool blend. Food dyes react with any animal fibers and having a blend of animal and man-made fibers can give a different color saturation or a slightly different hue to the finished product. Experiment with different dyes or yarn choices to create a unique, custom palette for your home.
Time: Weekend Project
Skill Level: Adventurous Beginner
Size: 16” square.
Gauge: Gauge is not essential for this project.
Materials
Yarn: Cascade Yarns 220 Superwash (100% Merino; 150 yards [137 meters]/100 grams): 817 Aran ( A, 4 balls)
Cascade Yarns Pacific Solids (60% acrylic, 40% Merino; 213 yards [195 meters]/100 grams): 01 Cream (B, 4 balls)
Hook: US size G/6 (4 mm) – US size H/8 (5 mm)
Notions: Tapestry needle, tape measure, scissors, fiber fill or pillow forms.
Additional supplies: Vinegar, food coloring (McCormick’s Black), baker’s twine, microwave-safe dish, plastic wrap, upholstery fabric for backing (optional).
Pattern Notes
Pillow covers are crochet in square panels, using linen stitch pattern, in a corner-to-corner direction. This allows you to adjust the cover size to fit any square pillow. Simply work the initial Increase Row until 2 sides of the triangle are desired length, before beginning to work the Decrease Row. After completing the panels, the covers are tie-dyed using food coloring. You could either make one pillow from 2 panels by sewing the panels together, or a set of 2 pillows, by adding a fabric backing to each. Basic sewing skills and a sewing machine would be helpful for making a fabric backing, with an envelope opening.
Pattern
With A or B, ch 3.
Row 1: (Sc, ch 1, sc, hdc) in 3rd ch from hook (skipped ch 2 counts as hdc), turn. (5 sts)
Row 2: Ch 2 (counts as hdc throughout), sc in first st, ch 1, sk next st, sc in next ch-1 sp, ch 1, sk next st, (sc, hd) in top of ch 2, turn. (7 sts)
Row 3: Ch 2, sc in first st, *ch 1, sk next st, sc in next ch-1 sp*; rep from * to last 2 sts, ch 1, sk next st, (sc, hdc) in top of ch 2, turn. (2 sts increased)
Repeat Row 3 until the two sides of the triangle measure 16”, or desired pillow size.
Dec row: Sk first 2 sts, sc in next ch-1 sp, *ch 1, sk next st, sc in next ch-1 sp; rep from* to last 2 sts, sk next st, hdc in top of ch 2, turn. (2 sts decreased)
Repeat Dec Row until 7 sts are left.
Next row: Sk first 2 sts, sc in next ch-1 sp, ch 1, sk next st, sc in next ch-1 sp, sk next st, hdc in top of ch 2, turn. (5 sts)
Next row: Sk 2 first 2 sts, sc in next ch-1 sp, sk next st, hdc in top ch 2, turn. (3 sts)
Next row: Sc2tog in sc and beg ch-sp. (1 st)
Cut yarn, and pull through.
Repeat for a second panel using the same yarn. Make additional panels from different fiber content yarn, if desired, for color variation.
Tie-dying
Step 1: Dissolve 2 tablespoons of vinegar in a gallon of warm water, and soak the panels for 20 min (or longer), to saturate the fibers.
Step 2: Remove the panels, wringing out extra water, and reserve 1 cup of vinegar solution for dying. Dissolve 10-15 drops of food coloring dye in the reserved liquid.
Step 3: Fold and tie the panels with baker’s twine to create different tie-dying patterns: center-spiral technique – the fabric is twisted from center in one direction, creating a “cinnamon roll” shape, and tied in several places creating “pie” wedges; accordion stripe – fold panel in accordion manner, creating small pleats, and tie in several sections along the “roll.”
Step 4: Place tied panels into a microwave-safe dish. Pour food coloring dye solution over the panels, evenly distributing, and flipping the covers to add dye to the back.
Step 5: Cover with plastic wrap, and microwave on high, at 30 seconds increments, for 2-3 min. The time may vary depending on your microwave. You want to reach the temperature of creating steam under the plastic, being warm to the touch. Leave to cool naturally.
Step 6: Remove plastic wrap and twine. Rinse the panels in water to wash any excessive dye. Lay flat to dry.
Finishing
Sew the panels together using tapestry needle, leaving a place for stuffing with fiber or inserting a pillow form. Sew the pillow shut.
If making a removable envelope-closure covers with fabric backing: cut 2 pieces of fabric 16” x 11”. Finish one 16” side of each fabric piece with a double-folded narrow hem. Layer the fabric pieces on top of the crochet panel, right sides together, matching the longer unfinished edges with the edges of the panel, and overlapping the hemmed edges in the middle. Pin in place. Sew around the 4 sides, backstitching at the start and the finish, and at the places where the fabric pieces are overlapping. Turn the pillow cover inside-out through the envelope opening in the middle of the back. Steam block with hot iron to lay flat the seams.