


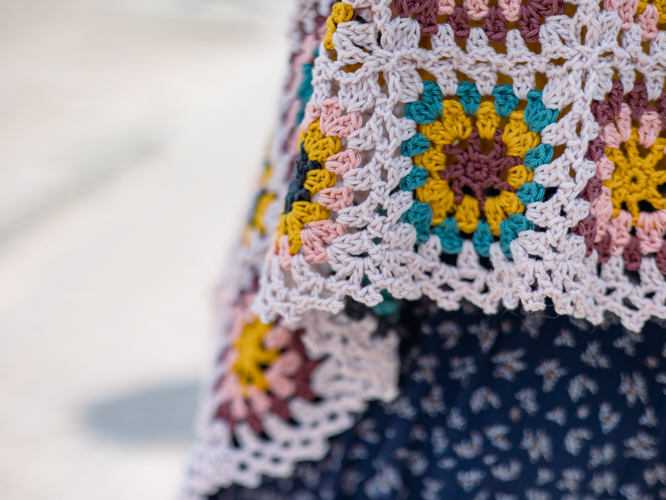
This waterfall-front vest is made up of individual Granny Squares that are joined together using a Join As You Go method, leaving the openings for the arms. This method allows you to join all the motifs together in one continuous round, eliminating any need for seaming or weaving the ends. After joining, the border and the armhole opening are finished, and fringe applied to the front of the Vest.
Time: 20-25 hrs
Skill Level: Easy
Size: 48” long, 19” wide
Gauge: 1 Joined Granny Square = 4”x4”
Materials
Yarn: Cascade Ultra Pima (100% Pima cotton, 220 yards [200 meters] / 100 grams) DK weight. MC – Shell (3854) 2 hanks, C1 – Coral Cloud (3827) 1 hank, C2 – Dark Sea Foam (3797) 1 hank, C3 – Brick (3792) 1 hank, C4 – Gold (3747) 1 hank, C5 – Dark Shadow (3831) 1 hank.
Hook: US size F/5 (3.75 mm)
Notions: tapestry needle, tape measure, scissors.
Special Stitches
Pinwheel Granny
Rnd 1: Ch 2, 8 sc into 2nd ch from hook, sl st to top of first sc. (8 sc)
Rnd 2: Ch 5 (counts as dc + ch-2), dc into next sc, *ch 2, dc into next sc; rep from * around, ch 2, sl st to top of 3rd ch of the ch-5. (8 dc, ch-2 sps.) Cut yarn.
Rnd 3: Sl st to any ch-2 sp, ch 3, dc in same ch-2 sp, *ch 1, (2 dc, ch 1, 2 dc) into next ch-2 sp corner made, ch 1, 2 dc into next ch-2 sp; rep from * around, ch 1, sl st to top of ch-3. (4 corners, 4 2-dc clusters) Cut yarn.
Rnd 4: Sl st to any ch-1 sp of corner, ch 3, (2 dc, ch 1, 2 dc) into same ch-1 sp, * [ch 1, 2 dc into next ch-1 sp] twice, ch 1, (2 dc, ch 1, 2 dc) into next ch-1 sp; rep from * another 3 times, ch 1, sl st to top of ch 3. (4 corners, 8 2-dc clusters) Cut yarn.
Weave in the ends.
Pattern Notes
Weave-in any ends as you go, when making individual Granny Squares. After completing all 60 Pinwheel Grannies, lay them out on a flat surface following the Granny Layout Diagram. Take a photo of the layout to use as a reference when joining the Grannies together. You could also make this as a wrap, by omitting the armhole openings and joining all the Grannies together.
Pattern
Begin making Pinwheel Grannies, using the following colors:
Granny A (make 10):
Rnd 1 & 2: work in C3.
Rnd 3: work in C4.
Rnd 4: work in C2.
Granny B (make 10):
Rnd 1 & 2: work in C4.
Rnd 3: work in C1.
Rnd 4: work in C3.
Granny C (make 10):
Rnd 1 & 2: work in C5.
Rnd 3: work in C4.
Rnd 4: work in C1.
Granny D (make 10):
Rnd 1 & 2: work in C3.
Rnd 3: work in C2.
Rnd 4: work in C5.
Granny E (make 10):
Rnd 1 & 2: work in C2.
Rnd 3: work in C1.
Rnd 4: work in C3.
Granny F (make 10):
Rnd 1 & 2: work in C1.
Rnd 3: work in C5.
Rnd 4: work in C4.
Granny Layout Diagram
| E | C | A | E | A | F | E | D | F | B | D | E |
| D | B | F | D | B | D | C | B | C | A | F | A |
| C | A | C | A | F | E | F | A | E | D | B | D |
| B | F | E | F | E | C | B | C | D | E | C | E |
| A | B | D | C | A | B | D | F | B | F | A | C |
Join As You Go
This diagram shows the order in which the Grannies are joined together. The instructions below give detailed information on how to work the joining. Each row of Grannies will be worked on twice: first joining one side of each Granny to the previous row; second, joining the Grannies to each other and finishing the other 3 sides.
Granny Joining Order Diagram
| 5 | 6 | 11 | 16 | 21 | 26 | 31 | 36 | 41 | 46 | 51 | 56 |
| 4 | 7 | 12 | 17 | 22 | 27 | 32 | 37 | 42 | 47 | 52 | 57 |
| 3 | 8 | 13 | 18 | 23 | 28 | 33 | 38 | 43 | 48 | 53 | 58 |
| 2 | 9 | 14 | 19 | 24 | 29 | 34 | 39 | 44 | 49 | 54 | 59 |
| 1 | 10 | 15 | 20 | 25 | 30 | 35 | 40 | 45 | 50 | 55 | 60 |
Row 1 (joining Grannies 1-5):
With MC, join yarn at the bottom Left outside corner of the Granny 1. Begin working the final round of the Granny Motif as follows:
Granny 1: Ch 3, dc into the same corner, *[ch 3, 2 dc into next ch-1 sp] x 3, ch 3, (2 dc, ch 3, 2 dc) into the corner ch-1 sp; rep from * once more, [ch 3, 2 dc into next ch-1 sp] x 3, ch 3, 2 dc into the corner ch-1 sp, ch 3. (3 sides of Granny 1 finished.)
Granny 2: 2 dc into the Bottom Left corner of Granny 2, [ch 1, sl st into ch-3 sp of Granny 1, ch 1, 2 dc into next ch-1 sp of Granny 2] x 3, ch 1, sl st into ch-3 sp of Granny 1, ch 1, * (2 dc, ch 3, 2 dc) into the corner of Granny 2, [ch 3, 2 dc into next ch-1 sp] x 3, ch 3; rep from * once more, 2 dc into the corner of Granny 2, ch 3. (3 sides of Granny 2 finished, 2 Grannies joined.)
Granny 3: 2 dc into the Bottom Left corner of Granny 3, [ch 1, sl st into ch-3 sp of Granny 2, ch 1, 2 dc into next ch-1 sp of Granny 3] x 3, ch 1, sl st into ch-3 sp of Granny 2, ch 1, * (2 dc, ch 3, 2 dc) into the corner of Granny 3, [ch 3, 2 dc into next ch-1 sp] x 3, ch 3; rep from * once more, 2 dc into the corner of Granny 3, ch 3. (3 sides of Granny 3 finished, 3 Grannies joined.)
Repeat this process for Granny 4.
Granny 5: 2 dc into Bottom Left corner of Granny 5, [ch 1, sl st into ch-3 sp of Granny 4, ch 1, 2 dc into next ch-1 sp of Granny 5] x 3, ch 1, sl st into ch-3 sp of Granny 4, ch 1, *(2 dc, ch 3, 2 dc) into the corner of Granny 5, [ch 3, 2 dc into next ch-1 sp] x 3, ch 3, 2 dc into the corner of Granny 5, ch 3. (2 sides of Granny 5 finished, 5 Grannies joined.)
Row 2 (joining Grannies 6-10):
Granny 6: 2 dc into Top Left corner of Granny 6, [ch 1, sl st into ch-3 sp of Granny 5, ch 1, 2 dc into next ch-1 sp of Granny 6] x 3, ch 1, sl st into ch-3 sp of Granny 5, ch 1, 2 dc into the corner of Granny 6, ch 1, sl st into the corner of Granny 4, ch 1. (1 side of Granny 6 finished, 6 Grannies joined.)
Granny 7: 2 dc into Top Left corner of Granny 7, [ch 1, sl st into ch-3 sp of Granny 4, ch 1, 2 dc into next ch-1 sp of Granny 7] x 3, ch 1, sl st into ch-3 sp of Granny 4, ch 1, 2 dc into the corner of Granny 7, ch 1, sl st into the corner of Granny 3 from Row 1, ch 1. (1 side of Granny 7 finished, 7 Grannies joined.)
Repeat this process for Granny 8 and Granny 9.
Granny 10 (part I): 2 dc into Top Left corner of Granny 10, [ch 1, sl st into ch-3 sp of Granny 1, ch 1, 2 dc into next ch-1 sp of Granny 10] x 3, ch 1, sl st into ch-3 sp of Granny 1, ch 1, 2 dc into corner of Granny 10, ch 1, sl st into corner of Granny 1, ch 1. (1 side of Granny 10 finished, 10 Grannies joined.)
Row 3 (continuing to join Grannies 6-10):
Granny 10 (part II): 2 dc into the same corner on Granny 10, *[ch 3, 2 dc into next ch-1 sp] x 3, ch 3, (2 dc, ch 3, 2 dc) into the corner ch-1 sp; rep from * once more, [ch 3, 2 dc into next ch-1 sp] x 3, ch 3, 2 dc into the corner ch-1 sp, ch 1, sl st into corner of Granny 2 from Row 1, ch 1. (4 sides of Granny 10 finished.)
Granny 9: 2 dc into the Bottom Left corner of Granny 9, [ch 1, sl st into ch-3 sp of Granny 10, ch 1, 2 dc into next ch-1 sp of Granny 9] x 3, ch 1, sl st into ch-3 sp of Granny 10, ch 1, * (2 dc, ch 3, 2 dc) into the corner of Granny 9, [ch 3, 2 dc into next ch-1 sp] x 3, ch 3; rep from * once more, 2 dc into the corner of Granny 9, ch 1, sl st into the corner of Granny 3 from Row 1, ch 1. (4 sides of Granny 9 finished.)
Repeat this process to finish Grannies 8 and 7.
Granny 6: 2 dc into Bottom Left corner of Granny 6, [ch 1, sl st into ch-3 sp of Granny 7, ch 1, 2 dc into next ch-1 sp of Granny 6] x 3, ch 1, sl st into ch-3 sp of Granny 7, ch 1, (2 dc, ch 3, 2 dc) into the corner of Granny 6, [ch 3, 2 dc into next ch-1 sp] x 3, ch 3, 2 dc into the corner of Granny 6, ch 3. (3 side of Granny 6 finished, 2 Rows joined.)
Repeat Rows 2 & 3 to join the next 2 rows, Grannies 11-20.
Armholes
To create armholes, omit joining Grannies 21 & 22 to Grannies 16 & 17. Work beginning of this row as follows:
Row 2 (joining Grannies 21-25):
Granny 21: 2 dc into Top Left corner of Granny 21, [ch 3, 2 dc into next ch-1 sp of Granny 21] x 3, ch 3, 2 dc into the corner of Granny 21, ch 3. (1 side of Granny 21 finished.)
Granny 22: 2 dc into Top Left corner of Granny 22, [ch 3, 2 dc into next ch-1 sp of Granny 22] x 3, ch 3, 2 dc into the corner of Granny 22, ch 1, sl st into the corner of Granny 18 from Row 4, ch 1. (1 side of Granny 22 finished.)
Resume working the rest of the Row as previous, joining Grannies 23-25 to Grannies 18-20.
Join Grannies 26-40 following the steps for Grannies 6-10.
Repeat the Armhole process for creating a second Armhole by omitting to join Grannies 41 & 42 to Grannies 36 & 37.
Resume joining the rest of the 60 Grannies as previously described, ending at the top of Granny 56. (All 60 Grannies joined, Granny 56 finished.)
Final Finishing Row: Ch 1, sl st into ch-3 sp between Granny 56 & 51, * ch 1, 2 dc into corner of next Granny, [ch 3, 2 dc into next ch-1 sp] x 3, ch 3, 2 dc into corner, ch 1, sl st into ch-3 sp; rep from * across the top to corner of Granny 5, (2 dc, ch 3, 2 dc) into the corner of Granny 5, **[ch 3, 2 dc into next ch-1 sp] x 3, ch 3, 2 dc into corner, ch 1, sl st into next ch-3 sp, ch 1, 2 dc into corner; rep from** across to the Bottom Left corner of Granny 1, ch 3, sl st to top of ch 3. (All Grannies finished and joined.)
Border
Sl st to first ch-3 sp, ch 7, sl st into 3rd ch from hook, ch 1, dc into same sp, *(dc, ch 4, sl st into 3rd ch from hook, ch 1, dc) into next ch-3 sp; rep from * around the edge, sl st to first ch-3 sp. Cut yarn.
Armhole Edging
With RS facing, join MC at the bottom corner of the armhole.
Ch 2, hdc into first st, * hdc into next ch-3 sp, hdc into each dc; rep from * around the armhole, sl st to top of first hdc. Cut yarn.
Repeat for the second armhole.
Fringe
Cut 8” long pieces of MC yarn to make fringe. Using 2 strands at a time, join fringe at the front edges, attaching them into each ch-3 picot loop.
Finishing
Steam block with hot iron to even the stitches.