


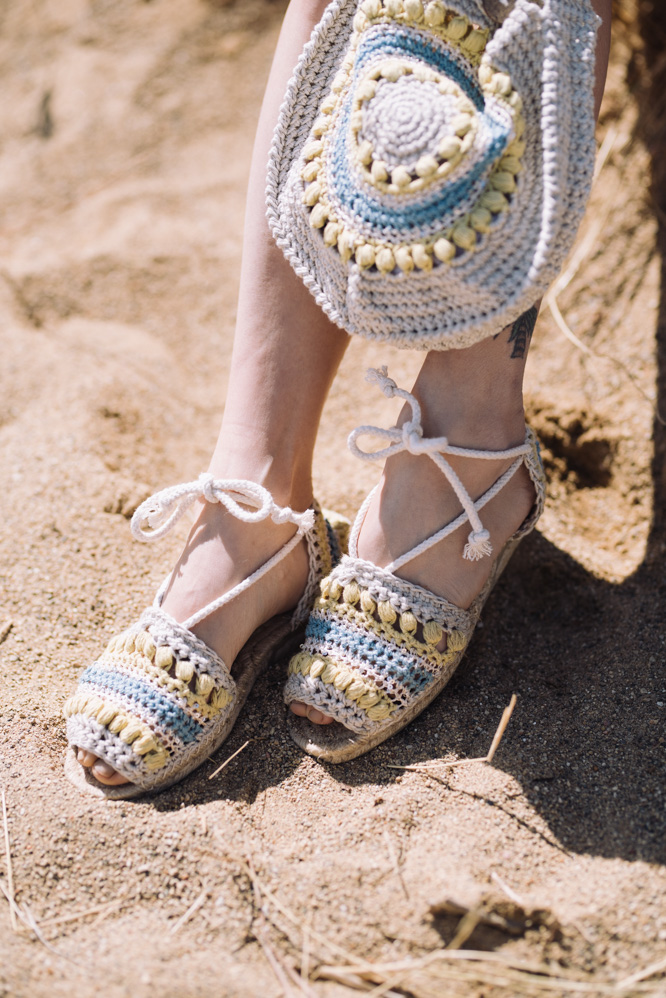
Make your own custom espadrilles sandals by crocheting custom uppers with cotton and linen yarn. Since these fibers lack elasticity, they are perfect for creating a shoe that fits and won’t stretch out. Use leftover yarn from the Maya Mandala Bag to make a perfect match.
Time: 4 Hours Pattern
Skill Level: Easy
Size: Finished foot length 9 (10, 11)” [23 (25.5, 28) cm]
Shown in size 10”
Gauge: 18 sts and 15 rows = 4″ [10cm] in tight Special Single Crochet 2 Together (sp-sc2tog) st with MC.
Materials
Yarn:
 Garnstudio DROPS Bomull-Lin (53% cotton, 47% linen; 93 yards [85 meters]/50 grams): 03 light beige (MC, 1 ball)

Garnstudio DROPS Belle (53% cotton, 33% viscose, 14% linen; 131 yards [120 meters]/50 grams): 04 dandelion (CC1, 1 ball), 13 dark jeans blue (CC3, 1 ball)
Rosários 4 Paillettes (100% polyester; 150 yards [137 meters]/25 grams): 01 (CC2, 1 ball)
Hook:US size E/4 (3.5 mm)
Notions: Tapestry needle, safety pins, linen/flax waxed or some other heavy cotton thread, 2 yards of 1/6” cotton cord, jute soles (same/similar: Prym Espadrille Soles, Prym Espadrille Soles UK EU Size Woven Straw/Jute with Rubber Base x 1 Pair 11x3x30 cm, Prym Espadrille Soles UK 6)
Special Stitches
Puff stitch (puff st): [Yo, insert hook in indicated st, yo again and draw a lp through] 5 times, yo and draw through all 11 lps on the hook, ch 1.
Special Single Crochet 2 Together (sp-sc2tog): Insert hook in last st worked, yo, pull up a lp (2 lps on hook), insert hook in next st, yo, pull up a lp (3 lps on hook), yo and draw through all 3 lps on hook. This variation of the classic sc2tog will allow you to keep the same number of sts in the row/round.
Pattern Notes
The top and heel are worked flat, making a curved form to adjust the foot shape. Both are sewn to the sole using a linen/flax waxed thread, and then tied together with a cotton cord.
To better adapt to your foot shape, toes are rounded by a sc row. You can increase the number of these sc rows and even use hdc or dc in some parts to allow for a better fit. Use the gauge and measure your foot circumference, rather than the length to decide which size to make. Length is mainly needed to get the right sole size.
Although the yarn suggested should not stretch too much, I recommend to pass the thread used to join the toe to the sole through the upper part of the toe to prevent further stretching.
Chains at the beginning of rows do not count as sts.
If you cannot find jute soles, flip-flop rubber soles can be an alternative. You just need to poke holes on the sole before adding toes and heels.
Pattern
Toe (make 2)
With MC, ch 19 (21, 23).
Row 1: Ch 1, sc in 2nd ch from hook and each rem ch, turn. (19 (21, 23) sts)
Row 2: Ch 1, sc2tog, sp-sc2tog to end, sc in last st, turn. (18 (20, 22) sc2togs, 1 sc)
With CC1
Row 3: Ch 2, sk first st, *puff st in next st, sk next st, ch 2; rep from * to last 2 sts, puff st in next st, dc in last st, turn. (9 (10, 11) puff sts)
Row 4: Ch 1, sc in first st, [2 sc in next ch-2 sp] to end, sc in last st, turn. (18 (20, 22) sts)
With CC2
Row 5: Ch 2, *sc in next st, ch 1; rep from * to last st, sc in last st, turn. (18 (20, 22) sts, 17 (19, 21) ch)
Row 6: Skipping ch-1 sps, rep Row 2. (17 (19, 21) sc2togs, 1 sc)
With CC3
Rows 7-8: Rep Row 2.
With CC2
Rows 9-10: Rep Row 2.
With CC1
Row 11: Ch 1, sc across, turn. (18 (20, 22) sc)
Row 12: Ch 2, *puff st in next st, sk next st, ch 2; rep from * to last 2 sts, puff st in next st, dc in last st, turn. (9 (10, 11) puff sts)
With MC
Row 13: Skipping ch-2 sps, rep Row 2. (9 (10, 11) sc2togs, 1 sc)
Rep Row 13 (0, (1, 2) more time(s). Do not cut yarn.
Rnd 1: With RS facing, sl st across the top edge, distribute 14 (15, 16) sc evenly across the left edge, working in row-ends, 19 (21, 23) sc across bottom edge, distribute 14 (15, 16) sc evenly across the right edge row-ends, sl st in first sl st in top edge. Fasten off.
You can adapt the width of the toe by adding more sc rows along left and right edges.
Heel (make 2)
Instructions work for all sizes.
With MC, make magic ring.
Row 1: Ch 1, 5 sc in ring, turn. (5 sts)
Row 2: Ch 1, 2 sc in each st to end, turn. (10 sts)
With CC1
Row 3: Ch 1, 2 sc in first st, sc across to last st, 2 sc in last st, turn (12 sts)
Row 4: Ch 1, sc2tog, sp-sc2tog to end, turn. (11 sc2togs)
With CC2
Row 5: Rep Row 3. (13 sts)
Row 6: Ch 1, [sc, ch 1, sc] in first st, ch 1, *sc in next st, ch 1; rep from * to last st, [sc, ch 1, sc] in last st, turn. (15 sc)
With CC3
Row 6: Ch 1, 3 sc in first st, skipping ch-1 sps, sc in each sc to last st, 3 sc in last st, turn. (19 sts)
Row 7: Rep Row 4. (18 sc2togs)
With CC2:
Row 8: Rep Row 3. (20 sts)
Row 9: Rep Row 6. (22 sc)
With CC1
Row 10: Rep Row 3. (24 sts)
Row 11: Rep Row 4. (23 sc2togs)
With MC
Row 12: Ch 2, 2 dc in first st, dc across to last st, 2 dc in last st. Do not cut yarn. (25 sts)
Rnd 1: With RS facing, 25 sc distributed evenly along the row-ends, sl st in ch 2 from Row 2. Fasten off.
Finishing
Weave in all ends.
Place the toes and heels on top of the sole. Pin the pieces in place and check that sandals are symmetrical.
Sew pieces to the sole assuring the needle makes an angle from the top to the edge and the sts are deep and close enough to securely tighten the thread.
When sewing the toes, I recommend to start from one of the bottom edges and instead of cutting the thread when reaching the top, pass the thread through the top part of the toe and continue sewing the other edge. That will prevent further stretching on the top toe.
For a classic espadrilles finishing, you can also stitch a blanket st all around the edges of the sole. That may be nice if you use contrast color for the thread. If not, it will be hardly noticed, and this is why I opted to do not add it in the sample shown.
Pass 1 yard cotton cord through the bottom edge of the toe (between the middle sts) and the upper part of the heel as seen in the sample (although you may find out other ways to tied it up). Knot the edges.
I, too, would love to make these. I am at a loss as to finding jute soles. It wasn’t until I read through the whole pattern that I found out I needed them. You should have listed them under materials needed. Now I’m sad I can’t make these.
Hi Ann, thank you for bringing this to our attention. Some links have been added to the notions section for jute soles. – Nicola, Editor
Anyone know where to purchase jute soles? I’d love to make these!
Hello Kathryn! I’ve reached out to the designer for advice and she or I will reply as soon as possible. Thanks! – Nicola, Editor
Hi Kathryn, here you have a link in Amazon https://www.amazon.com/Prym-Espadrille-Rubber-Natural-11x3x30/dp/B014T7NOFC
Kind Regards, Cristina
Hi Cristina – I clicked on the Amazon link you provided because I was interested in making the Espadrilles. However, the details state that they are for size 10.5 MENS . I tried putting in for women, and I got INSERTS instead. Please help me….