


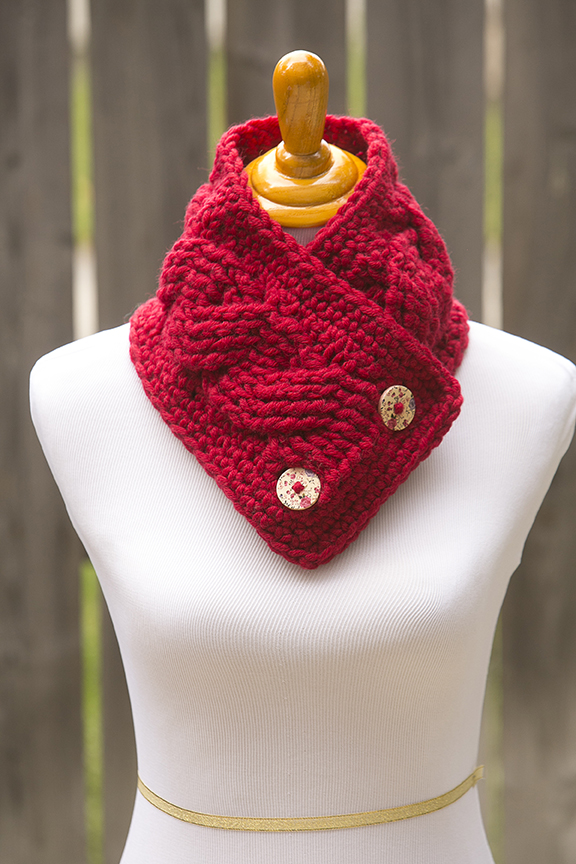
Chunky, thick and cozy, the Cherry Tart Cowl will surround your neck with plush fibers and protect you from the bitter cold. The cable stitches create luxurious texture and the vintage floral buttons give it a feminine touch.
Skill Level: Easy
Size: Fits 13 years & up
Gauge: Gauge not provided
Materials
Yarn: Lincraft Luxe (100% wool; 56 yards [51 meters]/100 grams): Red (3 balls)
Hook: US size P/16 (10.0 mm) hook
Notions: Scissors, tapestry/wool needle
Special Stitches
Cable Stitch: Skip 4 sts. In the 5th stitch crochet 1 Front Post Double Triple Crochet. Crochet 1 Front Post Double Triple Crochet in the 6th, 7th and 8th stitch.
Now you’re going to go back to the 1st stitch. Crochet 1 Front Post Double Triple Crochet in the 1st, 2nd, 3rd and 4th stitch. Continue crocheting normally in the 9th stitch and onwards.
Pattern
Begin with ch 10.
Row 1: Ch 2. Hdc into the fourth ch from hook. Hdc into the next 9 chs. (10 sts)
Row 2: Ch 2. FPDC into the next 8 sts. Hdc into the next st.
Row 3: Ch 2. BPDC into the next 8 sts. Hdc into the next st.
Row 4: Ch 2. Cable Stitch into the next 8 sts. Hdc into the last st.
Row 5: Ch 2. BPDC into the next 8 sts. Hdc into the next st.
Row 6: Ch 2. FPDC into the next 8 sts. Hdc into the next st.
Row 7: Ch 2. BPDC into the next 8 sts. Hdc into the next st.
Row 8: Ch 2. Cable Stitch into the next 8 sts. Hdc into the last st.
Rows 9-36: Repeat rows 5-8 seven times. (Note: You can either add or take away a couple sets of rows 5-8 is you’d prefer your scarf a different length)
Row 37: Ch 2. BPDC into the next 8 sts. Hdc into the next st.
Row 38: Ch 2. FPDC into the next 8 sts. Hdc into the next st.
Row 39: Ch 2. BPDC into the next 8 sts. Hdc into the next st.
Row 40: Ch 2. FPDC into the next 8 sts. Hdc into the next st.
Rows 41-43: Ch 1. Sc all around scarf. (Note: When you reach the corners, [sc, ch1, sc] into the same stitch.)
Fasten off, and weave in loose ends.
Taking your scarf, overlap the ends of it. Now place your buttons beneath the top end of the scarf. Make sure to place the buttons beneath the spaces/holes you’ll find next to the first cable stitch.
(Note: You can also sew the ends together on one side of your scarf, along the side of the top half, and the end of the bottom half.)

I’d love to do this for a friend confined to a wheel chair and we’re always looking to try something colorful and warm as she always feels the cold so acutely
Myself! I live in MN and it is COLD
I’ve never done a cable stitch but I’m willing to learn.
My friend who really feels the cold. Thank you for the free pattern.
I would make it for my sister and niece
Me! And my daughters too! Looks cozy!
My girlfriend, to wear under her winter coat.
One of my friends.
I would make this for my mother in law. And maybe my sisters and maybe one for myself.
My hairdresser
Definitely like this scarf. I’d make it for my daughter-in-law.
My friend, who loves drama. Do it in zebra yarn with big buttons. She would love it
I think this would be the perfect birthday gift for my best friend of over 50 yrs!
Me. I need something to keep my neck warm and I deserve to benefit from my talent once in a while
One of the lovely ladies at church just requested a cowl.
My friend Donna.
Such a pretty pattern! I want to make it for both my mother and for myself
I would make this for my best friend who lives in northern Idaho where it gets really cold.
This would be great for my niece!
I have a close friend who likes to wear scarves close to her neck, so I think she’d like this in a dark teal. And then I’d make one just like it for myself!
myself and maybe my daughter too
My daughter
my friends
Me i love the buttons so you can take on and off without over the head!
I would crochet this for my oldest daughter.
I would make it for my mother-in-law. In her favourite colour. She knits for everybody else, and really deserves something pretty for herself.
I agree with myrnam above. It would be nice to also include the suggested yarn weight so we can substitute. I looked up this yarn and it says Super Bulky, which I assume is the same as our #6 here in the US. I am hoping to make one for my mother and myself!
I would make it for my daughter.
I would make this for my friends.
i would crochet this for myself and my daughter
I would crochet this for my daughter. She rides the school bus and its getting cold. She have a hard time keeping the scarf positioned so her face will stay warm lol.
Myself, friends, and for charity donations
I’d crochet this cowl for my “adopted” daughter/best friend. She’s always cold & this would warm her up
I think this would actually be better for a man– I can see my husband wearing it with his peacoat.
I would crochet this for my mama. She loves em.
I would love to make this cowl for a charity.
I’d make this for my sister. She always appreciates the pretty things I make for her.
My sister would like this one.
I would totally make this for myself. It is gooooorgeous!
I would make it for my mom.
Love cherry red! I would make this cowl for my daughter, who wears a lot of cowls and loves this color.
I would make this Cowl for my niece.
for me me me. In different colors to go with each of my coats & jackets. I have a short neck so the cowls most knitters make are too bulky for me. This pattern looks just right.
I would make this for my granddaughter.
Maybe me, but probably as a gift; I’m intimidated by cables!
I love the cable look! If I was to crochet this, I would give it to one of my sisters-in-law.
I meant to say hook number. I guess this pattern would take a number 6 yarn. If I know the number I can check my own stash. I checked your store and could not find Linraft yarn. Thanks Myrna
I love this pattern ,however could you start printing the weight category. I try to guess by the book number that