


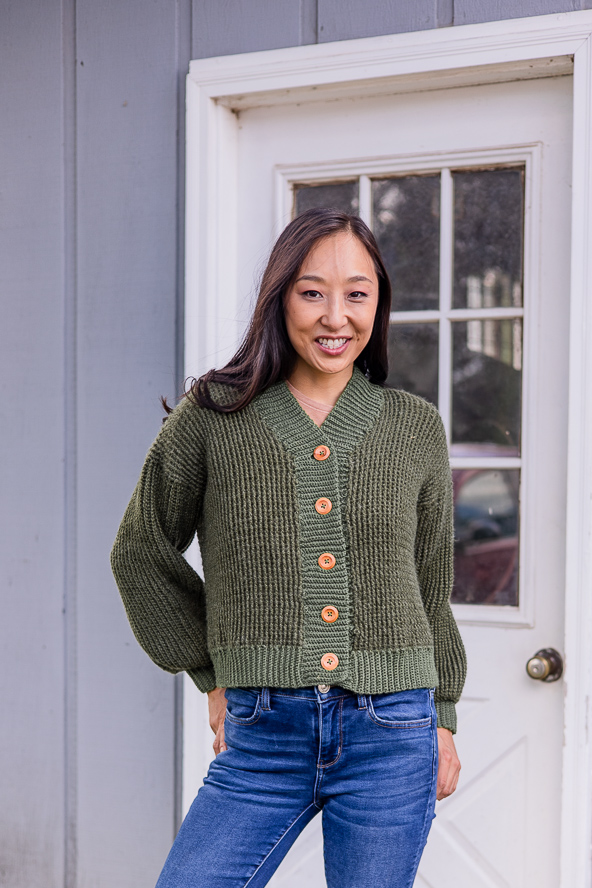
Maylin is a simple, cropped V-neck cardigan with bishop-style sleeves and a ribbed texture. Cardigan utilizes the use of two different color yarns in a similar color tone to add interest and contrast to the design. You could also use contrasting colors to make a bolder fashion statement.
Time: 25-30 hrs
Skill Level: Adventurous Beginner
Size: 36 (40, 44, 48, 52, 56, 60)” finished garment chest circumference, intended
with 4-6” of positive ease.
Gauge: 24 dc x 16 rows = 4 x 4” in pattern stitch, in MC yarn.
Materials
Yarn: Yarn Bee 44th Street, DK (70% Acrylic, 30% Nylon, 540 yards [494 meters] / 100 grams): Olive, 5 (5, 5, 6, 6, 6, 6) balls (MC)
Loops & Threads Woolike, Light Fingering (85% Acrylic, 15% Nylon, 678 yards [620 meters] / 100 grams), Olive, 1 ball (CC).
Hook: 3.5 mm (US size E)
Notions: tapestry needle, tape measure, scissors, 5 buttons 1” diameter.
Special Stitches
Dec St – decrease stitch: to work Dec St at the beginning of the row, work 1 bpdc around 2 sts, work in pattern to end; to work Dec St at the end of the row, work in pattern to last 2 sts, work 1 bpdc or fpdc around 2 last sts keeping in pattern.
Pattern Notes
Cardigan is worked buttom-up, in one piece, starting with contrasting color ribbing. You will hold 2 strands of yarn together at the same time. To do this, you can either work from the inside and outside of the 1 ball of yarn at the same time, or wind half your ball into a separate ball to use both at once. After separating for fronts and back, decreases used to shape V-neck front opening. After seaming shoulder seams, sleeves worked top-down, in the round, from armholes. Front ribbing is worked sideways, creating buttonholes at marked places.
Ch 2 does not count as a stitch at the beginning of the row.
Pattern
Ribbing
With two strands of CC held together and 3.5 mm hook ch 16.
Row 1 (RS): Sc into 2nd ch from the hook, and every ch across, turn. (15 sc)
Row 2 (WS): Ch 1, sc in back loop of every sc across, turn.
Rep Row 1 & 2 until ribbing measures 34 (38, 42, 46, 50, 54, 58)” long.
Fasten off CC.
Body
With MC, join yarn at the end of ribbing.
Set-up Row (RS): Ch 2, 196 (220, 242, 264, 286, 306, 330) dc across the top of the ribbing to end.
Row 1 (WS): Ch 2, *1 fpdc, 1 bpdc; rep from * across.
Row 2 (RS): Ch 2, *1 fpdc, 1 bpdc; rep from * across.
Rep Rows 1 & 2 until piece measures 13 (13, 13.5, 13.5, 14, 14, 14.5)” from the bottom of ribbing, ending with WS row.
Right Front Panel
Row 1 (RS): Ch 2, work in pattern across first 48 (55, 60, 66, 72, 76, 82) dc, turn.
Row 2 (WS): Ch 2, work in pattern across.
Right Front V-neck Shaping
Row 1 (RS): Ch 2, Dec St, work in patt across, turn. (47 (54, 59, 65, 71, 75, 81) dc)
Row 2 (WS): Ch 2, work in patt across.
Rep Rows 1 & 2 another 9 (9, 10, 11, 12, 13, 14) times. (38 (45, 49, 54, 59, 62, 67) dc)
Work even in patt until Armhole measures 7.5 (7.5, 8, 8.5, 9, 9.5, 10)” from the separation.
Fasten off.
Back
With RS facing, join MC in next st after the Right Front Panel.
Row 1 (RS): Ch 2, work in pattern across next 100 (110, 122, 132, 142, 154, 166) dc, turn.
Row 2 (WS): Ch 2, work in pattern across.
Work flat in patt until Back measures 7.5 (7.5, 8, 8.5, 9, 9.5, 10)” from the separation.
Fasten off.
Left Front V-neck Shaping
With RS facing, join MC after Back separation.
Work 2 rows in patt. Begin V-neck Shaping as follows:
Row 1 (RS): Ch 2, work in patt across to last 2 dc, Dec St. (47 (54, 59, 65, 71, 75, 81) dc)
Row 2 (WS): Ch 2, work in patt across.
Rep Row 1 & 2 another 9 (9, 10, 11, 12, 13, 14) times. (38 (45, 49, 54, 59, 62, 67) dc)
Work even in hdc until Armhole measures 7.5 (7.5, 8, 8.5, 9, 9.5, 10)” from the separation.
Fasten off.
Join Shoulder Seams.
With RS together, align Shoulder Fronts with Shoulder Back. Seam shoulders together using a method of choice.
Sleeves (Make 2)
With MC and RS facing, join yarn at the underarm.
Set-up Row: Ch 3 (does not count as a st), 90 (90, 96, 102, 108, 114, 120) dc around armhole opening, sl st to top of first dc. Place BOR marker.
Rnd 1: Ch 2, *1 fpdc, 1 bpdc; rep from * around, sl st to top of first dc. (90 (90, 96, 102, 108, 114, 120) dc)
Rep Rnd 1 until sleeve measures 16.5 (16.5, 17, 17, 17, 16, 16)” from armhole.
Dec Rnd 1: Ch 2, *dc2tog; rep from * around, sl st to top of Ch-2. (45 (45, 48, 51, 54, 57, 60) sts)
Next Rnd: Ch 2, dc in each dc around.
Dec Rnd 2: Ch 2, *1 dc, dc2tog; rep from * around. (30 (30, 32, 34, 36, 38, 40) sts)
Fasten off.
Cuff
With two strands of CC held together, join yarn at beg of last Rnd of sleeve.
Chain 16.
Setup Row (RS): Sc into 2nd ch from the hook, and every ch across, sl st in 2 sts along the sleeve edge, turn. (15 sc)
Row 1 (WS): Sk sl sts, sc in back loop of every sc across, turn. (15 sc)
Row 2 (RS): Ch 2, sc in back loop of every sc across, sl st in next 2 sts along the sleeve edge, turn.
Rep Rows 1 & 2 until all sts around sleeve edge worked. Join ribbing using Slip Stitch Join method.
Fasten off.
Repeat for second sleeve.
Front Ribbing
Place markers along Right Front Edge to mark buttonhole placements as follows:
Place first marker in the middle of bottom edge ribbing. Place 5th marker at the beginning of V-neck shaping. Place other 3 markers evenly spaced between the two markers.
Join 2 strands of CC at the bottom Right Front corner.
Ch 16.
Setup Row (RS): Sc into 2nd ch from the hook, and every ch across, sl st in 2 sts along the Front edge, turn. (15 sc)
Row 1 (WS): Sk sl sts, sc in back loop of every sc across, turn. (15 sc)
Row 2 (RS): Ch 1, sc in back loop of every sc across, sl st in next 2 sts along the front edge, turn.
Rep Front Ribbing Rows 1 and 2 all around Front edge, working buttonhole rows at markers as follows:
Buttonhole Row (WS): Sk sl sts, sc in back loop of first 5 sc, ch 5, sk next 5 sc, sc in back loop of last 5 sc, turn. (10 sc, 1 ch-5 sp)
Following Buttonhole Row (RS): Ch 1, sc in back loop of every sc across adding 5 sc in ch-5 sp, sl st in next 2 sts along edge, turn. (15 sc)
Fasten off after reaching the bottom of Left Front Edge.
Finishing
Weave in the ends. Sew buttons along Left Front ribbing, opposite of buttonholes.
Any ideas for shaping if you need this to be longer?
Hello Bette! I’ve reached out to the designer for advice and she or I will reply as soon as possible. Thanks! – Nicola, Editor
Hello,
Thank you for your question! A simple way to make this cardigan longer is simply work the body longer prior to splitting for sleeves. If you want it to go over hips, choose your hip circumference + any desired ease = closest size in the pattern. If your bust circumference large then hip circumference, then use that measurement for choosing the size.