


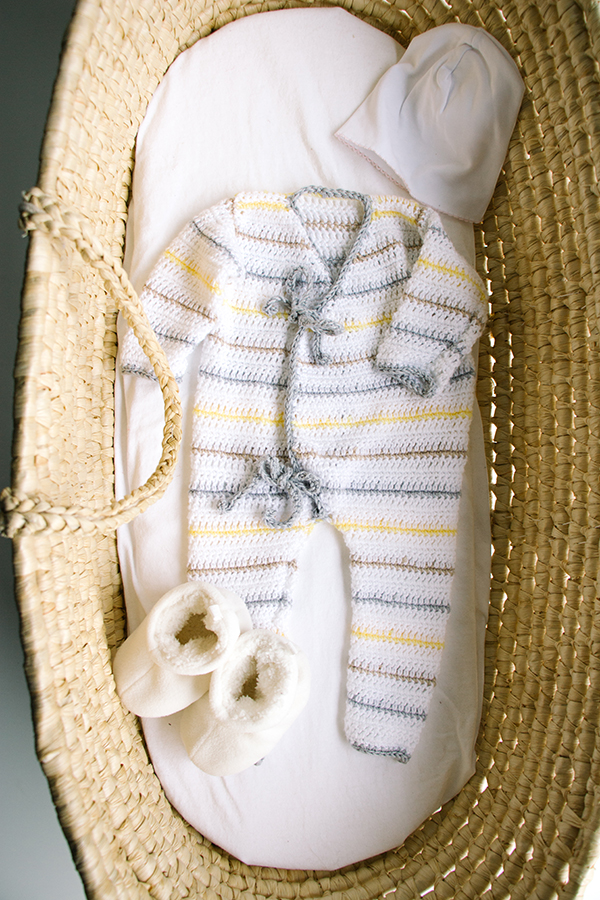
Forget fussy buttons and snaps and opt for this Easy Open Long Sleeve Onesie instead. Designed in a gender neutral yellow and gray, customize this beginner friendly pattern in your favorite colors and keep little ones cozy this spring.
Time: Weekend Project
Skill Level: Easy
Size: Finished Chest Size 16 (17, 18)” to fit sizes 3 (6, 12) months but very forgiving on sizing.
Shown in size 3 months
Gauge: 16 sts and 13 rows (6 rows dc + 7 rows sc) = 4” [10 cm] in patt st
Materials
 Yarn: Universal Yarn Little Bird (100% Acrylic; 344 yards [315 meters]/100 grams): Color #101 Snow Fort (A, 2 (2, 3) balls), Color #112 Ghostie Gray (B, 1 ball), Color #111 Chinos (C, 1 ball), Color #102 Bright Sun (D, 1 ball)
Hook: US size F/5 (3.75 mm)
Notions: Tapestry needle
Pattern Notes
Ch-3 counts as dc.
For Left Front decreases only, ch 2 and first dc = 1 decrease. On next row, work into dc and leave ch 2 unworked.
Special Stitches
Stripe Pattern
Work 3 rows in A (dc row, sc row, dc row), 1 sc row in a contrast color, using B, C, and D, then back to B, etc.
To cut down on ends to weave in, when working with a contrast color, stitch over color A working yarn to carry it across the row so it’s available for the next row.
Pattern
Legs (make 2)
Right Leg
With A, ch 25 (27, 29).
Row 1 (RS): Sc in 2nd ch from hook and in each ch across, ch 3, turn. (24 (26, 28) sc)
Row 2: Dc in each sc across, ch 1, turn.
Row 3: Work 2 sc in first dc, sc in each dc across to last dc, 2 sc in last dc, ch 3, turn. (26 (28, 30) sc)
Row 4: Rep Row 2, change to B, ch 1, turn.
Row 5: With B, rep Row 3, change to A, ch 3, turn. (28 (30, 32) sc)
Rows 6-8: With A, rep Rows 2-3, then Row 2 once more, change to C after Row 8, ch 1, turn. (30 (32, 34) sc)
Row 9: With C, sc in each dc across, change to A, ch 3, turn.
Row 10: With A, dc in each sc across, ch 1, turn.
Row 11: With A, 2 sc in first dc, sc in each dc across to last dc, 2 sc in last dc, ch 3, turn. (32 (34, 36) sc)
Row 12: With A, dc in each sc across, change to D, ch 1, turn
Rep Rows 9-12, 3 (3, 4) more times, maintaining established color order of contrast stripes. (38 (40, 44) sts)
Fasten off.
Left Leg
Rep all instructions for Right Leg but do not fasten off after final row, change to correct contrast color, ch 1, turn.
Join Legs
Row 1: With appropriate contrast color, sc in each sc across Left Leg, ch 4 (6, 4), sc in each sc across Right Leg until 2 sts rem, 2 sc in each of last 2 sc, change to A, ch 3, turn. (78 (82, 90) sc + ch-4 (6, 6) sp)
Row 2: With A, dc in first sc and in each sc and ch across to last sc, 2 dc in last sc, ch 1, turn. (84 (90, 96) dc)
Row 3: With A, sc in each dc across to last 2 dc, 2 sc in each of last 2 dc, ch 3, turn. (86 (92, 98) sc)
Row 4: Dc in first sc and in each sc across. Change to next contrast color, ch 1, turn. (87 (93, 99) dc)
Row 5: With contrast color, rep Row 3, change to A, ch 3, turn. (89 (95, 101) sc)
Rows 6-8: Rep Rows 2-4. (94 (100, 106) sts)
Size 3 months only
Sk to Work Even Section.
Sizes 6 (12) months only
Rows 10 – (13, 17):
Work Even Section
Work even on these sts (in A, dc row, sc row, dc row, with contrast color, sc row) until work measures 7 (8, 9)” from ch between Legs, ending with a WS row.
Begin Decreases
Note: Maintain color pattern as established.
Row 1 (RS): Sc2tog, sc in each dc across until 4 dc rem, sc2tog twice, ch 2, turn. (91 (104, 117) sc)
Row 2: Dc in next sc (see note on decs), dc2tog, dc in each sc across, ch 1, turn. (89 (102, 115) dc)
Row 3: Rep Row 1. (86, 99, 112) sc)
Left Front
Maintain Stripe Pattern as established.
Set-up Row (WS): Dc in next sc, dc in next 27 (28, 29) sc. Leave rem sts unworked, ch 1, turn. (28 (29, 30) dc)
Row 1: Sc in each dc across until 4 sts remain, sc2tog twice, ch 2, turn. (2 sts dec’d)
Row 2: Dc in next dc (see note on dec), dc in each sc across, ch 1, turn. (1 st dec’d)
Rep Rows 1-2 until 8 (9, 10) sts rem.
Work even on these sts as necessary until armhole measures 4 (4.5, 4.5)”.
Fasten off.
Back
With WS facing and A, sk 8 (9, 10) sc, join yarn with sl st in next sc, ch 3, dc in each of next 27 (29, 31) sc. Leave rem sts unworked, ch 3, turn. (28 (30, 32) dc)
Work even on these sts, maintaining Stripe Pattern as established until armhole has the same number of rows as Front, ending with a RS row. Do not fasten off, ch 3, turn.
Shoulders
Left Shoulder:
Row 1: Dc in next 7 (7, 9) sc, hdc in next sc, sc in next sc.
Fasten off. Do not turn.
Right Shoulder
Sk 8 (10, 10) sc, join yarn in next sc, ch 1, sc in same sc, hdc in next sc, dc in each sc across. Fasten off.
Right Front
Set-up Row (WS): With WS facing and A, sk 8 (9, 10) sc, join yarn with sl st in next sc, ch 3, dc in each sc across until 2 sts rem, dc2tog, ch 1, turn. (28 (29, 30) dc)
Row 1: Sc2tog twice, sc in each dc across, ch 2, turn. (26 (27, 28) sc)
Row 2: Dc in each sc across until 2 sts rem, sc2tog, ch 1, turn. (25 (26, 27) dc)
Rep Rows 1-2 until 8 (9, 10) sts rem.
Work even on these sts as necessary until armhole measures 4 (4.5, 4.5)”.
Fasten off.
Sleeves (make 2)
With A, ch 25 (27, 31).
Row 1 (RS): Sc in 2nd ch from hook and in each ch across, ch 3, turn. (24 (26, 30) sc)
Row 2: Dc in each sc across, ch 1, turn.
Row 3: Sc in each sc across, ch 3, turn.
Row 4: Rep Row 2.
Row 5: Work 2 sc in first dc, sc in each dc across until 1 dc rem, 2 sc in last dc, ch 3, turn. (26 (28, 32) sc)
Row 6: Rep Row 2.
Rows 7-10: Rep Rows 5-6. (30 (32, 36) sc)
Rows 11-14: Rep Rows 3-6. (32 (34, 38) sc)
Row 15: Rep Row 3.
Rep Rows 2- 3 until sleeve measures 7 (7.5, 8.25)”, ending with a RS row.
Fasten off.
Finishing
Sew inside leg seams.
Sew shoulder seams.
Sew sleeve seams.
Insert sleeves into armholes and sew into place.
Sleeve and Leg Hems
With MC, work 1 rnd sc and 1 sl st around each arm or leg opening. Fasten off.
Front Opening and Ties
Rnd 1: With MC and with RS facing, beginning at the bottom, work 1 rnd sc around entirety of front and neck opening.
Rnd 2: With MC and with RS facing, [sl st in each sc to point of Left Front, ch 36 (42, 48), sc in 2nd ch from hook and in each ch across back to Front opening] twice, sl st around to end, join rnd with sl st in first sl st.
Fasten off.
Ties
With MC ch 36 (42, 48).
Sc in 2nd ch from hook and in each ch across.
Fasten off, leaving a long tail for sewing.
Sew ties on Right Front as shown in photo, opposite the Left Front ties.
Weave in all ends
The pattern says easy but I totally disagree it’s very confusing, it should have more details and maybe pictures of how each step should look. I’ve spent a lot of wasted time on this very disappointing.
Hello, first I want to thank you for this free beautiful pattern. On the back side do I chain 3 and dc 7 hdc and sc on the left side then fasten off??
To join legs it says to sc across each sc but my rows ended up with double crochet. I repeated rows 9-13 4 times
I am working on the left front part. I don’t understand when it says ‘work even on these stitches as necessary until armhole measure 4”’ what does this mean? I need more explanation
I also do not understand the instructions for the back please help!
Hello Georgia! I’ve reached out to the designer for advice and she or I will reply as soon as possible. Thanks! – Nicola, Editor
Let us know if you have a specific question on the back instructions and we will do our best to help! – Nicola, Editor
Hello Georgia! I’ve reached out to the designer for advice and she or I will reply as soon as possible. Thanks! – Nicola, Editor
From the designer: “Work even means continue in the stitch pattern as established with no increases or decreases. For some sizes no work even rows will be needed because the piece will already measure the height it needs to be so it depends on the size you are making and your row gauge.” Hope this helps! – Nicola, Editor
This pattern is so confusing. I’m at the part of the left shoulder. The previous part (back) says not to fasten off, ch 3 and turn. And then the left shoulder part just continues with instructions of stitches but I don’t understand where those stitches belong. Do I continue on the back part of do the back and left shoulder connect somehow or where does row one of the left shoulder belong while my yarn is still stuck on the back part!?!?
Hello! I’ve reached out to the designer for advice and she or I will reply as soon as possible. Thanks! – Nicola, Editor
Hello again! From the designer: “Yes the Left Shoulder continues onto the Back. It really is Ch 3, turn and keep working.” Hope this helps!
Ok so I worked this pattern up have no idea what I did wrong but I can’t even sew it together. I wish there were pictures as you go to make sure things look correct. Any advise is greatly appreciated.
Hello Pamela! I’ve reached out to the designer for advice and she or I will reply as soon as possible. Thanks! – Nicola, Editor
Hello again! From the designer: “As for sewing it up, it’s all one piece up to the shoulder seams. As it says in the pattern, sew the shoulder seams, sew up the inside leg seams (they are attached they just aren’t seamed on the inside leg, sew up the sleeve seams (which are the only parts that stay separate) and sew the sleeves into the openings. There are no seams on the body.” Hope this helps!
I do wish there was the option to Print the Patterns without having to copy and paste to Word
I was reading other comments on other patterns, I found the print on the left side of the screen, Thank You
Hello! You are welcome to save this pattern by copying and pasting into a word document or by printing the pattern via the printer icon on the left hand side of your screen. Hope this helps! – Nicola, Editor