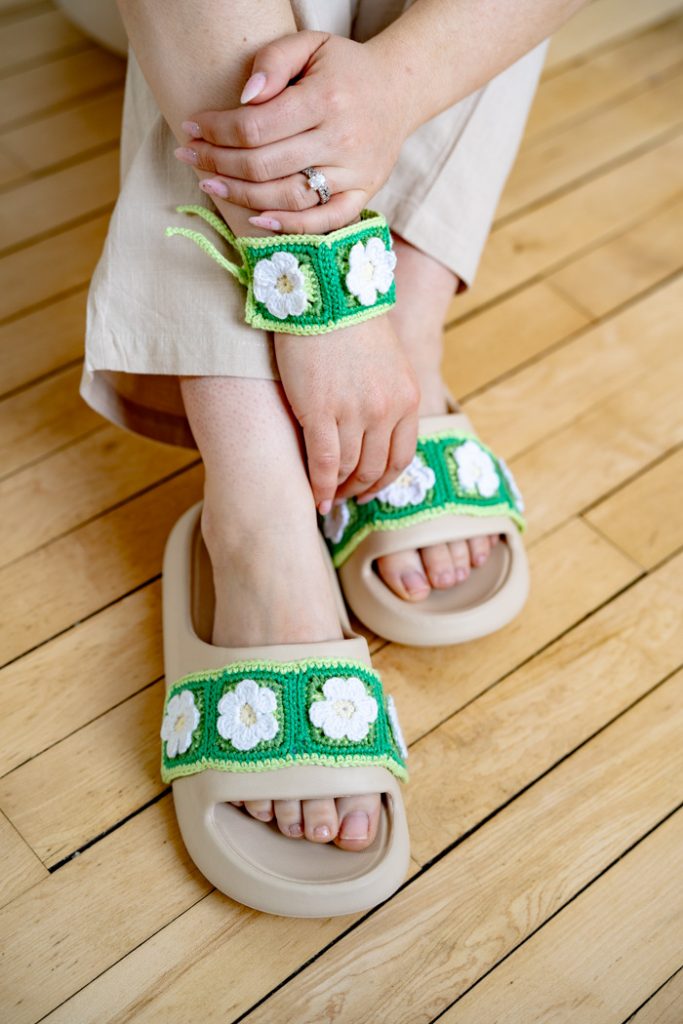
Enter your floral era with the Daisy Chain Set, a playful pairing of bangles and sandals made from adorable mini granny squares! Granny squares are having a moment, and they’re not just for blankets or even garments. Scaled down and reimagined as accessories, this boho dream set would fit perfectly at a summer festival or even a picnic lunch with close friends. Ready to break out of the classic granny mold? This is your chance to stitch something truly fun and free spirited.
Time: Day project
Skill Level: Easy
You can add or remove squares from your bracelet length if you require it bigger or smaller.
Gauge: Each square measures 1.75″ across.
Materials
 Yarn: Sirdar Happy Cotton (100% premium blend cotton; 47 yards [43m] / 0.7 ounces [20g]): Lemonade (MC 1 ball), Fizz (CC1, 1 ball), Treetop (CC2, 1 ball), Wicket (CC3, 1 ball), Shower (CC4, 1 ball)
Hook: US size B/1 14 2.00mm
Notions: Tapestry needle
Special Stitches
Back loop only – work in the back loop of the stitch indicated only.
Pattern Notes
Each mini square is made separately and the invisible join used to sew them together for the bracelet.
Before you join your squares check the length of them to the length of your wrist using a tape measure. If they are too long omit a square, too short, add a square.
Pattern
Mini Granny Square – make 4
With MC, MR, Ch 2 (counts as a st throughout unless otherwise stated)
Round 1: 11Hdc in the MR, join with a Sl St to the top of the beginning ch-2. (12) Fasten off MC.
Round 2: Join CC1 to the BLO of any stitch, (ch 3, 2 Dc, ch 2) in the same st. *3 dc in the next st, sk a stitch, (3 dc, ch 3) in the next stitch; * repeat from * to * twice more. 3 dc in the next stitch, skip a stitch, 3 dc in the next stitch, Ch 3, join with a sl st to the beginning ch-3. (24 Dc and 4 ch-3 spaces) FO CC1.
Round 3: Join CC2 to one of the ch-3 spaces. [Ch 3 (counts as 1sc and 2 ch throughout unless otherwise stated), sc] in the ch-3 space. *sc in next 6 sts, (sc, ch 2, sc) in the next ch-3 space; * repeat from * to * twice more. Sc in next 6 sts, join with a sl st to the first ch of the beginning ch-3. (32 sc and 4 ch-2 spaces) FO CC2
Round 4: Join CC3 to any of the ch-2 spaces. (Ch 3, sc) in the same ch-2 space. *sc in next 8 sts, (sc, ch 2, sc) in the ch-2 space; * repeat from * to * twice more. Sc in next 8 sts, join to the first ch of the beginning ch-3 with a sl st. (40 sc and 4 ch-2 spaces) FO CC3
Round 5: Join CC4 to any front loop of the first round. Ch 3 (counts as a stitch throughout) 2 dc in the same stitch. *Skip a stitch, (sl st, ch 3, 2 dc, ch 3, sl st) in the next stitch; * repeat from * to * 4 more times. Sl st to the first stitch to join. (6 petals) FO CC4.
Weave in your ends.
To Make a Bracelet
Join the 4 squares together with the invisible seam method in a row using 3. FO CC3 and weave in your ends.
Round 1: Join CC1 to the top right corner on the long edge (we will work a long edge first). Sc in each stitch to the next corner. (Sc, ch 2, sc) in the corner. Sc in next 5 sts down the first short side, ch 31, sl st in the second ch from the hook and down the ch in the remaining 29 stitches. Sc in the next unworked stitch on the short edge. Sc in each stitch to the next ch-2 space. (Sc, ch 2, sc) in the ch-2 space. Sc in each stitch across the second long edge to the next corner ch-2 space. (Sc, ch 2, sc) in the ch-2 space. Sc in 5 stitches up the second short side. Ch 31, sl st in the second ch from the hook and down the ch in the remaining 29 stitches. Sc in each of the remaining stitches on the short side to the beginning ch-2 space. Join with a slip stitch in the first sc. FO and weave in your ends.
Finishing
Block the bracelet using your preferred method.
To Make Sandals
Use the same method for the bracelet to join the squares into a line of 4.
Round 1: Join CC1 to the top right corner on the long edge (we will work a long edge first). Sc in each stitch to the next corner. (Sc, ch 2, sc) in the corner. Sc in each stitch to the next ch-2 space. (Sc, ch 2, sc) in the ch-2 space. Sc in each stitch across the second long edge to the next corner ch-2 space. (Sc, ch 2, sc) in the ch-2 space. Sc in each of the stitches on the short side to the beginning ch-2 space. Join with a slip stitch in the first sc. FO and weave in your ends.
Finishing
Block your line of squares using your preferred method. Attach to your sandals sewing along each of the edges. Alternatively you can use hot glue however a mixture of both methods is likely to last longest.


