


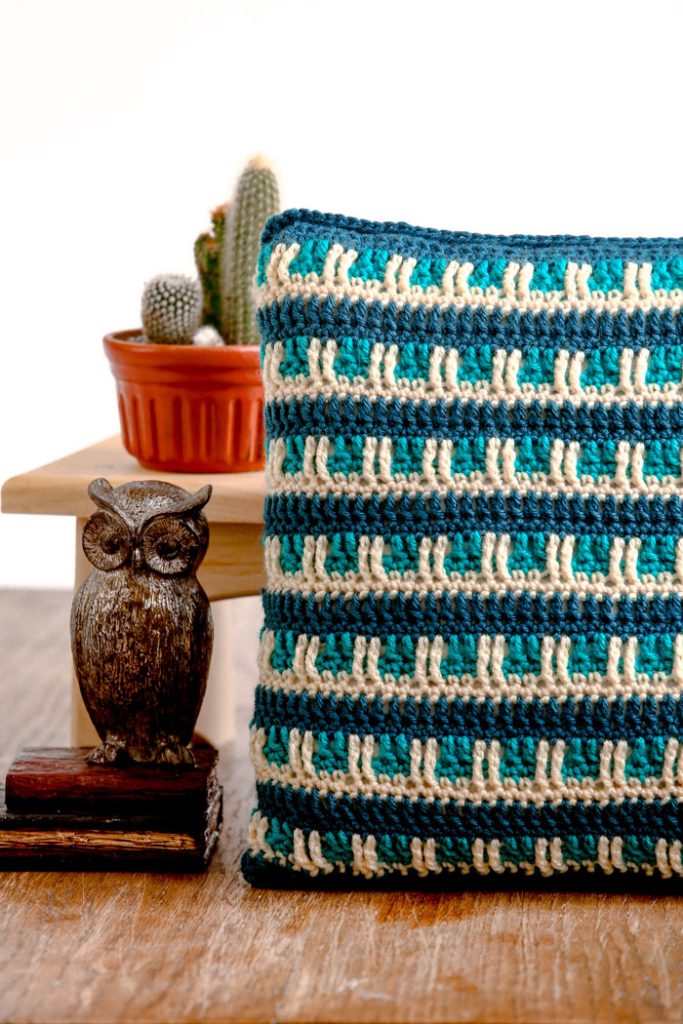
Add a touch of contemporary elegance to your home with the Linear Pillow Cover, a stylish accent piece that blends simplicity with sophistication. This design focuses on the strategic placement of vertical and horizontal lines, creating a bold geometric look that enhances any chair, sofa, or bed.
Perfect for crocheters looking to create a quick yet impactful project, this pattern is worked in the round and allows you to play with color to suit your personal style. Select three contrasting shades to make the linear design pop, or go for a monochromatic palette for a more understated, modern vibe.
Skill Level: Intermediate
Size: Approx. 25” around x 13” tall (not blocked)
Gauge: 16 dc and 14 rows = 4” [10 cm] (in pattern) with US size I hook
Materials
Yarn:
![]() Knit Picks Brava Worsted (100% acrylic; 218 yards [200 meters]/100 grams): Peacock (MC, 1 ball), Marina (CC1, 1 ball), Custard (CC2, 1 ball)
Knit Picks Brava Worsted (100% acrylic; 218 yards [200 meters]/100 grams): Peacock (MC, 1 ball), Marina (CC1, 1 ball), Custard (CC2, 1 ball)
Hook: US size I/9 (5.5 mm) hook
Notions: 14” x 14” pillow form, scissors
Pattern Notes
About gauge: If your pillow form is super puffy, you might want to measure around its waist and check it against your dc stitch gauge. Subtract 2-3” for stretch and then see how close you are to our 100 dc st circumference. For a fatter pillow form, you can add on to the foundation chain in multiples of 4.
This pattern is joined to be worked in the round after the first row of dc has been worked into the foundation chain.
Each color is worked for 2 rounds, joined with a slip st to the first st of that round and fastened off, leaving a 4” tail. The next color is joined (leaving a 4” tail), worked for 2 rounds, fastened off leaving a 4” tail and etc. These tails will be secured inside the pillow cover when the project is finished by tying them together in pairs. There is no need to weave in any ends.
It is possible to carry each color up 4 rounds until it is used again, but I found it was easier to keep the color rounds separate, plus the color changes appear much crisper.
Where possible, it is a good idea to join the new color at a slightly different location than where the previous round ended, still keeping in pattern, of course. This avoids having all the ch 3 (beginnings of rounds) stacking on top of each other.
Technique hint: There are other ways to start a new round of dc, besides working a ch 3. If you go to Youtube.com and type in “standing double crochet”, you might see some alternative methods you’d like to try.
Pattern
With MC (leaving a 36” tail to be used in finishing), ch 102 (multiple of 4 sts + 2).
Rnd 1: Dc in 4th ch from hook (beg ch counts as dc) and in each remaining ch to end of row. Join to work in the round with sl st to the ch 3. (100 dc)
Rnd 2: Ch 1, sc in first dc and all remaining dc around, end with sl st to first sc, cut yarn leaving a 4” tail and fasten off. (100 sc)
Rnd 3: With CC1, join yarn with sl st to a sc of previous round and ch 3, dc in next st, ch 2, sk 2 sts, *dc in next 2 sts, ch 2, sk 2 sts; rep from * around, join final ch 2 to the beginning ch 3 with sl st.
Rnd 4: Ch 1, sc in first dc, sc in next dc, ch 2, sk ch-2 sp, *sc in next 2 dc, ch 2, sk ch-2 sp; rep from * around, ending with sl st to beg sc, cut yarn leaving a 4” tail and fasten off.
Rnd 5: With CC2, join with sl st to first sc of previous round, ch 1, sc into same st, sc into next sc, *(with hook in front of ch sts) tr into each of 2 skipped sts from 3 rows below (hint: these skipped sts are in the MC round), sc in next 2 sc; rep from * around, ending with 2 tr, join with sl st to first sc.
Rnd 6: Ch 1, sc in first st and every remaining st around, ending with sl st to first sc. Check to make sure there are 100 sc, cut yarn leaving 4” tail and fasten off.
Rnd 7: With MC, join with sl st to any sc of previous round, ch 3, dc in every st around, ending with sl st to the beg ch 3. (100 dc)
Rnd 8: Ch 1, sc in first st and all remaining dc around, end with sl st to first sc, cut yarn leaving a 4” tail and fasten off. (100 sc)
Rep Rnds 3-8, 6 more times.
(Important Note: When working the subsequent repeats of Round 3, make sure the dc pairs of your current round are lined up over the dc pairs of the previous Round 3 – this will allow Rounds 5 & 6 to stay in proper alignment).
At the end of the final repeat of Rnd 8, cut the yarn leaving a 36” tail for seaming and fasten off. The pillow cover should measure approximately 13” tall.
Finishing
There is no need to block the pillow cover.
Turn the cover wrong side out and secure all the loose tail ends (tie each of them to their closest neighbor with a square knot – no need to trim the ends). Turn the cover right side out again.
Lay the pillow cover. With crochet hook and the 36” tail from the beg slip knotworking through both layers, join the beg foundation chain with a slip stitch, ch 1 and sc the two edges together. Fasten off and poke the yarn end gently to the WS of pillow cover.
Insert the pillow form into the cover, stretching slightly if necessary to give a snug fit.
With hook and the other 36” tail, sc through both layers of fabric to close top, to match the bottom edges.
Fasten off. Secure the end and poke it gently to the inside of the cover.