


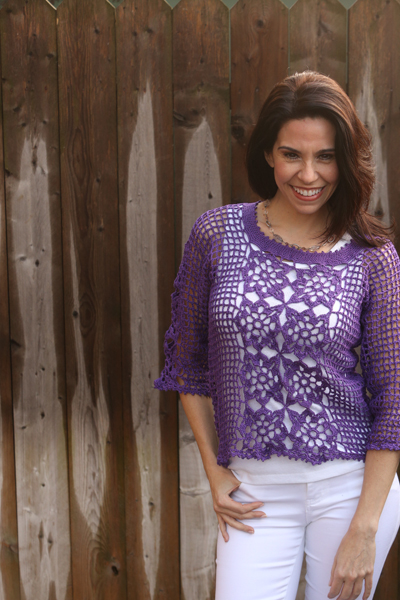
This gorgeous lace top features a motif design that covers the center front and back as well as the top of the ¾-length sleeves. The rest of the top is covered with an easy lace pattern that helps in customizing the pattern for different sizes, making this a beautiful top anyone can enjoy.
Skill Level: Intermediate
Size: Finished Bust Size 34 (38, 42, 46, 50)” to fit bust 32 (36, 40, 44, 48)”; Shown in size 34”
Gauge: 20 sc = 4″ [10 cm] after wet blocking
Materials
Yarn:
![]() Aunt Lydia’s Crochet Thread Fashion size 3 (100% mercerized cotton; 150 yards [137 meters): #531 Purple (6 (7, 8, 9, 10) balls)
Aunt Lydia’s Crochet Thread Fashion size 3 (100% mercerized cotton; 150 yards [137 meters): #531 Purple (6 (7, 8, 9, 10) balls)
Hook: US size D/3 (3.25 mm) hook
Notions: Tapestry needle
Pattern Notes
This pattern is worked in the round from the top down.
Pattern
First Motif
Ch 10, make a ring with a sl st into the first ch.
Rnd 1: Ch 1, 16 sc in ring, ending with sl st into the first ch.
Rnd 2: Ch 9 (count as dc, ch 6), (sk next sc, dc in next sc, ch 6) 7 times, ending with sl st into the 3rd ch.
Rnd 3: Sl st in next 2 sts, ch 3 (count as dc), 4 dc in same ch-6 sp, *ch 5, 5 dc in next ch-6 sp; rep from * around, ending with sl st into the 3rd ch.
Rnd 4: Sl st into the next 2 dc, *ch 3, (3 dc, ch 5, 3 dc) in next ch-5 sp, ch 3, sc in 3rd dc, ch 3, (3 dc, ch 3, 3 dc) in next ch-5 sp, ch 3, sc in 3rd dc; rep from * around, ending with sl st into the 3rd dc. Fasten off.
Second Motif (and the rest)
Rnds 1-3: Work same as first motif.
Rnd 4: Sl st into the next 2 dc, *ch 3, (3 dc, ch 2, sl st into the corresponding ch-5 sp on the previous motif, ch 2, 3 dc) in next ch-5 sp, ch 3, sc in 3rd dc, ch 3, (3 dc, ch 1, sl st into the corresponding ch-3 sp on the previous motif, ch 1, 3 dc) in next ch-5 sp, ch 3, sc in 3rd dc; rep from * as long as necessary, otherwise work same as Rnd 4 of first motif.
Top – Back
Join two rows of motifs with 5 motifs in each row as shown in the graphic below:
Front
Join two rows of 4 motifs in each row as shown in the graphic below:
Right Side of Body
Row 1: With RS facing and starting from bottom of back side motifs, attach yarn, ch 9, dc in next sc, *ch 6, sc in next ch-3 sp, ch 6, dc in next sc, ch 6, dc in next joint, ch 6, dc in next sc; rep from * across, ending with ch 6, dc in last ch-5 sp, ch 10 (mark this ch as the back neck), ch 41, dc in next ch-5 sp, work same as back to end. Turn.
Row 2: Ch 6, *dc in next ch-6 sp, ch 3, dc in next st; rep from * to end. Turn.
Row 3: Ch 6, *dc in next dc, ch 3; rep from * across, ending with dc in 3rd ch. Turn.
Rep Row 3 until Right Side of body is 5 (6, 7, 8, 9)”. Fasten off.
Left Side of Body
Work same as Right Side except start working with WS facing you.
Sleeve (Make Two)
Join 3 motifs as shown in the graphic below:
Right Side of Sleeve
Row 1: With RS of motifs facing and starting from bottom of the first motif, attach yarn, ch 9, dc in next sc, *ch 6, sc in next ch-3 sp, ch 6, dc in next sc, ch 6, dc in next joint, ch 6, dc in next sc; rep from * across, ending with ch 6, dc in the 3rd ch. Turn.
Row 2: Ch 6, *dc in next ch-6 sp, ch 3, dc in nextst; rep from * across to end. Turn.
Row 3: Ch 6, *dc in next dc, ch 3; rep from * across, ending with dc in 3rd ch. Turn.
Rows 4-13: Rep Row 3, 10 times. Fasten off at the end of Row 13.
Short Rows for Size Small
Row 14: Ch 6, *dc in next dc, ch 3; rep from * across, ending with dc in last dc, tr in 3rd ch. Turn.
Row 15: Ch 4, *dc in next dc, ch 3; rep from * across, ending with dc in 3rd ch. Turn.
Row 16: Ch 6, *dc in next dc, ch 3; rep from * across, ending with dc in the dc 2 dc before last, tr in next dc. Turn.
Row 17: Ch 4, *dc in next dc, ch 3; rep from * across, ending with dc in 3rd ch. Fasten off. Sleeve should measure 5” from the edge of the motifs
For Other Sizes
Continue working short rows until sleeve, at the armhole, measure (5½, 6, 6½, 6½)” from the edge of the motifs.
Fasten off.
Left Side of Sleeve
Work same as right side of sleeve except start working with WS facing.
Finishing – Bottom Edge and Cuffs
Row 1: Attach yarn to 3rd ch of the corner of the piece, [ch 4, sc in next dc]; rep between [ ] until you reach the motif, {ch 4, sc in the first dc of the 3 dc block, ch 4, sc in 3rd dc, ch 4, sc in next sc, ch 4, sc in next dc, ch 4, sc in the ch-3 sp, ch 4, sc in the 3rd dc of the next 3 dc block, ch 4, sc in next sc, ch 4, sc in the first dc of the 3 dc block, ch 4, sc in 3rd dc, ch 4, sc in 3rd ch of the corner ch-5 sp}; rep between { } as necessary, otherwise work between [ ] to end. Turn.
Row 2: *(2 sc, ch 3 picot, 2 sc) in next ch-4 sp; rep from * to end.
Fasten off.
Neckline Finishing
Rnd 1: With RS facing, attach yarn to the corner of the first motif on the back, [ch 6, dc in next sc, ch 6, sc in next ch-3 sp, ch 6, dc in next sc, ch 6, dc in the motifs joint, ch 6, dc in next sc, ch 6, sc in next ch-3 sp, ch 6, dc in next sc], (ch 6, sc in top of next dc). Repeat between ( ) until you reach the front motif, rep from between [ ], then rep between ( ) to end of round.
Rnd 2: *7 sc in next ch-6-sp; repeat from * around.
Rnd 3: *Sk next sc, sc in each of the next 3 sc; rep from * around.
Rnds 4, 6: Sc in every sc around.
Rnd 5: *Sk next sc, sc in each of the next 5 sc; rep from * around.
Rnd 7: *Sc in each of next 3 sc, ch-3 picot; rep from * around.
Fasten off.
Finishing
Sew side seams. Sew sleeves into armhole. Sew sleeve seams. Block top to size. 
Is there a stitch chart for the motif? The pattern states check the graphic below but there is no chart.
Is there a chart for how to join the top parts? How do I use the 41 ch made in right side body?
This pattern indicates there is a graphic that goes along with it, however, I can’t find the graphic. Can you help?
This is beautiful! yes, a chart might be very helpful…..
A joining motifs diagram has now been added. – Nicola, Editor