

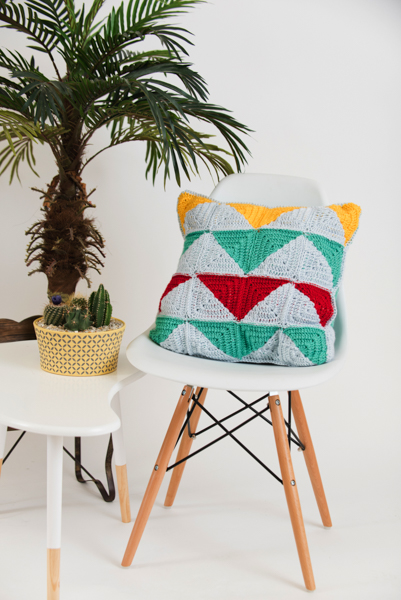
Triangles make this pillow eye-catching and bold. When you want to add a focal point to your room, this pillow will do the trick.
Skill Level: Easy
Size: 16” x 16”
Gauge: 16 sts and 8 rows = 4″ [10 cm]
Materials
Yarn:
![]() Knit Picks Brava Worsted (100% Premium Acrylic; 218 yards/100 grams): 26362 Clarity (MC), 2 balls; 25710 Tranquil (CC1), 2 balls; 25712 Red (CC2), 1 ball; 25706 Canary (CC3), 1 ball
Knit Picks Brava Worsted (100% Premium Acrylic; 218 yards/100 grams): 26362 Clarity (MC), 2 balls; 25710 Tranquil (CC1), 2 balls; 25712 Red (CC2), 1 ball; 25706 Canary (CC3), 1 ball
Hook: US size I/9 (5.5 mm)
Notions: Scissors; 16” pillow form; tapestry needle for weaving ends.
Pattern Notes
This pattern is made with squares that are joined together using the slip stitch join.
The front and back portions are joined together around the pillow insert using a single crochet join.
Pattern
Pillow Front
Note: Make 8 with MC and CC1, 4 with MC and CC2, 4 with MC and CC3.
With MC, Magic Circle, ch 3 (count as 1 dc here and throughout).
Rnd 1: Work (2 dc, ch 1, 3 dc), join CC, ch 1, (3 dc, ch 1, 3 dc) change to MC, ch 1, join in beg ch-3 with sl st – 12 dc; 4 ch-1 sps.
Rnd 2: Ch 3, 1 dc in each of next 2 sts, (2 dc, ch 1, 2 dc) in next ch-1 sp, 1 dc in each of next 3 sts, 2 dc in next ch-1 sp, change to CC, ch 1, 2 dc in same ch-1 sp just worked in, 1 dc in each of next 3 sts (2 dc, ch 1, 2 dc) in next ch-1 sp, 1 dc in each of the next 3 sts, 2 dc in next ch-1 sp, change to MC, ch 1, 2 dc in same ch-1 sp just worked in, join in beg ch-3 with sl st – 28 dc; 4 ch-1 sps.
Rnd 3: Ch 3, 1 dc in each of next 4 sts, (2 dc, ch 1, 2 dc) in next ch-1 sp, 1 dc in each of next 7 sts, 2 dc in next ch-1 sp, change to CC, ch 1, 2 dc in same ch-1 sp just worked in, 1 dc in each of next 7 sts, (2 dc, ch 1, 2 dc) in next ch-1 sp, 1 dc in each next 7 sts, 2 dc in next ch-1 sp, change to MC, ch 1, 2 dc in same ch-1 sp just worked in, 1 dc in each of next 2 sts, join in beg ch-3 with a sl st – 44 dc; 4 ch-1 sps.
Rnd 4: Ch 3, 1 dc in each of next 6 sts, (2 dc, ch 1, 2 dc) in next ch-1 sp, 1 dc in each of next 11 sts, 2 dc in next ch-1 sp, change to CC, ch 1, 2 dc in same ch-1 sp just worked in, 1 dc in each of next 11 sts, (2 dc, ch 1, 2 dc) in next ch-1 sp, 1 dc in each of next 11 sts, 2 dc in next ch-1 sp, change to MC, ch 1, 2 dc in same ch-1 sp just worked in, 1 dc into each of the next 4 sts, join in beg ch-3 with a sl st, fasten off – 60 dc; 4 ch-1 sps.
Pillow Back
With MC, ch 65.
Row 1: Dc in 4th ch from hook (count sk 3 chs as 1 dc), dc in each ch across, turn – 63 sts.
Row 2: Ch 3 (count as 1 dc here and throughout), dc in each st across, turn – 63 sts.
Rows 3-9: Rep Row 2.
Change to CC1.
Rows 10-18: Rep Row 2.
Change to MC.
Rows 19-27: Rep Row 2.
Change to CC1.
Rows 28-36: Rep Row 2.
Change to MC.
Row 37: Ch 1, sc in each st across – 63 sts.
Fasten off.
Finishing
Weave in ends. Lay the squares out to form the chevron pattern shown in the photo. Join the squares together using the slip stitch joining method.
Join the front and back pieces together, using a single crochet join, on three sides. Insert the pillow form and close off last side using single crochet join.
Weave all ends. 
Am I missing something? It says it needs a 16×16 pillow form but I have finished the squares and am half way through the back, and it seems to waaaay bigger than the pillow form. Does something happen when you make it a pillow? This is my first pillow to make
I love the pattern and I am an experienced crocheter but for the life of me I can not figure out how to go back and forth with the change of colors. Is there a tutorial I can watch? I love the pillow and would love to make several as gifts.
Thank you very much the pillow looks like it’s very interesting and I something I’d like to make
Love the pattern. Tu
How can I forward this pattern to my email to print
This is so so cool and rather easy . At my age – my hands are a bit slow bit indeed it is a easy pattern.
Thank you for everything and be blessed — Violet