


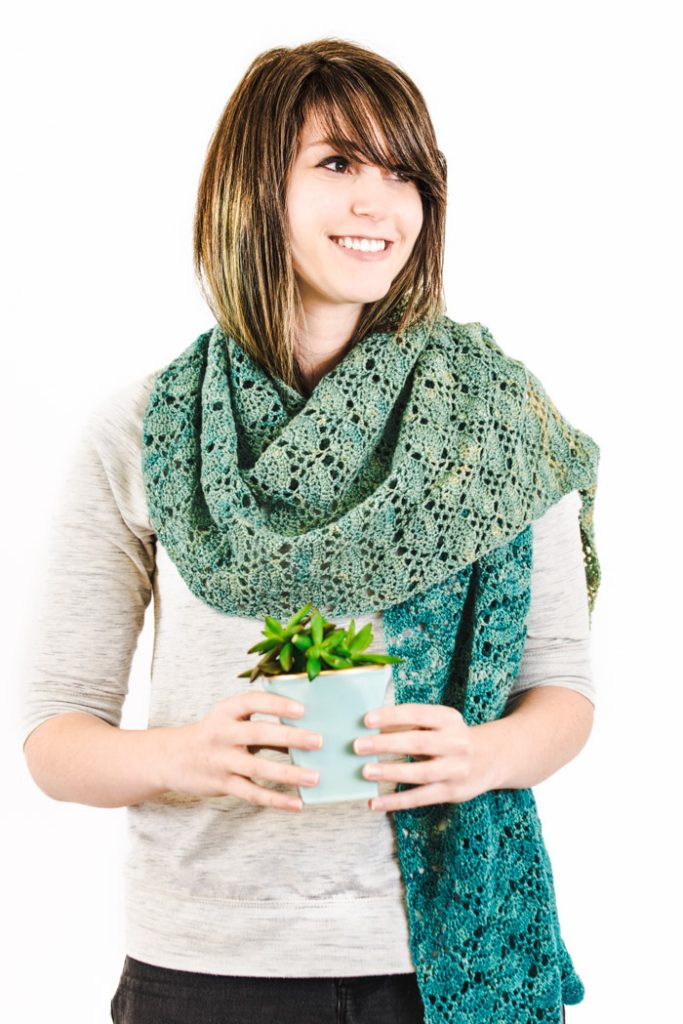
The Tucson Wrap brings the beauty of desert succulents to life with its bold shades of blue and green, evoking the vibrant rosettes of nature’s resilient blooms. This delicate yet striking scarf showcases the beauty of the yarn itself, with a simple yet captivating stitch pattern that allows its colors to truly shine.
Worked in two symmetrical halves and joined seamlessly, the Tucson Wrap offers a unique construction that ensures balance and beauty in every detail. Perfect for layering over casual or dressy outfits, this lightweight accessory will quickly become a favorite piece in your wardrobe.
Skill Level: Intermediate
Size: 10 x 60 (20 x 60)”
Shown in size 20 x 60”
Gauge: 18 sts and 24 rows = 4” [10 cm] in dc after wet blocking; one 12-st repeat of pattern = 2 ½”
Materials
Yarn:
![]() Frabjous Fibers Cheshire Cat Mini Skein Pack (100% Merino; 640 yards [585 meters]/142 grams): #42 Slithy Serpent, 1 (2) packs.
Frabjous Fibers Cheshire Cat Mini Skein Pack (100% Merino; 640 yards [585 meters]/142 grams): #42 Slithy Serpent, 1 (2) packs.
Hook: US size F/5 (3.75 mm)
Notions: Tapestry needle
Pattern Notes
This scarf is worked in 2 halves. Both halves start at the center and work out towards the ends, lengthwise.
Cheshire Cat Mini Skein Pack comes with 5 skeins of yarn. For the scarf (10 x 60) the middle skein is divided in half and each half skein of yarn is used at the beginning of each half of the scarf. The first half of the scarf uses 1/2 skein middle color and the 2 darkest colors. The second half of the scarf uses the other 1/2 skein of middle color and the 2 lightest color skeins of yarn.
For the wrap (20 x 60) the first half of is worked with 1 skein of the middle color and 4 skeins of the darkest colors. The second half of the wrap uses 1 skein of the middle color and 4 skeins of the lightest colors
To adjust the width of this scarf, work a multiple of 12 ch + 2
Pattern
Ch 50 (98) with the middle color of your 5 (10) skeins of yarn (see pattern notes).
Set-up Row: Sc in 2nd ch from hook, *ch 3, sk next 2 ch, sc in next ch; rep from * across, turn.
Row 1: Ch 4, sc in center of ch-3 sp, *ch 3, sc in center of next ch-3 sp, 3 dc in next sc, sc in center of next ch-3 sp, (ch 3, sc in next ch-3 sp) twice; rep from * until 3 ch-3 sps rem, ch 3, sc in next ch-3 sp, 3 dc in next sc, sc in next ch-3 sp, ch 3, sc in next ch-3 sp, ch 1, dc in last sc, turn.
Row 2: Ch 1, sc in top of dc, ch 3, sc in next ch-3 sp, 2 dc in each of the next 3 dc, sc in next ch-3 sp, *(ch 3, sc in next ch-3 sp) twice, 2 dc in each of the next 3 dc, sc in next ch-3 sp; rep from * to last ch-3 sp, ch 3, sc in top of turning ch, turn.
Row 3: Ch 4, sc in next ch-3 sp, *2 dc in each of the next 6 dc, sc in next ch-3 sp, ch 3, sc in next ch-3 sp; rep from * to last 6 dc, 2 dc in each of the next 6 dc, sc in next ch-3 sp, ch 1, dc in last sc, turn.
Row 4: Ch 1, sc in top of dc, (ch 3, sk next 2 dc, sc in next dc) 3 times, ch 3, *sc in next ch-3 sp, (ch 3, sk next 2 dc, sc in next dc) 3 times, ch 3; rep from * to turning ch, sc in top of turning ch. Turn.
Row 5: Ch 3, dc in sc, *sc in ch-3 sp, (ch 3, sc in next ch-3 sp) 3 times, 3 dc in next sc; rep from * across, ending with 2 dc in last sc, turn.
Row 6: Ch 3, dc in dc, 2 dc in next dc, sc in next ch-3 sp, (ch 3, sc in next ch-3 sp) twice, *2 dc in each of the next 3 dc, sc in next ch-3 sp, (ch 3, sc in next ch-3 sp) twice; rep from * to last dc, 2 dc in last dc, dc in turning ch, turn.
Row 7: Ch 3, dc in dc, 2 dc in each of the next 2 dc, *sc in next ch-3 sp, ch 3, sc in next ch-3 sp, 2 dc in each of the next 6 dc; rep from * to last 2 ch-3 sp, sc in next ch-3 sp, ch 3, sc in next ch-3 sp, 2 dc in each of the next 3 dc, dc in top of turning ch, turn.
Row 8: Ch 1, sc in top of dc, ch 2, sk next dc, sc in next dc, ch 3, sc in next ch-3 sp, *(ch 3, sk next 2 dc, sc in next dc) 3 times, ch 3, sc in next ch-3 sp; rep from * to last 5 dc, ch 3, sk next 2 dc, sc in next dc, ch 3, sc in top of turning ch, turn.
Rep Rows 1-8 for patt, changing to the second darkest yarn and then the darkest yarn once each runs out.
Work until scarf meas 30″ or desired length.
For the second half of the scarf, start at your beginning ch and work Set-up Row with middle color yarn. Work as for first half using the second lightest and then the lightest yarn until scarf measures the same as first half.
Finishing
Weave in ends. Block scarf.
The last stitch is either placed in the top of the turning chain, ie if you are told to ch 3 then start the pattern in the next stitch, the 3rd ch is “top of the turning chain”, or in the last stitch, this happens when the turning chain is a chain 1 or chain 2. If you turn the row with a chain 1, the first stitch of the new row is the last stitch of the row just completed. The chain 2 use is most often used with double crochet work as the turning chain. The chain two does not count as a double crochet stitch, so the last stitch of the row just finished is used for the first stitch of the new row. If the chain 3 turning method is used, the last stitch of the row just finished should have been made in the top 3rd chain of the previous row. As you chain 3 for the turn, the last double crochet stitch of the row just finished is skipped and the next double crochet is where you place your first double crochet stitch. The chain 3 turning on the new row equals a double crochet stitch and is aligned with the last double crochet stitch.
I hope this a clear explanation .
Use stitch markers. It helped me a lot