


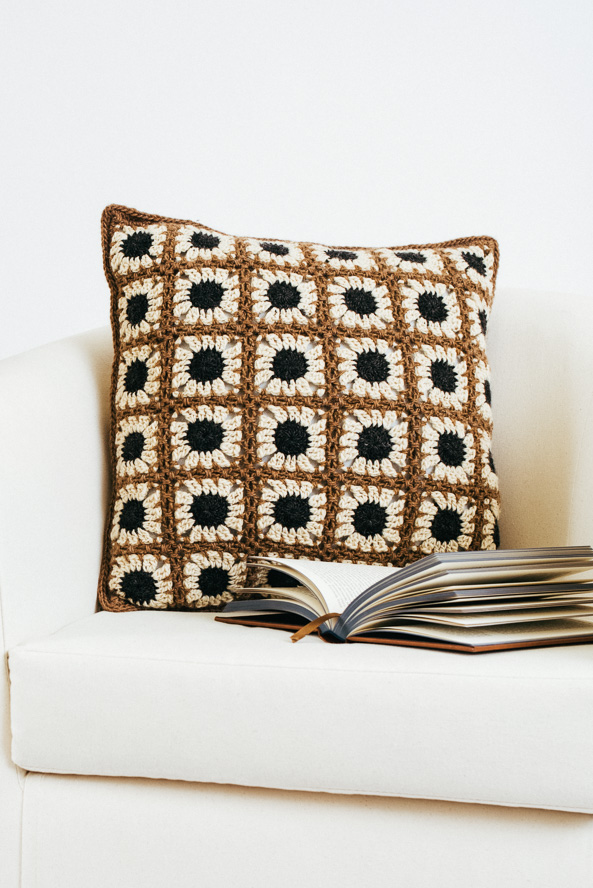
Dark seed heads, sun-bleached petals, intertwined dried stems and leaves that resemble basketry are the inspiration behind the Winter Gerbera Daisy pillow. The understated elegance of winter neutrals is the perfect accent for the home at any time of the year.
Skill Level: Intermediate
Size: 18” square
Gauge: Motif measures 3” blocked; 14.25 sts and 18.5 rows = 4” [10 cm] in sc after wet blocking.
Materials
Yarn:
![]() Brown Sheep Lamb’s Pride Worsted (85% Wool, 15% Mohair; 190 yards [174 meters]/113 grams): M140 Aran (A), 2 skeins; M08 Wild Oak (B), 2 skeins; M06 Deep Charcoal (C), 1 skein.
Brown Sheep Lamb’s Pride Worsted (85% Wool, 15% Mohair; 190 yards [174 meters]/113 grams): M140 Aran (A), 2 skeins; M08 Wild Oak (B), 2 skeins; M06 Deep Charcoal (C), 1 skein.
Hook: US size H/8 (5.0 mm); I/9 (5.5mm).
Notions: Safety pins; tapestry needle; 18” square pillow form; four 1.5” (38 mm) buttons (buttons used in sample are LaPetite Style 815 in black; 1.25” buttons are also suitable)
Special Stitches
Standing Sc: With slipknot on hook, insert hook into designated st, yarn over and pull loop through, yarn over and pull through both loops on hook completing the Standing sc st.
Single crochet two together (Sc2tog)
Insert hook in corner sp, yo, pull up lp, insert hook into next corner sp, yo, pull up lp (3 lps on hook), yo, draw through all 3 lps on hook.
Pattern
Front
Motif (make 36)
With smaller hook and C, make magic ring.
Rnd 1: Ch 3, work 15 dc in ring, sl st to top of ch 3. Fasten off.
Rnd 2: With A, sl st in any dc, ch 3 (counts as first dc), dc in same st, ch 3, 2 dc in next st (corner made), (dc in next 2 sts, 2 dc in next st, ch 3, 2 dc in next st) 3 times, dc in next 2 sts, join with sl st to top of first dc to join. Fasten off.
Rnd 3: With B, work Standing Sc in any corner sp, *(ch 2, sk 2 sts, sc in next sp between 2 dc) twice, ch 2, sc in next corner sp, ch 3, sc in same corner sp; rep from * 3 more times, ending with sl st in top of first sc. Fasten off.
Weave in loose ends and block to 3” square.
Joining Motifs
Motifs are joined together horizontally one pair at a time to form three strips that are 2 motifs wide and 6 motifs long. After the three strips are joined tog in the same fashion, the motif strips are then joined vertically. This creates a basket weave effect on the RS.
Note: The only difference in joining is that with the vertical rows, there is a ch-1 between motifs.
Joining horizontal rows of motifs
Place 2 motifs RS tog. With B, start with Standing sc in corner ch-3 sp, *(ch 2, sc in next ch-2 sp) 3 times, ch 2, sc in corner sp. Place next 2 motifs together, sc tog in corner of next motif and continue across from *. Continue until 6 pairs of motifs have been joined to form one strip. Make 2 more strips 2 motifs wide and 6 motifs long. Join strips tog as described above until all 36 motifs are joined horizontally.
Joining vertical rows of motifs
With RS tog and B, start with Standing Sc in any corner ch-3 sp, *(ch 2, sc in next ch-2 sp) 3 times, ch 2, sc in corner sp, ch 1. Sc in corner sp of next motif pair and continue across from *.
Finishing Rnd (RS): With B, start with Standing Sc in any corner sp, *(1 sc in next st, 2 sc in next ch-2 sp) 3 times, 1 sc in next st, sc2tog in next 2 corner sps; rep from * 5 more times, ending with sc, ch 1, sc in corner. Continue around, ending with sl st in first sc.
Fasten off. Weave in loose ends and block 18” square.
Back
Panel A
With larger hook and A, ch 65.
Row 1 (RS): Change to smaller hook, sc in 2nd ch from hook and each ch across, turn – 64 sc.
Rows 2-9: Ch 1, sc across row, turn. Fasten off at end of final row.
Note: All color changes will be made at the beg of a WS row so all tail ends will be on one side.
Row 10: With B, start with Standing Sc in first sc, sc across row, turn.
Rows 11-23: Ch 1, sc across row, turn. Fasten off at end of final row.
Row 24: With A, start with Standing Sc in first sc, sc across row, turn.
Rows 25-37: Ch 1, sc across row, turn. Fasten off at end of final row.
Row 38: With B, start with Standing Sc in first sc, sc across row, turn.
Rows 39-51: Ch 1, sc across row, turn. Fasten off at end of final row.
Weave in loose ends. Block to 18” wide and 11” tall.
Panel B (buttonhole panel)
With larger hook and A, ch 65.
Row 1 (RS): Change to smaller hook, sc in 2nd ch from hook and each ch across row, turn – 64 sc.
Rows 2-13: Ch 1, sc across row, turn. Fasten off at end of final row.
Row 14: With B, start with Standing Sc in first sc, sc across row, turn.
Rows 15-27: Ch 1, sc across row, turn. Fasten off at end of final row.
Row 28: With A, start with Standing Sc in first sc, sc across row, turn.
Rows 29-41: Ch 1, sc across row, turn. Fasten off at end of final row.
Row 42 (buttonhole row): With B, start with Standing Sc in first sc, sc in next 13 sc, (ch 3, sk 3 sc, sc in next 8 sc) 4 times, sc in rem 6 sc, turn.
Row 43: Ch 1, sc in next 14 sc, (sc in each ch of ch-3, sc in next 8 sc) 4 times, sc in rem 6 sc, turn.
Rows 44-49: Ch 1, sc across row, turn.
Row 50 (WS): Ch 1, sk first sc, sl st in each st across row. Fasten off.
Weave in loose ends. Block to 18” wide and 11” tall.
Optional Surface Crochet detail
Note: You can substitute an embroidered chain stitch but this can abrade the fabric with the repeated pulling through of the yarn.
With B beneath pillow panel, insert hook from front to back at the base of any stripe in color A and approx. in center of stripe. With your other hand, feed the yarn from below to the hook, yo, pull yarn to surface, insert hook from front to back in next vertical sp between sts, yo from below and pull yarn up to surface. Cont surface crocheting until you reach the end. Fasten off.
Repeat with remaining 2 white stripes working from the same direction from bottom to top. Weave in loose ends.
Finishing
Place Panel B (RS) over Panel A (RS) so that Panel B overlaps Panel A at center where colors line up. With B, whipstitch tog (on both ends) where panels overlap. Weave in loose ends.
Note: Final edging row will cover whip stitching.
Mark areas where buttons will be sewn. Sew on buttons. Button close.
With WS tog, pin front and back together at the center and edge of each motif. This helps to keep things in place when crocheting together since the front and back do not have the exact same number of sts (front is approx. 68 sts wide, backs are approx. 64 sts). To accommodate the extra sts on the front, make adjustments in the area approx. 5 sts beyond the corners so that the stripes and optional surface crochet details on the back will stay lined up with the motifs on the front.
Rnd 1: With front side facing, join with Standing sc in any corner and sc evenly across one side (each motif will be approx. 11 sc across). Make 1 sc, ch 1, sc in each corner, turn.
Rnd 2: With back side facing, ch 1, sl st around.
Fasten off and weave in loose ends. Insert pillow form and button close.