


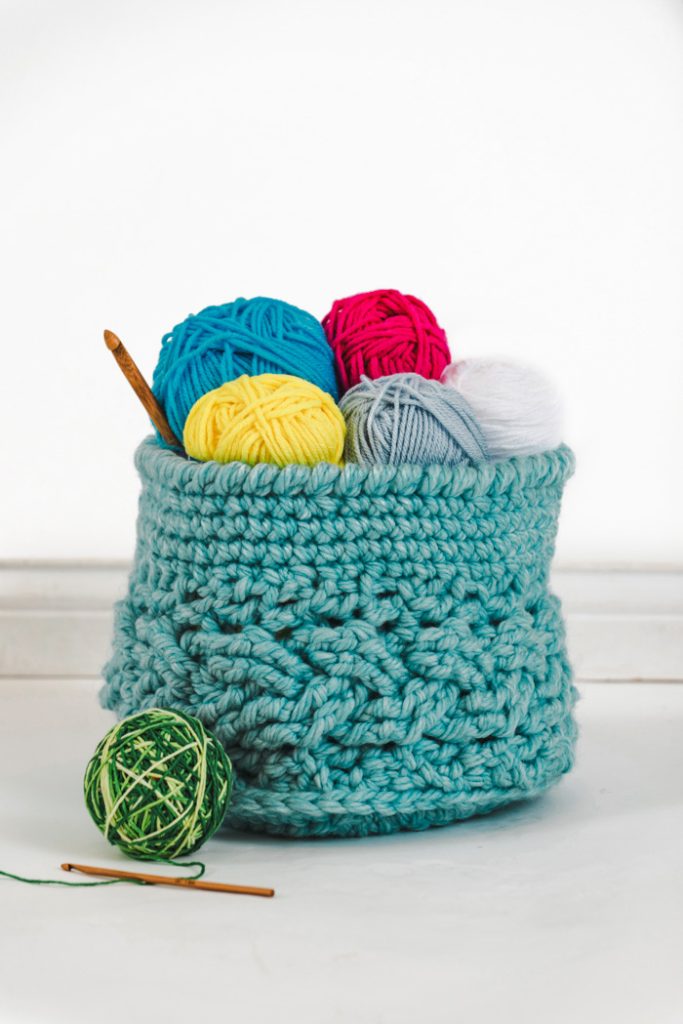
The Chunky Cable Basket is the perfect blend of functionality and style, making it an essential addition to any room in your home. Crafted with thick, super-chunky yarn, this basket works up quickly, allowing you to create a statement piece in no time. The textured cable braid adds a sophisticated and cozy feel, making it as beautiful as it is practical.
This versatile basket can be used for a variety of purposes – store your yarn and craft supplies, organize household items, or even display decorative objects like glass balls for a whimsical touch. Whether you choose a bold color to make it stand out or a more neutral hue to blend seamlessly with your décor, this basket is sure to elevate your space.
With its sturdy construction and stylish look, the Chunky Cable Basket is both a functional storage solution and a decorative accent piece that complements any room.
Skill Level: Intermediate
Size: 9” diameter (of base) x 8” tall
Gauge: 7 sts and 8 rows = 4” [10 cm] in Sc
Gauge is not necessary for this project.
Materials
Yarn:
![]() Red Heart Grande (78% Acrylic, 22% Wool; 46 yards [42 meters]/150 grams): E826 Wintergreen, 4 balls.
Red Heart Grande (78% Acrylic, 22% Wool; 46 yards [42 meters]/150 grams): E826 Wintergreen, 4 balls.
Hook: US size N/15 (10.0 mm)
Notions: US size H/8 (5 mm) hook to weave in yarn ends
Special Stitches
FPTR (Front post treble) – Yo twice, working in front of your current row, insert hook around the post of the st from back to front, yo, draw up a lp, (yo, pull through 2 lps) 3 times.
BPTR (Back post treble) – Yo twice, working behind your current row, insert hook around the post of the st from front to back, yo, draw up a lp, (yo, pull through 2 lps) 3 times.
Pattern Notes
The cable section of this pattern is worked separately in rows and then sewn to the circular base. Once the cable section is secured, more rounds are added on top. Join with sl st when working in the round unless otherwise stated.
Pattern
Cable Braid
Ch 12.
Row 1: Dc in 4th ch from hook and in each ch across row, turn – 10 dc.
Row 2: Ch 3, dc in next st, sk next 2 sts, FPTR around next 2 sts, working in front of sts just made, FPTR around 2 skipped sts, FPTR around next 2 sts, dc in last 2 sts, turn.
Row 3: Ch 3, dc in next st, sk next 2 sts, BPTR around next 2 sts, working in back of sts just made, BPTR around 2 sts just skipped, BPTR around next 2 sts, dc in last 2 sts, turn.
Rep Rows 2-3 until piece meas 37-38”.
Fasten off.
Base
Rnd 1: Ch 3 (count as dc here and throughout), 11 dc in an adjustable ring.
Rnd 2: Ch 3, dc in same st, dc in next st, *2 dc in next st, dc in next st; rep from * around until 2 sts rem, 3 dc in each of last 2 sts – 21 dc.
Rnd 3: Ch 3, dc in same st, dc in next st, *2 dc in next st, dc in next st; rep from * to last st, 2 dc in last st – 32 dc.
Rnd 4: Ch 3, dc in same st, *(2 dc in next st) 3 times, (dc in next st, 2 dc in next st) 6 times; rep from * once more, dc in last st – 52 dc.
Rnd 5: Ch 1, flip circle over so wrong side facing, working in front loops only, sc in each st around.
Rnd 6: Ch 1, flip back over so right side of Rnds 1-4 are facing and working through a loop on cable braid and both loops of Rnd 5 of base, sc in each st around, joining base to braid. Fasten off.
Top
Rnd 1: Join with sl st to any st along side of Cable Braid, work sc in post of each st around.
Rnds 2-3: Ch 1, sc in each st around.
Rnd 4: Ch 1, sc in first st, sc2tog, *sc in next 5 sts, sc2tog; rep from * around.
Rnd 5: Ch 1, reverse sc in each st around.
Fasten off.
Finishing
Use smaller hook to pull yarn tails through to hide them
Optional: Cut a cardboard circle the same diameter as the base to insert into bottom of basket for extra stability.
Is it absolutely necessary to use the wool blend yarn? I can imagine that it might give the item a certain amount of sturdiness, but some folks are sensitive or allergic to wool.
Ms. Ryan, can this patterned be done using worsted 4 yarn also? What changes might I need to make to the pattern to make use of the yarn I have already? Thank you!
Looks like a project for me
Thank you. I love this pattern. I’ve been crocheting since 1971. New to cable stitch though. Fairly new, that is.
Love this pattern..thank you so
Awesome great for my needs. Thank you for the Pattern.
Thankyou very cute and useful gift for friends