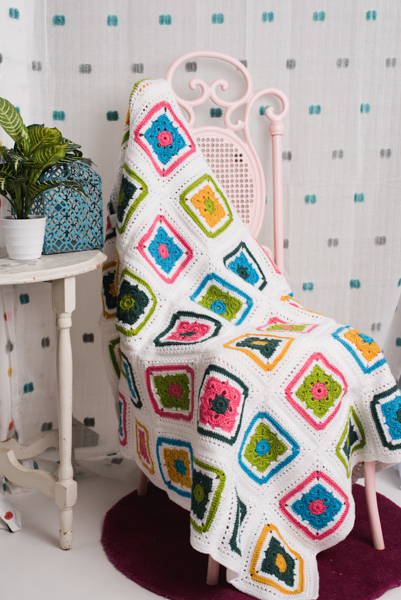
Sleep tight, sleep bright with this modern take on the granny square afghan. This soft and colorful blanket will bring spring warmth into your living room.
Skill Level: Intermediate
Size: Finished blanket 41” / [106 cm] x 53” / [136 cm], each square 6.7” / [17 cm] x 6.7” / [17 cm]
Gauge: 24 sts and 32 rows = 4” [10 cm]
Materials
 Yarn: Alize Extra (90% Acrylic, 10% Wool; 241 yards [220 meters]/100 grams): 55 White (A, 8 balls), 488 Dark Yellow (B, 1 ball), 117 Pistachio (C, 1 ball), 170 Candy Pink (D, 1 ball), 245 Turquoise (E, 1 ball), 156 Ivy (F, 1 ball)
Hook: US size 7 (4.5 mm)
Notions: Tapestry needle, scissors
Abbreviations
BL sl st– Slip stitch back loop only
BLsc – Single crochet back loop only
BLhdc – half double crochet back loop only
BLdc – double crochet back loop only
Pattern Notes
The blanket consists of 48 squares.
The squares are divided into 10 types (AA-AJ), which differ in color.
The following table lists the number of squares that should be made of each type and its color combination.
Each square consists of 3 colors:
Color 1- center circle and the frame of the flower
Color 2- the petals of the flower
Color 3- the blanket’s main color (color A)
Pattern
Rnd 1: With color 1, ch 5, form a ring with sl st into first ch.
Rnd 2: Ch 3 (counts as first dc), 19 dc into the ring, sl st to top of beg ch-3. Fasten off.
Rnd 3: Attach color 2 through back loop, (ch 5, BL sl st) in same st attached the yarn, BLsc in next st, ch 3, sk 2 sts, BLsc in next st, *(BL sl st+ ch 5 + BL sl st) in the same st, BLsc in next st, ch 3, sk 2 sts, BLsc in next st; rep from * 2 more times, sl st into first ch-5 loop.
Rnd 4: Ch 2, turn work to WS, sl st to ch-3 sp of previous rnd, turn back to RS, *5 dc in next ch-5 loop, ch 1, 5 dc into same ch-5 sp, sl st in ch-3 sp; rep from * twice more, 5 dc into next ch-5 sp, ch 1, 5 dc in same ch-5 sp, sl st in first sl st (in ch-3).
Rnd 5: Ch 4, sl st in first sl st (same st you finished with in previous rnd), BLsc in next 3 dc (make sure not to sk first dc), ch 3, sk next 2 dc, BLsc in ch-1 sp (gap), ch 3, sk next 2 dc, BLsc in 3rd dc and next 2 dc, *(BL sl st, ch 4, BL sl st) in same sl st, BLsc in next 3 dc (don’t skip first dc), ch 3, sk next 2 dc, BLsc in ch-1 sp, ch 3, sk next 2 dc, BLsc in 3rd dc and next 2 dc; rep from * twice more, sl st in first ch-4 loop.
Rnd 6: Ch 2, turn work to WS, sl st in last ch-3 sp of previous rnd (same as Rnd 4), turn back to RS, 8 dc in ch-4 loop, sl st in ch-3 sp, ch 3, sl st in BLsc, ch 3, *sl st in ch-3 sp, 8 dc in ch-4 loop, sl st in ch-3 sp, ch 3, sl st in BLsc, ch 3; rep from * twice more, sl st to first sl st of rnd. Fasten off.
Rnd 7: Attach color 3 through back loop of first dc, ch 3 (counts as first BLdc), BLdc in next 2 dc, 2 BLdc in next dc, ch 2, 2 BLdc in next dc, BLdc in next 3 dc, (dc, 3 hdc) in sp under 2 ch-3 sp of two previous rnds, (3 hdc, dc) in next sp, *BLdc in next 3 dc (don’t skip first st), 2 BLdc in next dc, ch 2, 2 BLdc in next dc, BLdc in next 3 dc, (dc, 3 hdc) in sp under 2 ch-3 sp of 2 previous rnds, (3 hdc, dc) in next sp; rep from * twice more, sl st to top of beg ch-3. Fasten off.
Rnd 8: Attach color 1 through back loop of top beg ch-3, ch 3 (counts as first BLdc), BLdc in next 4 sts, *(2 dc, ch 2, 2 dc) in ch-2 sp, BLdc in next 18 sts; rep from * twice more, (2 dc, ch 2, 2 dc) in ch-2 sp, BLdc in next 13 sts, sl st to top of beg ch-3. Fasten off.
Rnd 9: Attach color 3 through back loop of top ch-3, ch 2 (counts as first BLhdc), BLhdc in next 6 sts, *(2 hdc, ch 2, 2 hdc) in ch-2 sp, BLhdc in next 22 sts; rep from * twice more, (2 hdc, ch 2, 2 hdc) in ch-2 sp, BLhdc in next 15 sts, sl st to top of beg ch-2.
Rnd 10: Ch 2 (counts as first hdc), ch 1 (counts as gap), sk next st, hdc in the next st, (ch 1, sk next st, hdc in next st) in next 6 sts, *(2 hdc, ch 2, 2 hdc) in ch-2 sp, (ch 1, sk next st, hdc in next st) in next 26 sts; rep from * twice more, (2 hdc, ch 2, 2 hdc) in ch-2 sp, (ch 1, sk next st, hdc in next st) in next 16 sts, ch 1, sk next st, sl st to top of beg ch-2.
Rnd 11: Ch 3 (counts as first dc), dc in next 10 sts until ch-2 sp, (Note: you need to dc in ch-1 sp and in next dc all the way and then dc in next 2 dc), *(2 dc, ch 2, 2 dc) in ch-2 sp, dc in next 30 sts; rep from * twice more, (2 dc, ch 2, 2 dc) in ch-2 sp, dc in next 19 sts, sl st to top of beg ch-3. Fasten off.
Finishing
Assembly
Place the squares with 6 squares horizontally and 8 vertically.
With right sides held together (wrong side facing you), work through outer loops only, sl st squares together with color A.
Work horizontal rows and then vertical rows. When you’re done with last vertical row, don’t fasten off, you’ll continue the border from this point.
Border
Working on the right side, BL sl st in the next ch-1 sp (belongs to the left square corner), ch 1 (counts as first BLsc), BLsc along the blanket. When you reach a corner (ch-2 sp), BLsc in first ch-1 sp, ch 1, BLsc in 2nd ch-1 sp. Cont BLsc and work corners accordingly all around, sl st to top of beg ch-1 sp.
Fasten off.
Weave in all ends.
https://www.instagram.com/p/Bob9zc7liXf/?utm_source=ig_web_button_share_sheet


