


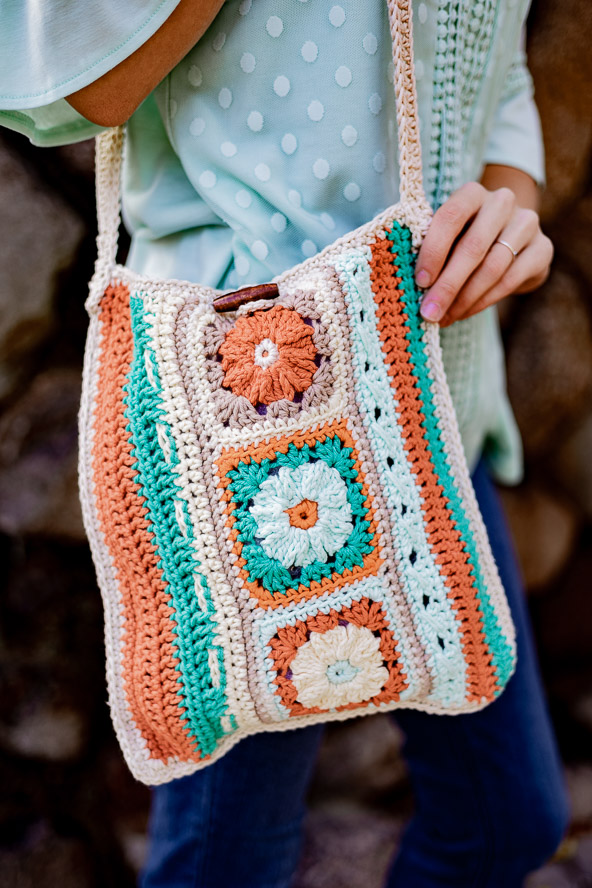
Libbie is a small shoulder bag that can be completed in a weekend. Made of two sides of the same basic design, the panels are joined on three sides and the top is edged in single crochet. The design of the bag is a strip of three granny squares with textured flowers and rounds. Along both sides of the granny strip are rows made of a variety of stitches to keep you interested. Finishing touches include a loop and wood toggle button closure and a crocheted shoulder strap sewn to the bag sides.
Time: Weekend Project
Skill Level: Easy
Size: Finished bag is approximately 10.5” x 12” (not including strap)
Gauge: Granny square approximately 3” x 3”
 Yarn: Cascade Yarns Nifty Cotton (100% Cotton, 185 yds [69.5 m]/100 g [3.5 oz.]:
1 Orange (CC1, 1 skein), 9 Buff (CC2, 1 skein), 10 Soft Yellow (CC3, 1 skein), 12 Mint (CC4, 1 skein), 31 Sea Green (CC5, 1 skein), 33 Toasted Almond (CC6, 1 skein), 35 Terra Cotta (CC7, 1 skein).
Hook: G/6-4.00mm crochet hook
Notions:
Tapestry needle
Scissors
Special Stitches
Cross Over Stitch – skip one stitch, 1 dc in each of next 3 stitches, working in front of previous 3-dc work dc in skipped stitch
Notes:
- Read all the pattern instructions before starting.
- Count stitches in each round or row.
- Turning chain does not count as a stitch unless indicated.
Color Scheme:
Square 1 – CC3, CC5, CC4, CC6
Square 2 – CC2, CC7, CC6, CC3
Square 3 – CC7, CC6, CC2, CC7
Square 4 – CC5, CC1, CC3, CC5
Square 5 – CC1, CC4, CC5, CC1
Square 6 – CC4, CC3, CC7, CC4
Granny Panel Bag Pattern
Granny Squares (make 6 squares according to the color scheme)
With first color, ch 3, join with sl st to first ch.
Rnd 1: Ch 1 (does not count as stitch), 8 sc into circle. Join with slip stitch to first sc. (8 sc)
Fasten off.
Rnd 2: Attach 2nd color, *ch 3, dc, tr, dc, ch 3, sl st in same st. Sl st into next st*. Repeat from * to * 7 more times. (8 petals)
Fasten off.
Rnd 3: Attach 3rd color to the top of any tr. Ch 2 (counts as hdc), (2 hdc, ch 1, 3 hdc) in the same stitch as ch-2 (corner made), 3 hdc in next tr. [(3 hdc, ch 1, 3 hdc) in the top of the next tr, 3 hdc in top of next tr] 3 times. Join with sl st to the top of ch-2. (12 clusters)
Fasten off.
Rnd 4: Attach first color to any stitch with sl st, ch 1, and sc in each st and ch-1 sp around. (10 stitches each side, 40 sts).
Fasten off.
Make Granny Panel
- Sew 3 squares together with CC2 – see order in graph below.
- With CC2, sc around large piece of 3 squares with 3 sc in each corner.
- Repeat steps #1 and 2 with 2nd panel of 3 squares.
1st Side Panel
Row 1: With right side of a Granny Panel facing you, attach CC6 in bottom-right corner to work up one long side, ch 1, sc in each stitch across, turn. (41)
Fasten off.
Row 2: Attach CC4, ch 1, sc in each stitch across, turn. Do not fasten off.
Row 3: Ch 2 (counts as a dc here and throughout), dc in next st, loosely complete Cross Over Stitch 9 times, dc in last 3 stitches, turn. Do not fasten off.
Row 4: Ch 1, sc in each stitch, turn.
Fasten off.
Row 5: Attach CC7, ch 2, dc in each stitch, turn. Do not fasten off.
Row 6: Ch 1, hdc across, turn.
Fasten off.
Row 7: Attach CC5, ch 1, hdc in each stitch across, turn.
Row 8: Ch 1, hdc in each stitch across.
Fasten off and weave in ends.
2nd Side Panel
Row 1: With right side of a Granny Panel facing you, attach CC6 in top left corner of granny strip to work down long side, ch 1, sc in each stitch across. (41)
Fasten off.
Row 2: Attach CC3, ch 1, hdc in each stitch across, turn. Do not fasten off.
Row 3: Ch 1, hdc across, turn.
Fasten off.
Row 4: Attach CC5, ch 2, dc in next st, [3 FPdc, 3 BPdc] 6 times, dc in last 3 stitches, turn. Do not fasten off.
Row 5: Ch 1, hdc in each stitch across.
Fasten off.
Row 6: Attach CC7, ch 2, dc in each stitch across, turn.
Row 7: Ch 2, dc in each stitch across, turn.
Row 8: Ch 1, sc in each stitch across, turn.
Row 9: Ch 1, sc in each stitch across.
Fasten off and weave in ends
Repeat adding first and second Side Panel to second Granny Panel.
Finishing
- With right side of one panel facing you, attach CC2 to any stitch and sc in each stitch around with 3 sc in each corner. Fasten off.
- Repeat step 1 with 2nd
- Block both pieces.
- With the wrong sides of each piece together, attach CC2 in the top left corner join the 2 pieces together with a sc in each stitch and sc in each corner. Join 3 sides, but not the top edge. Be sure to get both loops of each sc. Do not fasten off.
- After you join 3 sides, ch 1, sc in each of the stitches around the top of the bag to the center of the other side of the bag. Ch 15, attach loop with sc in the next st, sc in the remaining sts, sl st to first sc. Fasten off and weave in ends.
- Attach button in center of first side as shown in picture.
Strap
With CC2, ch 130 or desired length. Leave a 12-inch tail at beginning of chain.
Row 1: Hdc in each ch across, turn.
Row 2: Ch 1, (sc, skip 1, ch 1) across, turn.
Row 3: Ch 1, sc in each stitch and ch-1 sp across.
Fasten off leaving a 12-inch tail, and weave in ends.
Attach ends of strap on each side of the bag with tapestry needle and long tails.
What a lovely idea have to try it thank you
This granny square purse will probably be the first item I make since joining today. I love granny squares and the colors are awesome. So happy I found you and joined.
I am going to have to make this. I love the granny square panels – have already got the yarn so it could happen this weekend. Thanks for the lovely pattern. I can feel a crochet session coming on.