


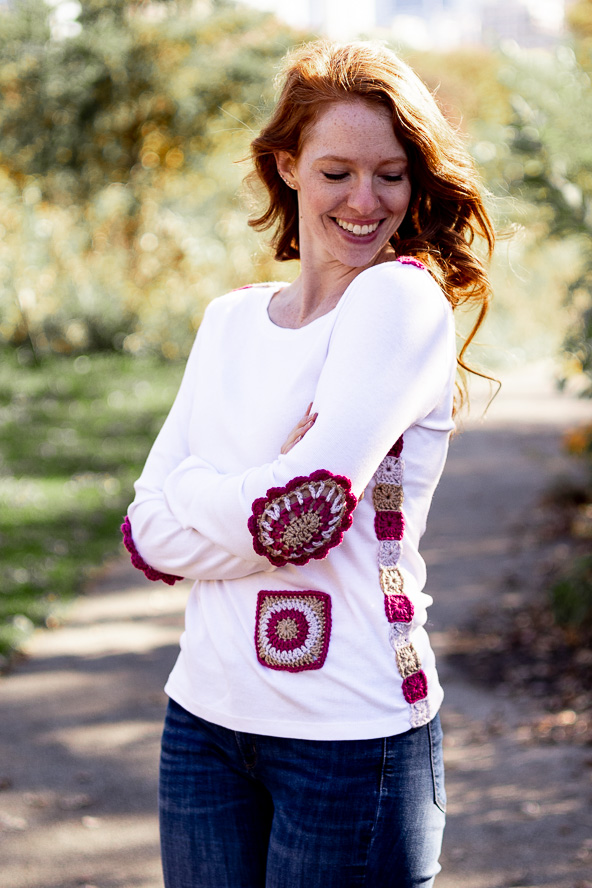
Add some crochet accents to a long sleeve tee to create this eye-catching beauty. Crochet motifs are hand stitched over sections of a long-sleeve tee and then the fabric is cut away for a lacy effect. You can add these crochet seams (and elbows and pocket) to any size tee for a perfectly customized look.
Time: Weekend Project
Skill Level: Easy
Size: Made to fit to any long sleeve tee – Any size you want!
Gauge: 1 small square = 1.5 x 1.5 in (3.8 x 3.8 cm)
Materials
 Yarn: Universal Yarn Uptown DK (100% Anti-pilling acrylic; 273 yards [250 meters]/100 grams): 120 Sahara (Color A, 1 ball), 104 Bashful (Color B, 1 ball), 148 Orchid (Color C, 1 ball)
Hook: US size H/8 (5.0 mm)
Notions: tapestry needle, long sleeve tee, sewing needle, sewing thread to match tee, straight pins
Special Stitches
Double Chain 2 (dch2): Double Chain 2 (dch2): Insert hook in st, yo, pull up a loop (2 loops on hook), yo, pull through both loops, there are 2 vertical loops coming off the loop on the hook, insert hook in the loop farthest from the hook, yo, pull up a loop (2 loops on hook), yo, pull through both loops.
Back Stitch: With sewing thread, sew up through fabric about 1/8 inch past where stitching should start, sew down where stitching should start, *sew up about 1/8” past end of last stitch, sew down at end of last stitch; repeat from * across. The top of the backstitch is short stitches one directly after the other, the back has the thread overlapping.
Whip Stitch (to encase a cut edge): With sewing thread, *sew through fabric under the cut edge picking up about 1/8 inch of the fabric below the cut edge, move over 1/8”; repeat from * encasing the cut edge in the whip stitches.
Pattern
Construction Steps
1. Measure the following seams:
a. Shoulder seam from neck band to sleeve cap.
b. Side seam from underarm to bottom of tee.
2. Determine how many squares it will take to cover each seam. Examples:
a. Sample shoulder seams measure 3.25 in.
i. Math: length of seam divided by size of square = number of squares needed. Sample 3.25 / 1.5 = 2.17
ii. Any number with a decimal lower than .7 should round down, the rest should round up.
iii. Therefore, in the sample the shoulder seams need 2 squares each.
b. Sample side seams measure 17 in.
i. Math: length of seam divided by size of square = number of squares needed. Sample 17 / 1.5 = 11.33
ii. Any number with a decimal lower than .7 should round down, the rest should round up.
iii. Therefore, in the sample the side seams need 11 squares each.
3. Make the crochet strips for the shoulder and side seams in the following manner.
a. Make one small square in first color and weave in all ends.
b. Make another small square in second color, do not weave in ends.
i. Use yarn end at end of Rnd 1 to seam one side of second square to one side of first square.
ii. Weave in ends
c. Continue making squares, changing color each time and seaming each square to the previous square, until strip is the pre-determined number of squares long.
4. Make 1 medium square for pocket.
5. Make 2 patches for elbows.
6. Sew crochet to tee.
a. Shoulder seams:
i. Pin one shoulder seam strip over one shoulder seam, with the seam in the center of the strip. It’s ok to pull and stretch the crochet a bit to get the ends to line up with the neck band seam and the shoulder seam.
ii. Back stitch the crochet to the tee just below the front loop of each stitch, or machine sew the crochet to the tee just below the front loop.
iii. Repeat with other shoulder seam.
b. Side seams:
i. Pin one side seam strip over one side seam, with the seam in the center of the strip. It’s ok to pull and stretch the crochet a bit to get the ends to line up with the under-arm seam and the bottom of the tee.
ii. Back stitch the crochet to the tee just below the front loop of each stitch, or machine sew the crochet to the tee just below the front loop, do not sew the bottom end of the crochet to the bottom of the tee.
iii. Repeat with other side seam.
c. Elbow patches:
i. Pin one elbow patch to the elbow of one sleeve. This may require trying on the tee, in which case safety pins will keep you from being poked.
ii. Back stitch the crochet to the tee just below the front loop of each stitch, or machine sew the crochet to the tee just below the front loop.
iii. Repeat with other elbow patch, taking care to place it in the same spot as the first on the other sleeve.
d. Pocket:
i. Pin pocket to desired spot. This may also require trying on the tee to see what you like.
ii. Back stitch the sides and bottom of the crochet pocket to the tee just below the front loop of each stitch, or machine sew the crochet to the tee just below the front loop. Make sure to leave the top un-sewn so the pocket is useable
7. With a sharp pair of small scissors, trim away the fabric underneath the crochet seam strips and elbow patches (NOT the pocket), leaving ¼ inch of fabric from the stitching line.
8. For added stability and a finished look, sew around (encase) the cut edge of the fabric on the inside of the shirt with a whip stitch.
Small Squares
Rnd 1: Ch 4, sl st to first ch made to form a ring, dch2, ch 2, [3 dc in ring, ch 2] 3 times, 2 dc in ring, sl st to top of dch2. (3 sts on each side)
Cut yarn leaving 10” end for joining, weave in starting end.
Pocket – make 1
Rnd 1: With Color A ch 4, sl st into first ch made to form a loop, dch2, 11 dc into loop, sl st to top of dch2 to join. (12 sts)
Rnd 2: With Color B (dch2, dc) in first st, 2 dc in each st around, sl st to top of dch2 to join. (24 sts)
Rnd 3: With Color C (dch2, dc) in first st, dc in next st, [2 dc in next st, dc in next st] 11 times, sl st to top of dch2 to join. (36 sts)
Rnd 4: With Color A work entire Rnd in back loop only dch2, ch 2, [2 dc in next st, hdc in each of next 2 sts, sc in each of next 3 sts, hdc in each of next 2 sts, 2 dc in next st, ch 2] 3 times, 2 dc in next st, hdc in each of next 2 sts, sc in each of next 3 sts, hdc in each of next 2 sts, dc in next st, sl st to top of dch2 to join. (44 sts)
Rnd 5: With Color B sl st in ch-2 sp, ch 3, sc in same ch-2 sp, [sc in each of next 11 sts, (sc, ch 2, sc) in ch-2 sp] 3 times, sc in each of next 11 sts, sc in ch-2 sp, sl st to first ch of beginning ch-3 to join. (52 sts)
Fasten off then weave in all ends.
Elbow Patches – make 2
Rnd 1: With Color A ch 6, 5 dc in 3rd ch from hook (skipped chs count as first dc), dc in each of next 2 chs, 6 dc in next ch, work back in other direction, dc in unworked loops of each of next 2 chs, sl st to top of beg ch-3. (16 sts)
Rnd 2: With Color B, ch 4 (counts as first dc and ch 1 here and throughout), [dc in next st, ch 1] 6 times, skip one, [dc in next st, ch 1] 7 times, skip one, sl st to 3rd ch of beginning ch-4 to join. (14 sts)
Rnd 3: With Color C sl st in next ch-1 sp, ch 4, dc in same sp, [ch 1, dc in next ch-1 sp, ch 1, (dc, ch 1, dc) in next ch-1 sp] 2 times, ch 1, [dc in next ch-1, ch 1] 2 times, [(dc, ch 1, dc) in next ch-1 sp, ch 1, dc in next ch-1, ch 1] 3 times, dc in next ch-1, ch 1, sl st to 3rd ch of beginning ch-4 to join. (20 sts)
Rnd 4: With Color A ch 1, *2 sc in next ch-1, [3 sc in next each of next 2 ch-1 sps, 2 sc in next ch-1 sp] 2 times, 3 sc in next ch-1 sp, 2 sc in next ch-1 sp, 3 sc in next ch-1 sp; repeat from * one more time. (52 sts)
Rnd 5: With Color B sl st in first st, [ch 1, skip 1, 5 hdc in next st, ch 1, skip 1, sl st in next st] 13 times. (13 scallops)
This is also a great idea for those of us who “outgrow” our tops as we age and add a few inches. Thank you for this idea.