


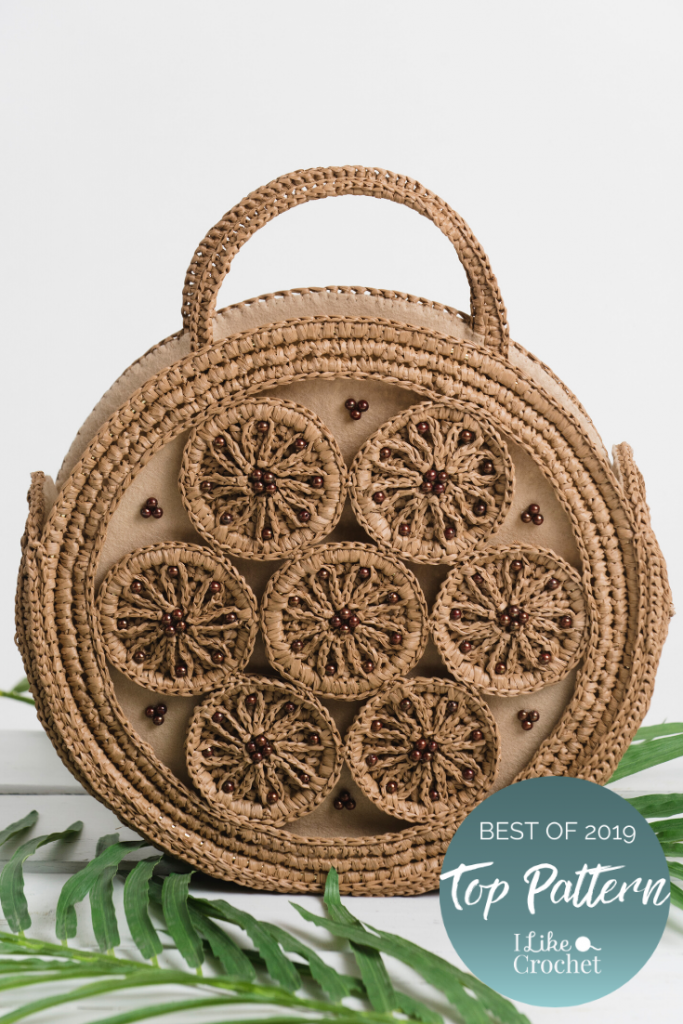
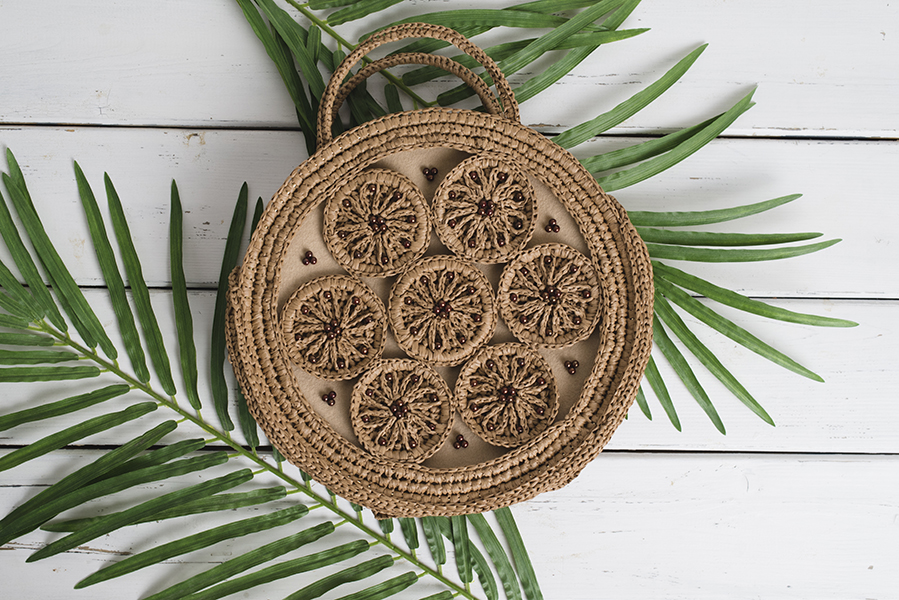
A unique shape, construction and stitching techniques make this a stunner of a bag. Worked in raffia with delicate bead accents, you’ll love bringing this bag along on all your summer holidays — whether they’re far away destinations or local staycations, this bag will turn heads wherever you go.
Skill Level: Intermediate
Size: 4.25” wide x 13” deep, excluding handles
Gauge: 1 motif = 3.25”
Materials
Yarn: Paper Mart Raffia Ribbon (1/4” wide x 100 yds per spool): #00 Kraft, 6 spools from www.papermart.com
Hook: US size F/5 (3.75 mm)
Notions: Pepperell Brass Plated Metal Rings: 21- #R3M 3” diameter; 2- #R6M 6” diameter and 2- #R12M 12” diameter from www.Pepperell.Com
Lima Beads Czech Glass Dark Opaque Red Bronze Picasso Round 6mm bead, 6- 11” strands from www.limabead.com
National Nonwovens TOY002 Wool Felt #615 Champagne, 1 yd x 36” wide from www.nationalnonwovens.com
Sulky #12 weight cotton thread #1128 Dk. Ecru from www.sulky.com
18 small safety pins, scissors, small eye hand sewing needle, clear nylon thread, tapestry needle, stitch marker
Special Stitches
Foundation Single Crochet (fsc): Beg with ch 2, insert hook in 2nd ch from hook, yo, pull up lp (this is the base ch for the first foundation sc), yo, pull through 1 lp on hook, yo, pull through both lps on hook to complete as a single crochet (first fsc made). *Insert hook into base ch of last fsc made, yo, pull up lp (base ch), yo, pull through 1 lp on hook, yo, pull through both lps on hook to complete as 2nd fsc; rep from * for each additional fsc.
Faux Piping: Working over sts of previous rnd, insert hook in same st at base of indicated sts, yo, pull up lp, yo, pull through all lps on hook to work over sts of previous rnd as a sc.
Double Slip Stitch (Dsl st): Insert hook in same place as last stitch made, yo, pull up lp, insert hook in next st, yo, pull through all lps on hook to complete as a slip stitch (1 dsl st made).
Front loop (frt lp): Front lp of a st is closest lp.
Back horizontal bar: Skip top 2 lps of indicated st, insert hook in next horizontal bar on back of st. (Also called 3rd bar)
Pattern Notes
Weave in ends as work progresses.
Join with a sl st unless otherwise noted.
Ch 2 at beg of rnds counts as a hdc.
Pattern
Motif (make 21)
Make a magic ring.
Rnd 1 (RS): Ch 1, 8 sc in magic ring, join to frt lp of first st. (8 sc)
Rnd 2: Ch 10, sl st in frt lp of first st and in each st around, join to back lp of same st at base of beg ch-10. (8 ch-10 lps)
Rnd 3: Working in back lps of Rnd 1 sts, ch 2, hdc in same st, 2 hdc in each st around, join to 2nd ch of beg ch-2. (16 hdc)
Note: Fold ch-10 lps forward and hold out of the way with thumb to see back lps more clearly to work next rnd.
Rnd 4: Ch 2, hdc in same st, hdc in next st, [2 hdc in next st, hdc in next st] around, join to top of beg ch-2. (24 hdc)
Rnd 5: Ch 2, hdc in same st, hdc in each of next 2 sts, [2 hdc in next st, hdc in each of next 2 sts] around, join to 2nd ch of beg ch-2. (32 hdc)
Rnd 6: Ch 1, place ring behind work, insert hook in first st and under ring, yo, pull up lp, yo and draw through both lps on hook to complete as a sc, working in same manner, sc in each st around, join to first st. (32 sc)
Rnd 7: Working faux piping over sts of last rnd, ch 1, [insert hook through first ch-10 lp making sure lp is not twisted, insert hook in first st, yo and complete as a sc] twice, sc in each of next 3 sts, * [insert hook through next ch-10 lp and in next st, yo and complete as a sc] twice, sc in each of next 3 sts; rep from * around, join to first st. (40 sc)
Fasten off.
Beading: Referring to photo as placement guide, use sewing needle and double strand of clear nylon thread to sew 12 beads to each motif.
Bag Border (make 2)
Rnd 1: Work 110 fsc, join to top of first st to form a ring.
Rnd 2: Ch 1, work Faux Piping st over each st around, join to first st. Divide last rnd into 8 equal sections and place a stitch marker between each section.
Rnd 3: Ch 1, sc in each st around, increasing 1 sc at each marker. (118 sc)
Rnd 4: Ch 1, work faux piping st over each st around. Divide last rnd into 10 equal sections and place a stitch marker between each section.
Rnd 5: Using 12” ring, rep Rnd 6 of motif to work sc sts around ring, increasing 1 st at each marker. (128 sc)
Rnd 6: Working faux piping over sts of last rnd, ch 1, work 1 sc over each st around.
Fasten off.
Handle (make 2)
Rnd 1: With sl knot on hook and working sts with a looser tension, [insert hook through 6” metal ring, yo, pull up lp and complete as a sc] 90 times, join to first st, making sure sts are not twisted. (90 sc)
Rnd 2: Fold tops of rnd 1 sts to WS and downward until rnd is upside down on ring having bottom of stitches along top edge of ring. Inserting hook under ring and in space between sts of rnd 1, work 1 sc between each st along top edge of ring, join to first st.
Fasten off.
Note: If hook is difficult to insert between sts, slide sts apart slightly to widen space between sts before inserting hook.
Gusset Border (make 1)
Rnd 1: With 2 strands raffia, ch 255, join to form a ring, making sure sts are not twisted.
Rnd 2: Ch 2, hdc in each ch around, join to first hdc of rnd.
Rnd 3: Ch 2, turn to WS, flip bottom edge of foundation ch of Rnd 1 upward until foundation ch is RS facing and even with top of beg ch-2. Rem lp from hook, insert hook in ch at base of beg ch-2 of Rnd 1, return lp to hook and pull through lp on hook to join. Do not fasten off, set aside. (255 hdc)
Finishing
Assembly
- Place 6 motifs around 1 center motif on a flat surface. Place safety pins in edges where motifs meet. Use tapestry needle and raffia to whipstitch the closest lps of 1 st on each side of pins to form motif Unit.
- Place Unit inside Bag Border on a flat surface with RS facing. Place safety pins where Unit edges meet foundation ch of rnd 1 of Bag Border. Working in opposite edge of foundation ch, sl st join raffia to any ch, sl st in each ch of Bag Border to within 1 ch of first pin, [insert hook into next foundation chain, insert hook in closest adjacent lp of first motif st, yo and complete as a loose sl st] rep approx 2-3 times until sts of same motif and foundation ch of Bag Border no longer meet, *sl st in each ch to within 1 ch of next pin, insert hook into next ch, insert hook in closest adjacent lp of next motif, yo and complete as a loose sl st] rep approximately 2-3 times until sts of same motif and foundation chain no longer meet; rep from * around, join to first sl st (first Bag Panel completed). Rep to sl st opposite side of rem Bag Border and motif Unit together for 2nd Bag Panel.
- Arrange and pin 8 motifs in a horizontal line on a flat surface with side edges touching. Use tapestry needle and raffia to whipstitch 2 closest adjacent loops that meet on each side of motifs to form Gusset.
- Place Gusset inside Gusset Border on a flat surface with RS facing, pin and sl st in same manner as in step 2 of assembly, easing sts at ends where necessary to lie flat, to complete Gusset.
- From felt, use scissors to cut a 27” x 4” rectangle for gusset lining, curving ends to correspond to rounded short ends of gusset. Center lining on WS of gusset and pin in place with safety pins. Use dk. ecru thread and needle to whipstitch lining edges to back horizontal bar of each hdc of Gusset.
- Place Bag Panel WS facing on a flat surface, lay top edge of handle WS up 3” above top edge of Panel and making sure remainder of handle is hidden behind top 2 motifs of unit and cannot be seen from RS. Use tapestry needle and raffia to sew both side edges of handle to WS of Panel.
- 7. Cut a 12.25” circle from felt for Bag lining. Center and pin lining circle to WS of Panel and use dk ecru to whipstitch in place. Rep to line 2nd Panel.
- Using photo for bead placement guide, use a double strand of clear thread and needle to sew a triangle shape of 3 beads to open areas of lining around motifs of both Panels.
- Find center on each short end of Gusset and place a safety pins in 12th stitch on each side of center. With handle centered at top edge of Panel, center long edge of Gusset to outer edge of Panel and beginning and ending with marked sts, use safety pins to pin into position. With RS of Panel, sl st join raffia to marked 12th st of Gusset and corresponding st of Bag, work Dsl st in each st, easing sts of Gusset where necessary, ending in next marked 12th st at opposite end of Gusset. Repeat to add 2nd Panel to Gusset.
I have some leftover Raffia from a hat I made and this will go perfectly. What a beautiful design. I have just started the project and it is going well. The directions are easy to follow.