


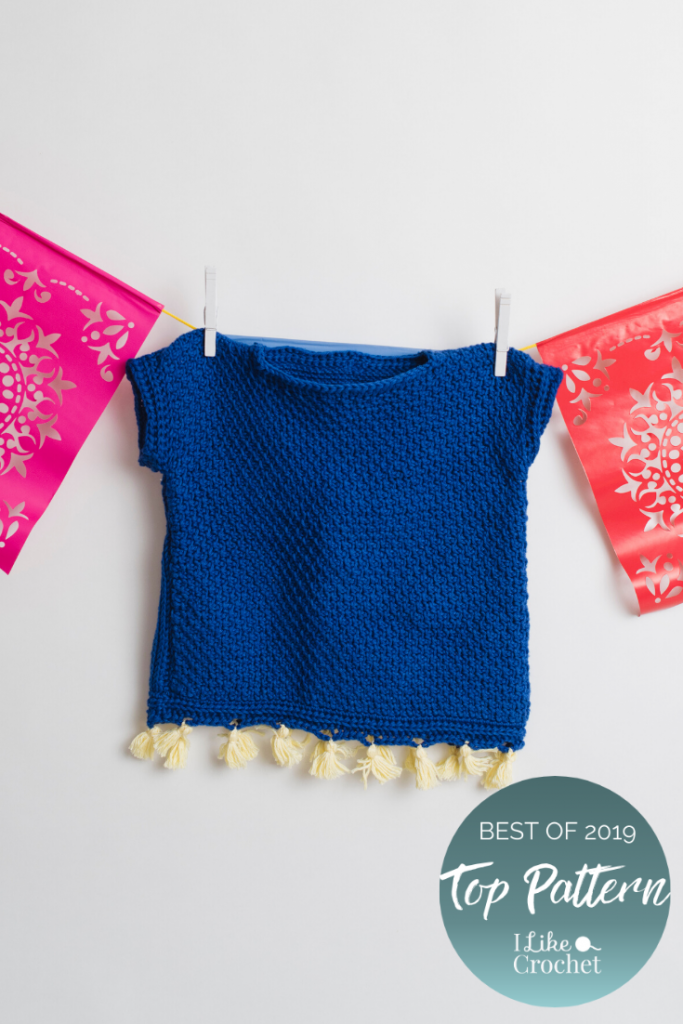
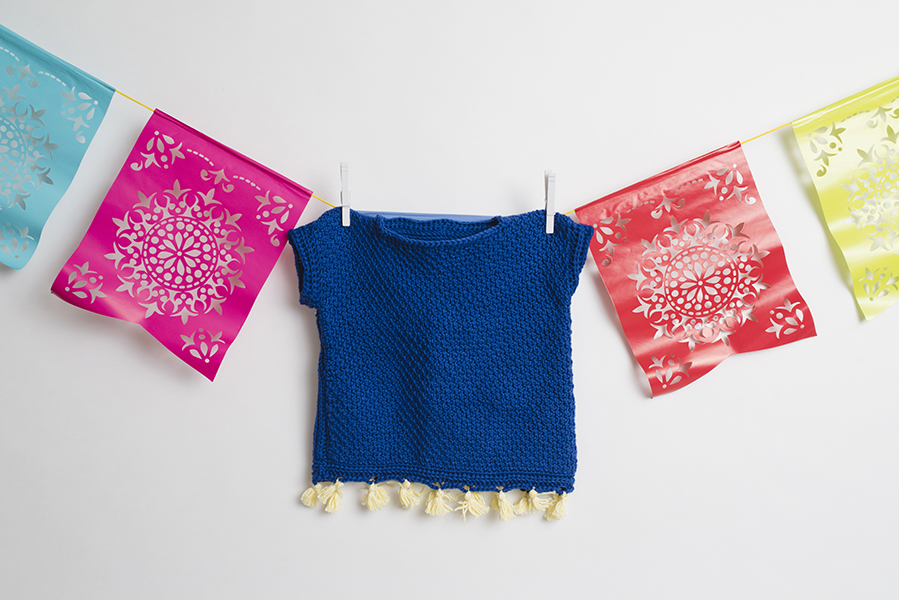
Tunisian stitches are the star of this cute little tee. Embellish your own with flowers, tassels or enjoy it plain! A basic understanding of Tunisian crochet is necessary to complete this pattern. It is written in a made-to-measure style, meaning you can use any hook or yarn weight and can come to any gauge you like. Just follow the included measurements and your fit will come out right!
Skill Level: Intermediate
Sizes: 2 (4, 6, 8, 10)
Gauge: Is not crucial to this pattern. Instead you will be working to included measurements.
Materials:
- 250-950 yards of yarn of your choice. Recommended: worsted weight cotton.
- Tunisian crochet hook with a cable of your choice
- A crochet hook sized larger than your Tunisian hook
- Measuring and sewing notions
- Optional beads or buttons
Special Stitches
Standard Return Pass (srp): Ch 1, yo, pull through 2 across until 1 lp rem on hook.
Yarn Over Slip Stitch (yoss): Yo, insert hook into st, pull up a lp, pull it through both lps on hook.
Picot: Ch 3, sl st in 3rd ch from hook.
Pattern Notes
Sweater is worked flat from the bottom up, then the pieces are seamed together with the sleeves, trim, collar and embellishments added last.
When measuring your starting chain, do NOT pull or stretch your chain in any way. Just lay it flat.
Follow the measurements for the size you want using the chart below.
Pattern
Front Panel
Make a ch that measures your Starting Width measurement. Make a note of how many chs this requires so you can replicate it exactly for Back Panel.
Row 1: Starting in the second ch from the hook, pick up a lp in each ch across.
After every row, you will be doing a srp.
Row 2: *Tss, tps; rep from * across.
Row 3: Thc across.
Rep Row 3 until Front Panel reaches Front Panel Length measurement. Do NOT fasten off.
Right Shoulder (right side of panel facing you)
Row 1: Thc until you’ve reached your Shoulder Width measurement leaving the rest of the sts unworked. Make note of how many lps you worked so you can replicate them exactly for your left shoulder.
After every row, you will be doing a srp.
Rep Row 1 until just the shoulder flap measures 1” high.
Last Row: Tbo.
Left Shoulder (right side of panel facing you)
From the left side of panel, count back an identical number of stitches that matches your Right Shoulder and pull up a lp.
Row 1: Thc across.
After every row, you will be doing a srp.
Rep Row 1 until just the shoulder flap measures 1” high.
Last Row: Tbo.
Note: You will notice that the stitches in the center of your front panel have not been properly bound off. That is nothing to worry about. You will bind them off when you add your neck trim.
Back Panel
Make a ch that is the same length you made for your Front Panel.
Row 1: Starting in the second ch from the hook, pick up a lp in each ch across.
After every row, you will be doing a srp.
Row 2: Tks across.
Rep Row 2 until panel reaches Back Panel Length measurement.
Last Row: Tbo.
Seaming
With RS of your Front Panel and Back Panel facing each other, seam the sides and tops as follows:
Step one: From the bottom of each side upward until your Armhole Depth measurement remains.
Armhole Depth Measurements:
- 2T = 4.25in
- 4T = 4.75in
- 6T = 5in
- 8T= 5.5in
- 10T=6in
Step two: From the top edge of each side inward.
See diagram below. Once seamed, turn garment right side out.
Arm Trim (make 2)
Using a hook that is at least 1 full hook size larger than your Tunisian hook, attach yarn to armpit area of your garment. Be sure to mark the first st of every rnd.
Rnd 1: Yoss evenly around your armhole, join with sl st. Ch 1, turn.
Rnd 2: Working in the BLO, yoss around, join with sl st. Ch 1, turn.
Rep Rnd 2 until Arm Trim is about 1-1.5” long.
Fasten off.
Neck Trim
Using the same hook you used to make your arm trim, attach yarn to back of your neckline. Be sure to mark the first st of every rnd.
Rnd 1: With a loose tension, yoss evenly around your neckline. When you get to the part of your Front Panel that was never finished off, drop down and yoss in the tbo style, join rnd with sl st. Ch 1, turn.
Rnd 2: With a loose tension and working in the BLO, yoss around, join with sl st.
Fasten off.
Bottom Trim
With the same hook you’ve been using for your arm/neck trim, attach yarn to any st along the bottom of your garment. Be sure to mark the first st of every rnd. Hint: I like to attach near one of the side seams.
Rnd 1: Sc in each st around, join with sl st. Ch 1, turn.
Rnd 2: Working in the BLO, yoss around, join with sl st. Ch 1, turn.
Rep Rnd 2 until Trim is 1-1.5” long or until desired size.
Note: If you do NOT want tassels, fasten off. If you DO want tassels, do NOT fasten off. Instead proceed to the ‘Tassels’ portion of this patt.
Adding Tassels
Row 1: *Working in BLO, ch 3, sk 2, Yoss 4-5 times (about 1” worth of sts); rep from * around; join with sl st.
Fasten off.
Attach Tassels to ch-3 sps using method of your choice.
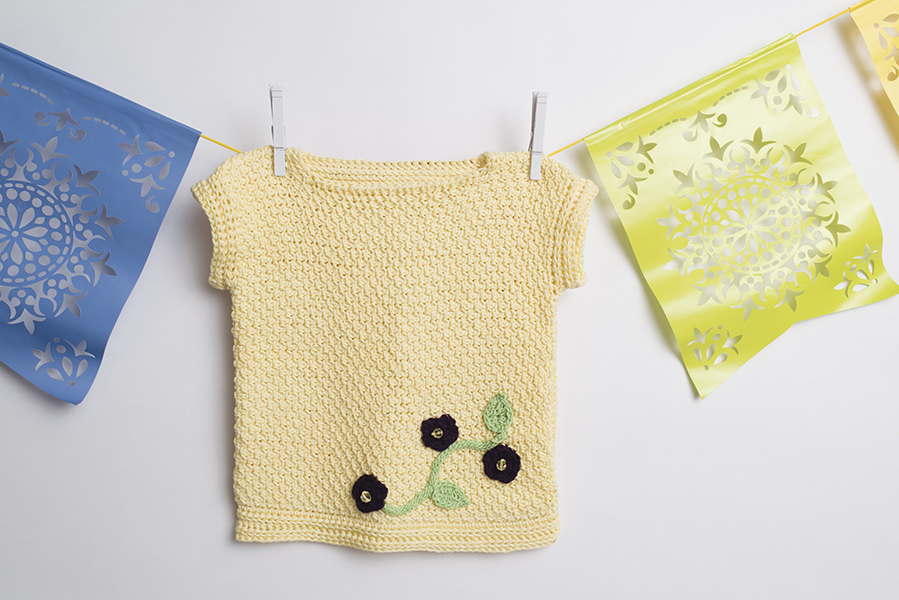
Embellishments
Stem
Make a ch the desired length of your flower stem.
Row 1: Starting in the 2nd ch from hook, sl st in each ch across.
Fasten off.
Flower
Start with a magic circle. Alternatively, you can ch 3 and join to first ch to form a ring.
Rnd 1: *Sc, 2 dc, sc, sl st; rep from * 4 more times for a total of 5 petals.
Fasten off.
After flowers are sewn onto the garment, you can sew beads or buttons to act as the ‘center’ of each flower, if desired.
Leaf
Ch 6.
Rnd 1: Starting in the 2nd ch from hook, sc, hdc, dc 2. Place 4 dc in the last ch. Now you will turn and work your way across the opposite side of the chs: dc 2, hdc, sc, picot. Join with a sl st to the 1st sc. FO.
Finishing
Weave in any loose ends.
Sew on any embellishments, beads, and/or buttons.
Hi Rose there is a link on the right hand side under the green circle top patterns. Just click and it brings up the measurements
Hello, I’ve been up and down this pattern a few times and I’m not finding a measurements chart, the only measurements I see are for the arm holes. Is there a link I’m not seeing?
Hi Rose, I couldn’t find it at first either. Until I turned my phone to landscape viewing mode, to find an entire column of photos and info on the right side, that somehow weren’t visible when I viewed in portrait. Hope this helps you.
Hi Bee and Rose! I’m so sorry that the measurements were hard to find – especially on mobile devices! I’ve pasted the link here as well: https://www.ilikecrochet.com/wp-content/uploads/Tunisian-Tee-Party-Measurements.jpg
Happy crocheting!
Hi Pauline:
Here are some helpful video tutorials for the Tunisian stitches in this pattern:
Tunisian Simple Stitch (tss) : https://www.youtube.com/watch?v=H3OCOJ1VOnk
Tunisian Knit Stitch (tks) : https://www.youtube.com/watch?v=wL3FKTTtSWk
Tunisian Purl Stitch (tps) : https://youtu.be/-BOIRehttgM
Tunisian Honey Comb (thc): tss in each tps and tps in each tss across. I definitely recommend watching this video and paying close attention to the part where she discusses learning to ‘read’ Tunisian stitches. Video: https://www.youtube.com/watch?v=a4iZdvj-rvE
Tunisian Bind Off (tbs) : https://www.youtube.com/watch?v=RnXwN4Xx9qU
Standard Return Pass (srp): Ch1. Yo and pull through 2 across until 1 loop remains on hook.
Yarn Over Slip Stitch (yoss): Yo. Insert hook into st and pull up a loop and pull it through both loops on hook.
Picot: Ch3. sl st in 3rd ch from hook.
Please let me know if you have any other questions or concerns and I will be sure to help you asap. I hope you do post a picture of your completed top, I would love to see your work!
I’m having trouble with row 3 ‘thc’ Across what does this thc stand for.
Thank you for your comment. We’ve reached out to the designer for clarification and will post here when available. Thank you