


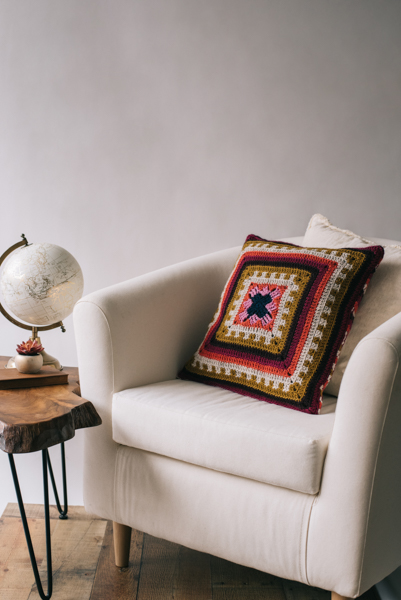
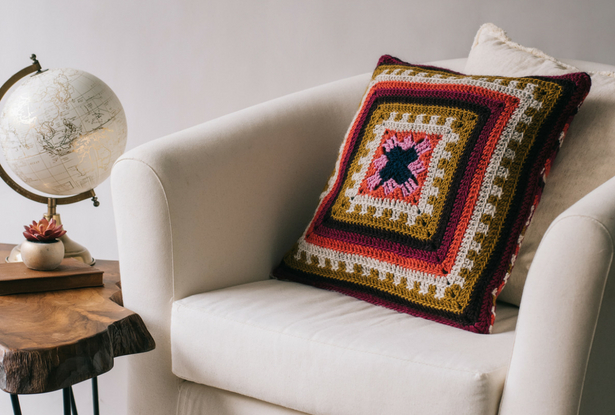
This kilim-inspired pillow is an excellent stashbuster and a great way to play with color. Besides being a colorful addition to the home, its double sided, meaning you can flip the pillow over for a fun, new look!
Skill Level: Intermediate
Size: 17” square
Gauge: 14 sts and 6.5-7 rows = 4” [10 cm] in dc after wet blocking.
Materials
 Yarn: Brown Sheep Lamb’s Pride Worsted (85% Wool, 15% Mohair; 190 yards [174 meters]/113 grams): M127 Navy Sailor (A, 1 skein), M105 RPM Pink (B, 1 skein), M153 Spice Bazaar (C, 1 skein), M01 Sandy Heather (D, 1 skein), M177 Olympic Bronze (E, 1 skein), M185 Aubergine (F, 1 skein), M23 Fuchsia (G, 1 skein).
Note: Colors A and B can be substituted with Colors F and G to reduce number of skeins purchased.
Hook: US size 7 (4.5 mm); H/8 (5.0 mm)
Notions: Safety pins, tapestry needle, 16” pillow form, four 1” or 1.25” buttons (buttons used in sample measure 1.18”).
Pattern Notes
It is recommended to line the pillow since a white purchased pillow form will show through if using same colors as sample or other dark colors.
Sample pillow used approx. 0.5-yard dark brown felt to make a simple pillow cover measuring approx. 16.5 x 16.5”.
Pattern
Front
With smaller hook and A, make magic ring.
Rnd 1: Ch 1, work 12 sc in ring, sl st in top of first sc. Pull tail end of magic ring tight.
Rnd 2: *Ch 4, tr in next 2 sc, ch 4, sl st in next sc; rep from * 3 more times, join with sl st to first sc. Fasten off.
Rnd 3: Join B with sl st in last ch-4 sp completed from previous rnd, *ch 4, 2 tr in ch-4 sp, sl st in top ch of ch-4 of previous rnd, ch 4, tr in next 2 tr, ch 4, sl st in sp between next 2 tr of previous rnd; rep from * 3 more times. Fasten off.
Rnd 4: Join C with sl st in last ch-4 sp completed in previous rnd, ch 1, *(sc, hdc, dc, tr) in same ch-4 sp, sc in top of next ch-4 from previous rnd, hdc in next tr, (dc, tr) in next tr, (sc, hdc) in top of next ch-4 from previous rnd, (dc, ch 2, dc) in next tr, (hdc, sc) in next tr; rep from * 3 more times, end with sl st in first sc. Fasten off.
Rnd 5: Join D with sl st in 2nd ch of any ch-2 corner, ch 3 (counts as first dc), dc in same st, *dc across next 14 sts, 2 dc in first ch of ch-2 corner sp, ch 2, 2 dc in next ch of ch-2 corner sp; rep from * 3 more times, ending with sl st in top of first dc after last ch 2. Fasten off. (18 dc across each side)
Rnd 6: Join E with sl st in 2nd ch of any ch-2 corner, ch 3 (counts as first dc), dc in same ch (changing to D with 2nd yo of dc), dc in back lp of next 2 dc (working over unused yarn per color section throughout) with D (changing to E with 2nd yo of last dc), dc in back lp of next 2 dc with E. Continue across working 2 dc through back lp for each color and working over unused yarn behind sts being worked to corner ending with D (change to E with 2nd yo of last dc). With E, work 2 dc in first ch of ch-2 corner, ch 2, 2 dc in 2nd ch of ch-2 corner (changing to D with 2nd yo of last dc). Continue around in this manner to last corner ending 2 dc in first ch of ch-2 corner with E, ch 2, sl st to first dc. Fasten off. (22 dc across each side)
Rnd 7: Join E with sl st in 2nd ch of any ch-2 corner, ch 3, dc in same ch, dc in back lp of next dc and across, *(2 dc in first ch of ch-2 corner, ch 2, 2 dc in second ch of ch-2 corner), dc in next dc and across to next corner; rep from * twice more, ending with 2 dc in 2nd ch of ch-2 corner, ch 2, sl st in top of ch-3 at beg of rnd. Fasten off. (26 dc across each side)
Rnd 8: Rep Rnd 7 with F. (30 dc across each side)
Rnd 9: Rep Rnd 7 with G. (34 dc across each side)
Rnd 10: Rep Rnd 7 with C. (38 dc across each side)
Rnd 11: Rep Rnd 7 with D. (42 dc across each side)
Rnd 12: Rep Rnd 6 with E and D. (46 dc across each side)
Rnd 13: Rep Rnd 7 with E. (50 dc across each side)
Rnd 14: Rep Rnd 7 with F. (54 dc across each side)
Rnd 15: Rep Rnd 7 with G. (58 dc across each side)
Weave in ends.
Block 17” square.
Back
Panel A
With larger hook and D, ch 63.
Row 1 (RS): Change to smaller hook, dc in 4th ch from hook and each ch across, do not turn. Fasten off. (60 dc; first 3 ch at beg of row counts as first dc)
Note: All rows are worked on RS except for final slip stitch edging row.
Row 2 (RS): Join E with sl st in top of ch-3 at beg of previous row, ch 3, dc in back lp of each dc across row. Fasten off.
Rep Row 2 for all subsequent rows in following Color Sequence until 16 rows have been completed.
Color Sequence
Color D
Color C
Color D
Color E
Note: Final two rows are to reinforce edge and also to easily indicate which end will be at center under buttonband.
Row 17 (RS): Turn panel around to work across opposite side. With D, sl st in bottom of last dc completed in Row 1, ch 3, dc across, turn. (60 dc)
Row 18 (WS): Ch 1, sl st in first dc and each st across to end. Fasten off.
Weave in loose ends.
Block to 17” wide and 10.5” tall.
Panel B
With larger hook and F, ch 63.
Row 1 (RS): Change to smaller hook, dc in 4th ch from hook and each ch across, do not turn. Fasten off. (60 dc; first 3 ch at beg of row counts as first dc)
Row 2 (RS): Join G with sl st in top of ch-3 at beg of previous row, ch 3, dc in back lp of each dc across row. Fasten off.
Rep Row 2 for all subsequent rows in following color sequence until 14 rows have been completed.
Color Sequence
Color C
Color D
Color F
Color G
Row 15 (RS) (Buttonhole): Join C with sl st in top of ch-3 at beg of previous row, ch 3 (counts as first dc), dc in back lp of next 10 dc, (ch 2, sk 2 dc, dc in next 10 dc) 4 times, end with dc in last dc of previous row (4 buttonholes made). Fasten off.
Row 16 (RS): Join D with sl st at beg of row, ch 1, sc in first dc, (sc in back lp of next 10 dc, dc in next 2 ch) 4 times, ending with 11 sc in back lp of rem 11 dc, turn. (60 sc)
Row 17 (WS): Ch 1, sc in first sc and each st across to end, turn.
Rows 18-19: Rep Row 17.
Row 20 (RS): Ch 1, sl st in first sc and each st across to end. Fasten off.
Weave in ends.
Block to 17” wide and 9.5” tall.
Finishing
Place Panel B (RS) on top of Panel A (RS), lining up Buttonholes at center of pillow (8.5” from edge). Take care to position Panel A’s slip stich edging under Panel B so that all dc through back loops face the same direction. Mark areas for button placement. Sew on buttons. Button closed.
Tack Panels A and B together at corners where they overlap.
With WS together, pin front and back together. With back side facing and G, join with sl st in any corner dc of back panel and 2nd ch of any ch-2 corner of front panel, sl st across next 59 dc (the last st worked for the front panel will be the first ch of the ch-2 at the corner). Work one extra sl st at corner. Continue to slip stitch around all 4 sides with 1 extra sl st at each corner. Fasten off.
Note: There will be 60 sl sts (plus 1 sl st for the corner) on all 4 sides of the pillow. There will be approximately 30 stripe ends on both sides which require 2 sl sts in each stripe end.
When working over areas where Panel B overlaps Panel A, sl st in just Panel B and let Panel A slide behind where it is not tacked. This reduces bulk in the seam. The previously tacked corners will hold Panel A in place.
The final slip stitch seam is meant to mimic the raw simplicity of different kilim sections pieced together. If a more tailored edge is preferred (no exposure of the color changes where the stripes end), sl st with desired color across each striped section after the two back panels have been tacked together (60 sts for each side). This is also an easier way to put the pillow together since the front and back panels will have the same number of stitches to sl st tog.
Weave in loose ends.
Insert pillow form and button closed.
Thank you very much for all this fantastic patterns!
Marianne