


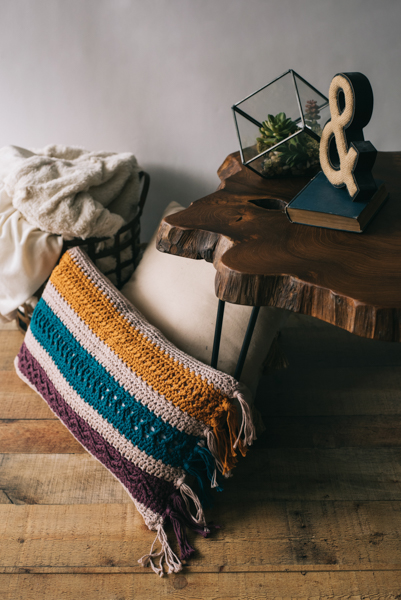
This pillow was inspired by traditional rug patterns. Using woven-like stitches, it features geometric patterns in three textured panels. To complete the look, the shorter sides are decorated with tassels and crocheted button closures.
Skill Level: Intermediate
Size: 12 / [30 cm] x 24” [60 cm] without Fringes (fits to IKEA Avsitklig pillow)
Gauge: 15 sts and 8 rows = 4” [10 cm] in hdc worked in BL only
Materials
 Yarn: Scheepjes Cahlista (100% Cotton; 93 yards [85 meters]/50 grams): #257 Antique Mauve (MC, 2 balls), #383 Ginger Gold (CC1, 2 balls), #401 Dark Teal (CC2, 2 balls), #394 Shadow Purple (CC3, 2 balls)
Hook: US size H/8 (5.0 mm)
Notions: Tapestry needle
Special Stitches
Join with sc in first st: Slip knot, insert hook in first st, yo, draw up a lp, yo, draw up both lps.
FPtr (front post treble crochet): Yo twice, insert hook from front to back to front again around post of st, yo, pull up a lp, (yo, draw through 2 lps) 3 times.
BPtr (back post treble crochet): Yo twice, insert hook from back to front to back again around post of st, yo, pull up a lp, (yo, draw through 2 lps) 3 times.
FPtr2tog (front post treble crochet 2 together): Yo twice, insert hook from front to back to front again around the post of first indicated st, yo, draw up a lp, (yo, draw through 2 lps) twice (2 loops remain on hook), yo twice, insert hook from front to back to front again around post of next indicated st, yo, draw up a lp, (yo, draw through 2 lps) twice (3 lps on hook), yo, draw though all 3 lps.
BPtr2tog (back post treble crochet 2 together): Yo twice, insert hook from back to front to back again around the post of first indicated st, yo, draw up a lp, (yo, draw through 2 lps) twice (2 lps remain on hook), yo twice, insert hook from back to front to back again around post of next indicated st, yo, draw up a lp, (yo, draw through 2 lps) twice (3 lps on hook), yo, draw though all 3 lps.
Pattern Notes
This pattern is worked flat.
The front and back of the cushion are worked separately then sewn together on three sides; on the forth side it is fastened with buttons.
The front loop is the loop closest to you; the back loop is furthest from you.
Resize button loop to your button.
Pattern
With MC, ch 86.
Row 1 (RS): Hdc in 3rd ch from hook, hdc in each ch across. (84 sts)
Row 2 (WS): Ch 2, turn, working in FL hdc in each st across.
Row 3: Ch 1, turn, sc in first st, *sc in next st, ch 1, sk next st; rep from * across to last st, sc in last st, do not turn. Fasten off MC.
Row 4: With RS facing without turning, join CC1 with sc in first st, *sk next st, ch 1, sc in next ch-1 sp; rep from * across to last st, sc in last st.
Row 5: Ch 2, turn, hdc in FL next 2 sts, *hdc in next ch-1 sp, hdc in FL next st; rep from * across.
Rows 6-7: Ch 3, turn, dc in first st, *sk next st, dc in next st, working behind last st made dc in skipped st; rep from * across to last st, dc in last st.
Row 8: Ch 2, turn, hdc in each sts across. Fasten off CC1.
Row 9: With RS facing, join MC with sc in first st, sc in next st, *sk next st, ch 1, sc in next st; rep from * across.
Row 10: Ch 2, turn, hdc in FL next st, *hdc in next ch-1 sp, hdc in FL next st; rep from * across to last st, hdc in FL last st.
Row 11: Rep Row 8. Fasten off MC.
Rows 12-13: With CC2, rep Rows 9-10.
Row 14: Ch 3, turn, dc in next st, sk next 2 sts, FPtr in next st, working behind last st made, dc in first skipped st, dc in next st, *sk next 2 sts after FPtr, FPtr in next st, working behind last st made, dc in first skipped st, dc in next st; rep from * across to last 2 sts, dc in last 2 sts.
Row 15: Ch 3, turn, dc in next 2 sts, sk next 2 sts, BPtr around next FPtr row below, working in front of last st made, dc in first skipped st, dc in next st, *sk next 2 sts after BPtr, BPtr around next FPtr row below, working in front of last st made, dc in first skipped st, dc in next st; rep from * across to last st, dc in last st.
Row 16: Rep Row 8. Fasten off CC2.
Rows 17-19: With MC, rep Rows 9-11. Fasten off MC.
Rows 20-21: With CC3, rep Rows 9-10.
Row 22: Ch 3, turn, dc in next 2 sts, sk next 3 sts, FPtr in 4th st, working behind last st made dc in 2nd skipped st, dc in next 4 sts, *working in front of work FPtr2tog as follows: work first leg in same st as previous FPtr, sk next 3 sts and work second leg in 4th st, working behind last st made, dc in 2nd skipped st, dc in next 4 sts; rep from * across to last 4 sts, FPtr in same place as second leg of last FPtr2tog, sk 1 st, dc in last 3 sts.
Row 23: Ch 3, turn, dc in next 3 sts, sk next 3 sts, BPtr in 4th st, working in front of last st made dc in 2nd skipped st, dc in next 4 sts, *working in back of work BPtr2tog as follows: work first leg in same place as previous BPtr, sk next 3 sts and work second leg in 4th st, working in front of last st made dc in 2nd skipped st, dc in next 4 sts; rep from * across to last 3 sts, BPtr in same place as second leg of last BPtr2tog, sk 1 st, dc in last 2 sts.
Row 24: Rep Row 8. Fasten off CC3.
Rows 25-26: With MC, rep Rows 9-10.
Row 27: Ch 2, turn, working in BL hdc in each sts across.
Fasten off.
Finishing
Weave in ends.
Assembly
Wash pieces and block lightly before sewing.
Place body pieces with wrong sides together with matching bottom edges, whipstitch around three sides.
Fringes
Attach Fringes to both side edges of the pillow case. Join 2 Fringes in both ends of each CC sections and 1 Fringe in both ends of MC sections.
Cut 4 10” lengths for each Fringe. Fold strands in half, insert hook where you want to attach, pull folded end through, pull ends through fold and draw them to tighten. Trim ends even.
Buttons (make 4)
With MC, make magic ring.
Ch 2 and make 10 hdc in the ring, join in first hdc, cut yarn leaving a long end.
Weave the yarn end through all sts to have a tighter result.
Button Loops
Along unseamed side edge, make button loops next to each MC Fringes as follows:
Join yarn next to Fringe, ch 10, join with sl st to the other side of the Fringe.
Cut yarn. Weave in ends.
Sew buttons opposite button loops.
Weave in ends.