

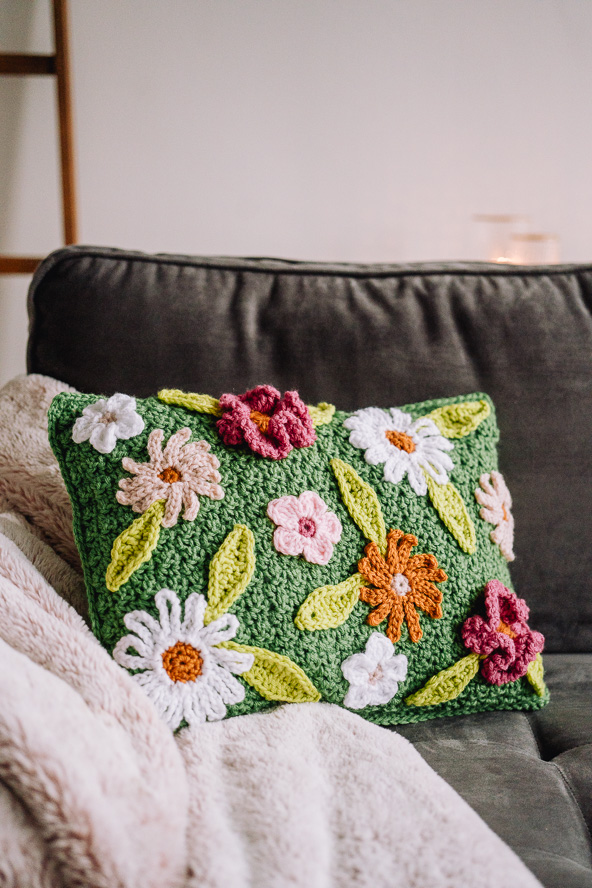
Poppies, asters and daisies flourish across this petal-powered pillow, infusing your space with the freshness of a spring garden. Create an oasis of blocks with this scrap friendly project that features crochet floral appliqués crocheted and sewn separately onto the subtly textured pillow front. Perfect for a weekend project, this design offers an easy yet rewarding experience for crafters of all levels.
Time: Weekend Project
Skill Level: Easy
Size: 16” wide, 12” high”
Gauge: 12 sts and 10 rows = 4” [10 cm] in sc/dc
Materials
 Yarn: Bernat Super Value (100% acrylic; 440 yards [402 meters]/197 grams): 53246 Lush (MC), 53223 Grass (CC1), 53806 Masala (CC2), 53402 Magenta (CC3), 07391 White (CC4), 53800 Primrose (CC5), 07438 Baby Pink (CC6): 1 skein each
Hook/Needles: US size H/8 (5.0 mm) crochet hook
Notions: Tapestry needle, straight pins, 16” x 12” pillow form
Special Stitch
Single crochet join (sc join): Place slip knot on hook, insert hook in indicated st, yo and pull up a lp, yo and draw through both lps on hook.
Pattern Notes
This pattern is worked in two panels (front and back). Flower and leaf appliqués are sewn to the front panel before pillow is assembled.
When making appliqués, leave a long tail of each color to use for sewing pieces to pillow front.
Pattern
Front/Back Panel (Make 2)
With MC, ch 48,
Row 1 (RS): Dc in back bar of 4th ch from hook (skipped chs count as dc) and in each ch across, turn. (46 dc at end of this row).
Row 2 (WS): Ch 3 (counts as dc throughout), sc in next st, [dc in next st, sc in next st] across, turn. (23 dc, 23 sc at end of this row)
Rows 3-30: Rep Row 2.
Row 31: Ch 3, dc in each st across, fasten off.
Large Leaf (Make 4)
With CC1, ch 16.
Row 1 (RS): Sl st in 2nd ch from hook and in next 2 chs, sc in each of next 2 chs, hdc in each of next 2 chs, dc in each of next 3 chs, hdc in each of next 2 chs, sc in each of next 2 chs, (sl st, ch 2, sl st) in last ch, rotate leaf to work into bottom of sts, sc in each of next 2 sc, hdc in each of next 2 hdc, dc in each of next 3 dc, hdc in each of next 2 hdc, sc in each of next 2 sc, sl st in next sl st, fasten off. (6 sl st, 8 sc, 8 hdc, 6 dc, 1 ch-2 sp at end of this row)
Small Leaf (Make 7)
With CC1, ch 13.
Row 1 (RS): Sl st in 2nd ch from hook and in next 2 chs, sc in each of next 2 chs, hdc in next ch, dc in each of next 2 chs, hdc in next ch, sc in each of next 2 chs, (sl st, ch 2, sl st) in last ch, rotate leaf to work into bottom of sts, sc in each of next 2 sc, hdc in next hdc, dc in each of next 2 dc, hdc in next hdc, sc in each of next 2 sc, sl st in next sl st, fasten off. (6 sl st, 8 sc, 4 hdc, 4 dc, 1 ch-2 sp at end of this row)
Poppy (Make 2)
Rnd 1 (RS): With CC2, make slip ring, ch 3 (counts as dc throughout), 11 dc in ring, join to top of beg ch-3, fasten off. (12 dc at end of this rnd)
Rnd 2: With CC3, sl st join in any st of Rnd 1, ch 3, 3 dc in same st, 4 dc in each st around, join to top of beg ch-3. (48 dc at end of this rnd)
Rnd 3: [Ch 1, sl st in next st] around, sl st in beg st, fasten off. (48 sl sts, 48 ch-sps at end of this rnd)
Daisy (Make 2)
Rnd 1 (RS): With CC2, make slip ring, 6 sc in ring, do not join. (6 sc at end of this rnd)
Rnd 2: 2 sc in each st around. Sl st in next 2 sts, fasten off. (12 sc at end of this rnd)
Rnd 3: With CC4, sl st join in any st of Rnd 2, ch 12, sl st in same st as join, [sl st in next st, ch 12, sl st in same st of Rnd 2] around, sl st in first st to join, fasten off. (12 ch-12 lps at end of this rnd)
Aster (Make 1 with Rnd 2 in CC2, and make 2 with Rnd 2 in CC5)
Rnd 1 (RS): With CC2, make slip ring, 6 sc in ring, join to first sc, fasten off. (6 sc at end of this rnd)
Rnd 2: With CC5, sl st join in any st of Rnd 1, [ch 6, turn, sl st in 2nd ch from hook and in next 4 chs, sl st in same st of Rnd 1] twice, * sl st in next st of Rnd 1, [ch 6, turn, sl st in 2nd ch from hook and in next 4 chs, sl st in same st of Rnd 1] twice, rep from * around, sl st in first sl st to join. (12 sl-st petals at end of this rnd)
Apple Blossom (Make 2)
Rnd 1 (RS): With CC5, make slip ring, 5 sc in ring, join to first sc, fasten off. (5 sc at end of this rnd)
Rnd 2: With CC4, sl st join in any st of Rnd 1, (ch 3, dc, tr, dc, ch 3, sl st) in same st, (sl st, ch 3, dc, tr, dc, ch 3, sl st) in next st and in each st around, join in beg sl st of rnd, fasten off. (5 petals at end of this rnd)
Cherry Blossom (Make 1)
Follow instructions for Apple blossom with CC3 in Rnd 1 and CC6 in Rnd 2.
Attach Appliqués
Referring to Appliqué Placement Photo, arrange appliqués on one pillow panel and pin in place. Using yarn tails (See Pattern Notes) and tapestry needle, sew appliqués in place. Use enough stitches to hold each piece in place, but don’t flatten the appliqués completely. A little texture and movement give the appliqués a more realistic look.
Finishing
Weave in loose ends.
Assemble Pillow
Place pillow front and back together with wrong sides facing and matching corners. Working from pillow front through both thicknesses, with MC sc join (see Special Stitches) in bottom right corner, * 3 sc in corner, sc in end of first 3 rows, [2 sc in end of next row, sc in end of next 3 rows] across, 3 sc in corner, * sc in each st across top edge, rep from * to *, insert pillow form in opening, sc in each st along bottom edge to close pillow, join to beg sc.