


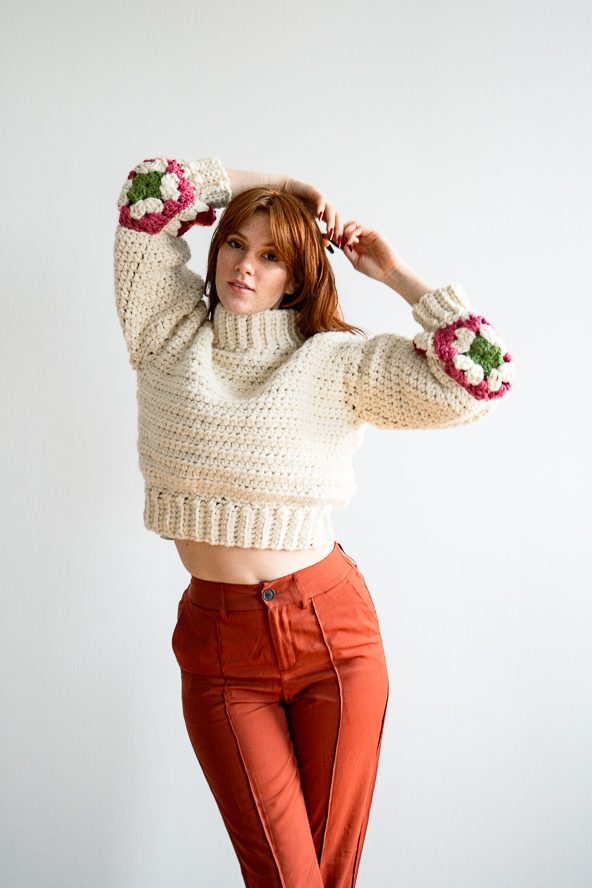
Introducing the Retro Revival Granny Square Sweater, a chic fusion of vintage charm and contemporary style. This sweater reimagines the classic granny square within a modern silhouette. Its winter white body showcases a cropped waist, oversized sleeves and the illusion of chunky knit through the clever use of half double crochet stitches. The standout feature of this garment lies in its sleeves, adorned with bands of vibrant granny squares. These squares bring a playful pop of color, elevating the soft, puffy texture of the sweater and infusing it with a fresh, retro-inspired vibe.
Time: Month project
Skill Level: Intermediate
Sizes:
S/M (L/XL)
Length measured from top of collar to bottom of waist: 21 (22)”
Width measured at bottom of waist: 15.25 (19)”
Sleeve length measured under armpit towards wrist: 17 (17.5)”
Granny square: 5.5” square
Gauge: 8 hdc sts and 7 hdc rows = 4” [10 cm]
Materials
 Yarn: Lion Brand Wool-Ease Thick & Quick (80% Acrylic; 20% Wool; 106 yards [97 meters] / 6 ounces [170 grams]): MC: Fisherman [640-099] 6 (7) balls, CC1: Pumpkin [640-133A] 1 ball, CC2: Glacier [640-105L] 1 ball, CC3: Grass [640-131B] 1 ball, CC4: Raspberry [640-112] 1 ball, CC5: Cranberry [640-138] 1 ball
Hooks: US size J/10 6.0 mm and K/10.5 6.5mm
Notions: Removable stitch markers, tapestry needle, scissors
Pattern Notes
This crochet pattern uses US terms.
Pattern is worked in pieces (front body panel, back body panel, sleeves) then assembled. The end of each sleeve before the cuff uses 3 granny squares sewn together. Waistline, neckline, and wrist ribbing are added last.
Pattern is written for size Small/Medium with Large/XL directions in parentheses.
Each granny square uses 3 colors.
This pattern uses a K/10.5 6.5mm hook for the sweater body and arms and a J/10 6.00mm hook for the cuffs, neckline, waistline, and granny squares. Make your gauge and determine the correct hook sizes for you.
The ch-2 at the beginning of each row counts as 1 hdc.
Pattern
Body (Make 2)
Using hook K/10.5 6.5mm hook and Color MC, ch 41 (45).
Row 1: Start in 3rd ch from hook (skipped sts count as a st), hdc in each st across, ch 2, turn. (40 (44))
Row 2-23 (24): Hdc in each st across. Final st is worked in top of ch-2 from previous Row. Ch 2, turn.
Use a stitch marker to mark this side as the RS of your work. Fasten off and weave in ends.
Right Shoulder
Using a K/I0.5 6.5 mm hook, work on the RS. Add yarn in first st on last row on the body.
Ch 2, hdc in next 9 (11) sts. (10 (12))
Fasten off and leave a long tail for crocheting the shoulders together, approx. 15”.
Left Shoulder
Using a K/10.5 6.5mm hook and the same body panel as above on the RS, add yarn in 30th stitch on Row 23 (24) of the body. There should be 20 skipped stitches between the end of the Right shoulder and beginning Left shoulder.
Ch 2, hdc in next 9 (11) sts. (10 (12))
Fasten off and leave a long tail for crocheting the shoulders together, approx. 15”.
Repeat on both body panels, except only leave a tail for crocheting the shoulders together on one of the panels.
Shoulders Assembly
Determine which side of the body will be the front and mark it with a stitch marker. Lay the two body panels on top of each other with right sides facing each other.
Working on the WS, thread a yarn needle using the tails left on the shoulders and mattress stitch the shoulders together 10 (12) sts across. Fasten off.
Repeat on the other shoulder. Fasten off and weave in all ends.
Sides Assembly
Using a K/10.5 6.5 mm hook and still working on the WS, mattress stitch from the bottom of the body panel and work up towards the shoulder, seaming Rows 1 to 10 (9). The part not seamed creates an armhole of 7.5” (8.5”).
Sleeves
Using a K/10.5 6.5 mm hook, turn the sweater inside out and work on RS. Add yarn under the arm hole and ch 1.
Row 1 (RS): Sc 36 (40) sts all the way around the armhole. Sl st to the first st and turn. Be careful not to be tight with your stitches. (36 (40))
Row 2-14 (15): Ch 2 (counts as a hdc), hdc in each st around, sl st in ch-2, turn.
Fasten off. Leave tail ~48” long to sew granny squares on later.
Granny Squares
Using J/10 6.00mm hook and Color MC, ch 4 and sl st to first ch to form circle or create a magic circle.
Row 1: Ch 5 (counts as dc plus ch 2 here and throughout), [3 dc into circle, ch 2] three times, 2 dc into circle, sl st to 3rd ch of beginning ch-5. Sl st to ch-2 sp, changing to CC1. (12 dc and 4 ch-2 spaces)
Row 2: Ch 5, 3 dc into same space, ch 1, *[3 dc, ch 2, 3 dc] into next ch-2 space, ch 1. Repeat from * 2 more times. 2 dc into beginning ch-2 sp, sl st to 3rd ch of beginning ch-5 to join. Sl st to ch-2 sp, changing to next color CC2. (24 dc or 8 dc-clusters, 4 ch-2 spaces, 4 ch-1 spaces)
Row 3: Ch 5, 3 dc into same space, *ch 1, 3 dc next ch-1 space, ch 1, [3 dc, ch 2, 3 dc] into next ch-2 space. Repeat from * 2 more times. Ch 1, 3 dc next ch-1 sp, ch 1, 2 dc into beginning ch-2 sp, sl st to 3rd ch of ch-5 to join. (36 dc or 12 dc-clusters, 4 ch-2 spaces, 8 ch-1 spaces)
Fasten off. Weave ends except from Row 3 for each square; leave tails ~16.5” for seaming square sides together.
Repeat for two more squares, changing colors as follows:
Square 2: Row 1 CC3, Row 2 MC, Row 3 CC4.
Square 3: Row 1 CC1, Row 2 CC5, Row 3 MC.
Granny Square Assembly
Place stitch marker every 12th (13th) stitch along the last row of sleeves. Line granny squares up so corners match stitch markers.
Square 1: Connect to stitch markers in 1st st and 12th (13th) st
Square 2: Connect stitch markers in 13th (14th) st and 24th (26th) st
Square 3: Connect stitch markers in 25th (27th) and 36th (40th) st
Work on RS of sleeve. Flip square up so WS is now facing out. Mattress stitch the back loop of the square to the back loop of the sleeve (note: the back loop of the square looks like the front loop because it is flipped up). Use tails from Granny Squares’ Row 3 to seam sides of squares together.
Wrist Ribbing
Using a J/10 6.00 mm hook, work on the RS. Add Color A yarn between two granny squares (preferably the two that align at the bottom of the wrist, so the seam is not noticeable).
Row 1 (RS) size S/M only: Ch 1, dec the next 10 sts by sc2tog 5 times, sc in next 2 sts (you will be at the end of the first square), dec the next 12 sts by sc2tog 6 times (you will be at the end of the second square), dec the next 10 sts by sc2tog 5 times, sc in next 2 sts (you will be at the end of the third square). (20 sc)
Row 1 (RS) size L/XL only: Ch 1, dec the next 10 sts by sc2tog 5 times, sc in next 2 sts (you will be at the end of the first square), dec the next 10 sts by sc2tog 5 times, sc in next 2 sts (you will be at the end of the second square), dec the next 10 sts by sc2tog 5 times, sc in next 2 sts (you will be at the end of the third square). (21 sc)
All Sizes: Sl st to first st and ch 7.
Row 2: Start in 2nd from hook and work 6 sc down towards wrist, 2 sc along the wrist, turn. (6)
Row 3: Skip 2 sc, 6 sc blo, ch 1, turn.
Row 4: 6 sc blo, 2 sc along the wrist, ch 1, turn.
Rows 5-20 (21): Repeat Row 3 and 4 all the way around the sleeve.
Crochet last row and Row 1 together with 6 sc in both loops.
Fasten off and weave in ends.
Neckline Ribbing
Using a J/10 6.00mm hook, work on the RS. Insert hook at the neckline by the shoulder on the inside (WS). Ch 8.
Row 1 (RS): Start in 2nd ch from the hook and work 7 sc down towards the neckline, 2 sc along the neckline, and turn. (7)
Row 2: Skip 2 sc, 7 sc blo, ch 1, turn.
Row 3: 7 sc blo, 2 sc along neckline, turn.
Rows 4-50: Repeat Row 2 and 3 all the way around the neckline. Crochet last row and Row 1 together with 7 sc in both loops.
Fasten off and weave in ends.
Waistline Ribbing
Using a J/10 6.00mm hook, work on the RS with the sweater upside down. Add yarn on the right side where the panels were seamed together and ch 1.
Row 1 (RS) size S/M only: *Sc in same st as join, [sc2tog, sc in next 2 sts] four times, sc2tog, [sc2tog, sc in next 2 sts] four times, sc2tog, sc, sc2tog.* Rep from * 1 time. (58 sc)
Row 1 (RS) size L/XL only: *[Sc in next 2 sts, sc2tog, sc in next st, sc2tog] three times, sc in next st; rep from * 3 more times. (64 sts)
All Sizes: Sl st to first st. Ch 8.
Row 1: Start in 2nd from hook, 7 sc, 2 sc along the bottom, turn.
Row 2: Skip 2 sc, 7 sc blo, ch 1, turn.
Rows 3-58 (64): 7 sc blo, 2 sc along bottom, turn.
Repeat Row 2 and 3 all the way around the bottom of the sweater. You end with making Row 2.
Crochet Row 58 (64) and Row 1 together with 7 sc in both loops.
Fasten off and weave in ends.
If we can’t download..how do we print them? I don’t have printer so must print @ places like staples.
Hello! We currently do not allow downloads of our patterns, but are exploring options in the near future. You are welcome to save this pattern by copying and pasting into a word document or by printing the pattern via the printer icon on the left hand side of your screen (you can change the printing destination to print to Adobe PDF to save the pattern instead of printing it from your computer). Hope this helps! – Nicola, Editor
I want to how many Granny Squares to make for a granny Square long coat.
And a pocket.
The coat is going to have a hood, scarf, belt,and large pockets all attached.
How many Granny Squares would I need to make
Hello, you might find this pattern a good place to start instead: https://www.ilikecrochet.com/previews/the-throwback-thursday-jacket/
If you read the pattern you have to make 3 granny squares per sleeve.
Hi! How can I download the pdf of this pattern?
Hello! We currently do not allow downloads of our patterns, but are exploring options in the near future. You are welcome to save this pattern by copying and pasting into a word document or by printing the pattern via the printer icon on the left hand side of your screen. Hope this helps! – Nicola, Editor
What a nice pattern! Thank you very much – I will make it for my daughter.
Have a nice week!
Marianne