


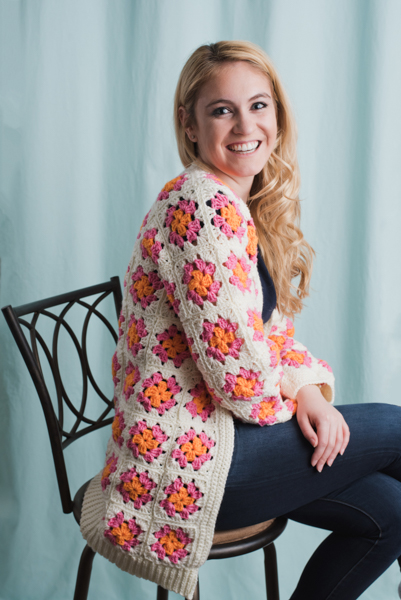
Chilly summer evenings have met their match with this jacket. A nod to the old granny square pieces of the past, the Throwback Thursday Jacket has granny squares that are connected with cream instead of black yarn. This subtle shift makes all the difference!
Skill Level: Easy
Size: Small (Medium, Large), Finish Bust Size 34 (38, 42)”
negative ease recommended.
Shown is size Small.
Gauge: square = 3” / [8.5] cm (size Small on 5.0mm hook); 3.5” / [9.5] cm (size Medium on 6.0mm hook); 4” / [10.5 cm] (size Large on 6.5mm or 7.0mm hook)
Materials
 Yarn: Paintbox Yarns Simply Aran (100% Acrylic; 201 yards [184 meters]/100 grams): 217 Mandarin Orange (A, 3 balls), 250 Bubblegum Pink (B, 3 balls), 02 Champagne white (C, 6 balls)
Hook: US size H/8 (5.0 mm), US size J/10 (6.0 mm), US size K/10.5 (6.5 mm) or L/11 (7.0 mm)
Notions: Removable markers, tapestry needle
Downloads
Updated 3/29/2023
Special Stitches
Blo hdc slst (back loop only half double crochet slip stitch): Yo, insert hook in back loop only of the stitch, yo, pull up a loop, pull through 2 stitches on hook.
Pattern Notes
The different sizes of this cardigan are worked by increasing the hook size to increase the size of each motif.
Width across back: 17″ (S); 19″ (M); 21″ (L)
Length: 29″ (S); 32″ (M); 35.5″ (L)
Armhole: 6.5″ (S); 7.5″ (M); 8.5″ (L)
Sleeve Length: 18″ (S); 19.5″ (M); 22″ (L)
Pattern
Square (make 112)
With A, ch 4, join with sl st in first ch to form a ring.
Rnd 1 (RS): Ch 5 (counts as dc, ch 2 here and throughout), 3 dc in ring, (ch 2, 3 dc in ring) twice, ch 2, 2 dc in ring, join with sl st in 3rd ch of beg-ch. Fasten off.
Rnd 2: Join B in any corner ch-2 sp, ch 5, 3 dc in same sp, *ch 1, (3 dc, ch 2, 3 dc) in next ch-2 sp; rep from * twice more, ch 1, 2 dc in first ch-2 sp, join with sl st in 3rd ch of beg-ch. Fasten off.
Rnd 3: Join C in any corner ch-2 sp, ch 5, 3 dc in same sp, *ch 1, 3 dc in next ch-1 sp, ch 1, (3 dc, ch 2, 3 dc) in next ch-2 sp; rep from * twice more, ch 1, 3 dc in last ch-1 sp, ch 1, 2 dc in first ch-2 sp, join with sl st in 3rd ch of beg-ch.
Fasten off.
Finishing
Assembly
Updated 1/5/2021
With right sides held together and working through outer loops only, single crochet squares together with C as show in assembly diagram. Per the diagram, the numbers indicate how many squares need to be sewn together for each panel. For example the back panel consists of 5 squares (per 8 rows =40 squares in total), the front panel of 2 squares per each side (per 8 rows =16 squares for each side) and the sleeves consist of 4 squares (per 5 rows=20 squares in total). =112 squares in total for the whole cardigan.
Back Panel
Once all the squares are done, you will start the assembly process from the back panel.
If you refer to the diagram, you will notice the back panel has 5 squares that need to be sewn horizontally which form the upper back.
You will be sewing 40 squares in total for the back.
With right sides held together and working through outer loops only, single crochet squares together with C (or your preferred method). Back panel is made of 40 squares. Weave all ends.
Front Panels
For the front you will be sewing 32 squares in total, 2 squares on the left and 2 squares on the right side (16 squares on each side).
With right sides held together and working through outer loops only, single crochet squares together with C (or your preferred method). Front panel is made of 32 squares. Weave all ends.
Bottom Ribbing
Ribbing is worked separately and then sewn to the bottom of the cardigan.
Foundation Row: Ch 12.
Row 1: Blo hdc slst in 3rd ch from hook and each ch to end of row, turn. (10 sts)
Row 2: Ch 2, blo hdc slst in each st across, ch 2, turn. (10 sts)
Measure to fit around bottom of Cardigan without stretching too much. Fasten off. Sew in place.
Front Opening Ribbing
Attach C and sc around entire body and neck, working 5 rnds in total.
Fasten off.
Sleeves Ribbing
Attach C and work 3 rows, decreasing evenly at Granny Square joining parts.
Work 3 rows even in sc.
Fasten off.
Weave in all ends.
Sleeves
Attach C and work 3 rows, decreasing evenly at Granny Square joining parts.
With right sides held together and working through outer loops only, single crochet squares together with C (or your preferred method). Each sleeve is made of 20 squares.
Once crocheted or sewn together fold sleeve in half so as to form a tube, and sew to 2 front squares and to 2 back squares so as to align for shoulders. Repeat for next sleeve. Weave all ends.
We will now join the front and back panel and sleeves of our cardigan together with Color C.
Lay your sleeve panel out flat with RS facing up.
Lay your back panel out flat with the RS facing up.
Lay your front panel out flat on top of your back panel with the RS facing down.
You should now have RS facing together. With right sides held together and working through outer loops only, single crochet squares together with C (or your preferred method)
Work 3 rows even in sc.
Fasten off.
Weave in all ends.
View this post on Instagram
View this post on Instagram
Thank you for sharing this very lovely pattern. Most patterns this length have a hood. I have made a few granny square cardigans and some people did not want the hood. This pattern looks easy. Thank you for providing the instructions for all sizes. The diagram provided seems to be cut off on the right though. I look forward to working on this project,
Hello Janet! I’ve reached out to the designer for advice and she or I will reply as soon as possible. Thanks! – Nicola, Editor
Hi Janet! Thank you for bringing this to our attention, the diagram has now been updated! https://www.ilikecrochet.com/wp-content/uploads/Throwback-Thursday-Jacket-Assembly-Diagram.png
– Nicola, Editor
Thank you for the jacket pattern x
Nicola the download doesn’t download correctly and when u hit print it doesn’t show the left hand side and prints out on three pages. Is there a way to downsize on your end so it prints out correctly???
Hello, is this the download you are having trouble with? https://www.ilikecrochet.com/wp-content/uploads/Throwback-Thursday-Jacket-Assembly-Diagram.jpg
If you are having trouble with print formatting, we recommend copying and pasting into a word document since we don’t have PDF downloads of our patterns.
Hope this helps! Nicola, Editor
It’s there a pattern for this jacket in sc squares?
Hi Nancy! At this time, no, we do not have a different version of this pattern. However, if you were to make squares that match the dimensions of the squares in this pattern, I’m sure you could still arrange them and join them together to make a similar jacket. Hope this helps! – Nicola, Editor
I love this jacket and would like to make it as a gift for a friend. I have made all the squares required but do not quite understand the assembly diagram. What do all the numbers mean? Also, parts of the diagram have solid line and some do not. Do these solid lines have some purpose? Would appreciate a little more information on assembly. Thank you in advance.
Hello Sharon! I’ve reached out to the designer for advice and she or I will reply as soon as possible. Thanks! – Nicola, Editor
Hi Sharon! We’ve added some information from the designer to the assembly portion of this pattern above. We will also be providing a new assembly diagram soon. Hope this helps! – Nicola, Editor
Is there a way to modify this pattern for a plus sized gal?
Hi Maria! We have a wonderful article on this topic that you might find helpful:
https://www.ilikecrochet.com/magazine/crochet-articles-and-interviews/making-it-fit-adapting-crochet-patterns-for-plus-sizes/
https://www.ilikecrochet.com/daily/previews/making-it-fit-adapting-crochet-patterns-for-plus-sizes-part-2/
Hope this helps! – Nicola
I don’t see an assembly diagram. I’d love to make this but it’s difficult without knowing how many to make per size and how to assemble the squares.
Thank you
Hi Martha,
The assemmbly diagram is on the right hand side of the page below the photos. But, here it is as well! >> https://www.ilikecrochet.com/wp-content/uploads/Throwback-Thursday-Jacket-Assembly-Diagram.jpg
Would like to make this sweater. Could you please supply the assembly diagram.
I was looking for the assembly diagram too. I found it when I scrolled all the way down passed the photos of the cardigan. You click on the downloads word and it pops up. Hope this is helpful.
hi!! Where can i find the diagram?
Please see diagram listed under the DOWNLOADS.
I’m a new customer and am disappointed in my subscription. I am looking for the assembly diagram for this pattern. The pattern refers to it. I see others are having the same problem. Can you email it? Please advise.
Did you ever find the diagram?
Hello! Here is the diagram: https://www.ilikecrochet.com/wp-content/uploads/Throwback-Thursday-Jacket-Assembly-Diagram.jpg
I still don’t see any assembly diagram and I want to make this. I need this now, not next year. Thank you in advance.
Your tone is incredibly rude. The link to the diagram in on the right side, below the pictures. It’s titled “Downloads.”
Hi, Is there an assembly diagram yet? This is a lovely jacket
Thanks, Cornel for your comment. I’m looking into this and will update ASAP.
For anyone on mobile or tablet, to see the diagram you have to scroll all the way to the bottom of the screen, literally all the way down past all the pictures of the cardigan, and directly after them where you will see “Downloads” with a link to the diagram.
Where’s the assembly diagram?
Thank you, Deborah, for the comment. I’ll take a look and add as needed. Thank you!
Well, where is the assembly diagram???
Hi Tamara! You can find the assembly diagram under the photos on the right hand side of the page. I’ve also pasted it here: https://www.ilikecrochet.com/wp-content/uploads/Throwback-Thursday-Jacket-Assembly-Diagram.jpg
Happy crocheting! – Nicola, Editor