


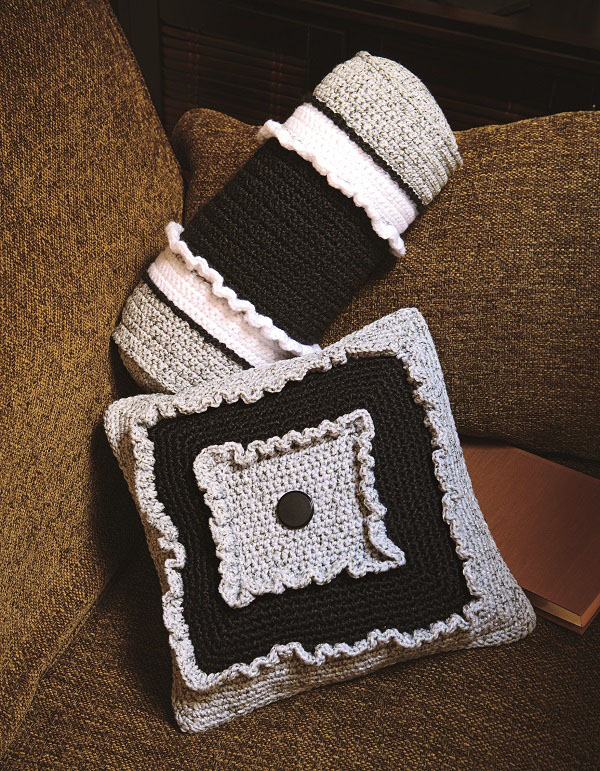
Designed by: Sandy Scoville for Martingale
Send these pillows off to college with your kids, or just toss them on your couch for a fresh new look.
Skill Level: Intermediate
Size: Square Pillow: 14″ square; Roll Pillow: 14″ wide, 5″ diameter at ends, and 19″ around center.
Gauge: 14 sc and 15 rows with A = 4″
Materials
Yarn: Red Heart Fiesta (73% acrylic, 27% nylon; 330 yards [301 meters]/170 grams): #6341 Millennium (A, 2 skeins); Lion Brand Homespun (98% acrylic, 2% polyester; 185 yds [170 meters]/170 grams): #373 Black (1 skein); Red Heart Super Saver (100% acrylic; 364 yards [332 meters]/198 grams): #0311 White (1 skein)
Hook: US size H/8 (5.0 mm) hook or size needed to obtain gauge
Notions: 14″-square pillow form, 14″-wide x 5″- diameter roll pillow form, 1 black button with shank: 1¼” diameter, safety pins, tapestry needle
Pattern Notes
The above materials cover both the Square and Roll Pillows.
Square Pillow
Back
With A, ch 50.
Row 1 (RS): Ch 1, sc in 2nd ch from hook and in each rem ch. Turn. (49 sc)
Row 2: Ch 1, sc in each sc. Turn.
Rows 3-50: Rep row 2. At end of last row do not turn.
Edging
Ch 1, sc in edge of row 50 and in edge of each row to beg ch, work 3 sc in first unused lp of beg ch, sc in next 47 lps, work 3 sc in next lp, sc in edge of each row along next side; working along top edge, work 3 sc in first sc, sc in next 47 sc, work 3 sc in next sc; join in first sc. (206 sc)
Fasten off.
Front
With A, ch 20.
Row 1 (RS): Ch 1, sc in 2nd ch from hook and in each rem ch. Turn. (19 sc)
Row 2: Ch 1, sc in each sc. Turn.
Rows 3-16: Rep row 2. At end of last row, do not turn.
Note: Remainder of front is worked in rnds.
Inner Ruffle
Rnd 1: Ch 1; working along next side, sc in edge of each row to beg ch; working along lower edge in unused lps of beg ch, work 3 sc in first lp, sc in next 17 lps, work 3 sc in last lp, sc in edge of each row along next side, work 3 sc in first sc on top edge, sc in next 17 sc, work 3 sc in last sc; join in first sc. (78 sc)
Rnd 2: Ch 1, sl st in fl of same sc as joining, ch 3 (counts as a dc on this and foll rnds), work 3 dc in fl of next sc, *dc in fl of next dc, work 3 dc in fl of next dc; rep from * around; join in top of beg ch-3. Fasten off A. (156 dc)
Contrasting Section
Join B in unused lp of 2nd sc of any 3-sc corner group on rnd 1 of ruffle.
Rnd 1 (RS): Ch 1, work 3 sc in same lp; working behind ruffle in bl only, (sc in each sc to 2nd sc of next corner 3-sc group, work 3 sc in corner sc) 3 times, sc in each rem sc; join in first sc. (86 sc)
Rnd 2: Ch 1; working in both lps, sc in same sc, work 3 sc in corner sc, (sc in each sc to 2nd sc of next corner 3-sc group, work 3 sc in corner sc) 3 times, sc in each rem sc; join in first sc. (94 sc)
Rnd 3: Ch 1, sc in same sc, (sc in each sc to 2nd sc of next corner 3-sc group, work 3 sc in corner sc) 4 times, sc in each sc to first sc; join in first sc. (102 sc)
Rnds 4-9: Rep rnd 3. At end of rnd 9—150 sc. Fasten off B.
Outer Ruffle
Join A in fl of any corner sc, ch 3, work 2 dc in same lp, dc in fl of next lp, *work 3 dc in fl of next sc, dc in fl of next sc; rep from * around; join in top of beg ch-3. Fasten off A.
Outer Section
Join A in bl of corner sc on rnd 9 of contrasting section behind ruffle.
Rep rnds 1-7 of contrasting section. At end of rnd 7. (206 sc)
Last Rnd: Sl st in each sc; join in first sl st.
Fasten off.
Finishing
Sew button to center of front. Hold front and back with WS tog and back facing you; with safety pins, pin tog along 3 side edges, carefully matching sts. Join A through one corner sc on back and through corner sc on front (do not catch sl sts); matching sts, sl st through both pieces around 3 sides; insert pillow form; sl st through rem sts; join in joining sl st. Fasten off and weave in ends.
Roll Pillow
Body
Note: Change colors as instructed.
With A, ch 68 sts.
Row 1 (WS): Sc in 2nd ch from hook and in each rem ch. Turn. (67 sc)
Row 2 (RS): Ch 1, sc in each sc. Turn.
Rows 3-10: Ch 1, sc in each sc. Fasten off A. Do not turn.
Row 11 (RS): Join B in first sc of row 10, sl st in each sc. Fasten off B. Do not turn.
Row 12 (RS): Join C in first sc of row 10 behind sl st, ch 1, sc in each sc. Turn.
Rows 13-16: Ch 1, sc in each sc. Turn.
Row 17 (WS): Ch 1, sc in each sc. Drop C. Draw up lp slightly and remove hook. Secure lp with safety pin. Turn.
Row 18 (RS): Join A in first sc of row 17; sl st in each sc. Fasten off A. Do not turn.
First Ruffle
Row 19 (RS): Remove safety pin and insert hook in C lp. Working with C in row 17 behind sl sts on row 18, ch 3, work 2 dc in fl of first sc, *dc in fl of next sc, work 3 dc in fl of next sc; rep from * across. Fasten off C. Do not turn.
Center Section
Hold piece with RS facing you; join B in unused bl of first sc on row 17 behind ruffle.
Row 1 (RS): With B, ch 1, sc in same lp and in bl of each sc across. Turn.
Rows 2-20: With B, rep row 1. At end of row 20, change to C in last sc. Cut B. Turn.
Row 21: With C, ch 1, sc in bl of each sc. Remove hook and secure lp with safety pin. Do not turn.
Row 22 (RS): Join A in first sc of row 21, sl st in each sc. Fasten off A. Turn.
Row 23 (WS): Remove safety pin from C lp and insert hook in lp. With C, ch 1, sc in each sc on row 21 behind sl sts. Turn.
Rows 24-27: With C, ch 1, sc in each sc. Turn.
Row 28: With C, ch 1, sc in each sc. Do not turn. Fasten off C.
Row 29 (RS): Join B in first sc of row 28, sl st in each sc. Fasten off B.
Second Ruffle
Turn piece upside down so row 29 is at bottom. Rejoin C in unused lp of first sc on row 21 of center section (behind A sl sts); ch 3, work 2 dc in same sc; working in rem unused lps, *dc in next sc, work 3 dc in next sc; rep from * across. Fasten off C.
Top Section
Hold piece with WS facing you and row 29 of center section at top; join A in first sc on row 28 (do not catch sl st on row 29 behind row 28).
Rows 1 (WS)-10: Ch 1, sc in each sc, turn. At end of row 10, fasten off A. Set piece aside.
End Caps (Make 2)
Note: End caps are worked in continuous rnds. Do not join. Mark first st on each rnd.
Rnd 1 (RS): With A, ch 4 (3 sk chs count as a dc), work 11 dc in 4th ch from hook. (12 dc)
Rnd 2: Work 2 sc in top of beg-3 sk chs, sc in next sc, work (2 sc in next sc, sc in next sc) 5 times. (18 sc)
Rnd 3: Work 2 sc in first sc, sc in next sc, work (2 sc in next sc, sc in next sc) 8 times. (27 sc)
Rnd 4: Sc in each sc.
Rnd 5: Work 2 sc in first sc, sc in next 2 sc, work (2 sc in next sc, sc in next 2 sc) 8 times. (36 sc)
Rnd 6: Work 2 sc in first sc, sc in next 3 sc, work (2 sc in next sc, sc in next 3 sc) 8 times. (45 sc)
Rnd 7: Work 2 sc in first sc, sc in next 4 sc, work (2 sc in next sc, sc in next 4 sc) 8 times. (54 sc)
Rnd 8: Work 2 sc in first sc, sc in next 5 sc, work (2 sc in next sc, sc in next 5 sc) 8 times. (63 sc)
Rnd 9: Sc in first 3 sc, work (2 sc in next sc, sc in next 14 sc) 4 times. (67 sc)
Rnd 10: Sc in each sc; join in first sc. Fasten off.
Finishing
Fold body with WS facing you and side edges tog. With tapestry needle and matching yarn colors, sew side seam to form tube. Turn RS out. Slip roll pillow form inside tube. Place one end cap with RS facing you at one end of tube; matching body seam and end-cap joining, join A through end cap and body in first sc to left of joining. Ch 1, sc in each st around; join in first sc. Fasten off. Rep for other end cap. Weave in ends.