


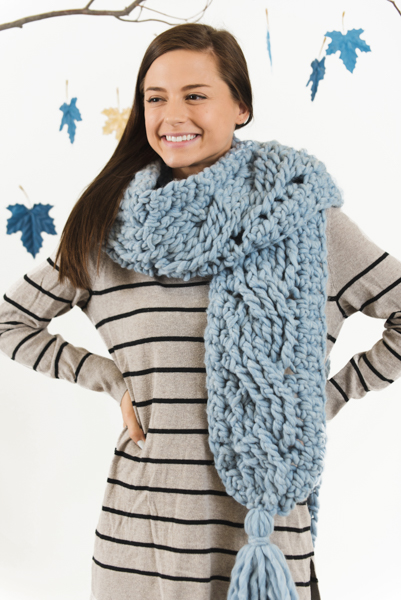
Bulky designs are in, and this oversized braided cable scarf fits the bill. Complete with a fun tassel, this piece will keep you toasty while you explore the great outdoors regardless of the temperature.
Skill Level: Easy
Size: Child 6-12 yrs (Teen, Adult); 7 (7, 9)” / [18 (18, 23) cm] wide x 73 (82, 82)” / [185 (208, 208) cm] long
Shown in size Adult.
Gauge: 4 sts and 5 rows = 4” [10 cm] in sc.
Materials
Yarn: We Are Knitters The Wool (100% Wool; 87 yards [80 meters]/200 grams): Denim, 4 (5, 5) balls
Hook: US size S (20.0mm)
Notions: Tapestry needle
Abbreviations
st(s) – stitch(es)
ch – chain stitch
sc – single crochet
FPdc – front post double crochet
FPdtr – front post double triple crochet
Special Stitches
Front Post Double Crochet (FPdc)
Yo, insert hook under the post of next st, yo, draw up a lp (3 lps on hook), yo, draw through 2 lps on hook (2 lps on hook), yo, draw through last 2 lps on hook.
Front Post Double Treble Crochet (FPdtr)
Yo 3 times, insert hook under the post of next st, yo, draw up a lp (5 lps on hook), yo, draw through 2 lps on hook (4 lps on hook), yo, draw through 2 lps on hook (3 lps on hook), yo, draw through 2 lps on hook (2 lps on hook), yo, draw through last 2 lps on hook.
Cable Stitch
Sk next 3 sts, FPdtr in next 3 sts, going back to first st, FPdtr in first, 2nd and 3rd st.
(The sections should be crossed over)
Pattern Notes
This pattern is worked in the row, from side to side.
Pattern
Ch 9 (9, 11).
Row 1: Sc in 2nd ch from hook, sc in next 7 (7, 9) sts, turn – 8 (8, 10) sts.
Row 2: Ch 1, sc in same st, sc in next 7 (7, 9) sts, turn – 8 (8, 10) sts.
Sizes Child (Teen) only
Row 3: Ch 1, sc in same st, FPdc around next 6 sts from 2 rows below, sc in next 1 (1) sts, turn – 8 (8) sts.
Row 4: Rep Row 2.
Row 5: Ch 1, sc in same st, Cable Stitch around next 6 FPdc from 2 rows below, sc in next 1 (1) sts, turn – 8 (8) sts.
Row 6: Rep Row 2.
Row 7: Ch 1, sc in same st, FPdc around next 6 FPdtr from 2 rows below, sc in next 1 (1) sts, turn – 8 (8) sts.
Row 8: Rep row 2.
Row 9: Ch 1, sc in same st, FPdc around next 6 FPdc from 2 rows below, sc in next 1 (1) sts, turn – 8 (8) sts.
Size Adult only
Row 3: Ch 1, sc in same st, sc in next st, FPdc around next 6 sts from 2 rows below, sc in next 2 sts, turn – 10 sts.
Row 4: Rep Row 2.
Row 5: Ch 1, sc in same st, sc in next st, Cable Stitch around next 6 FPdc from 2 rows below, sc in next 2 sts, turn – 10 sts.
Row 6: Rep Row 2.
Row 7: Ch 1, sc in same st, sc in next st, FPdc around next 6 FPdtr from 2 rows below, sc in next 2 sts, turn – 10 sts.
Row 8: Rep row 2.
Row 9: Ch 1, sc in same st, sc in next st, FPdc around next 6 FPdc from 2 rows below, sc in next 2 sts, turn – 10 sts.
All Sizes
Row 10: Rep Row 2.
Row 11: Rep Row 5.
Row 12: Rep Row 2.
Row 13: Rep Row 7.
Row 14: Rep Row 2.
Row 15: Rep Row 9.
Row 16: Rep Row 2.
Rows 17-94: Rep Rows 11-16.
Row 95: Rep Row 5.
Row 96: Rep Row 2.
Row 97: Rep Row 7.
Row 98: Rep Row 2.
Size Child only
Row 99: Rep Row 2.
Fasten off. Weave in loose ends.
Sizes Teen (Adult) only
Row 99: Rep Row 9.
Row 100: Rep Row 2.
Rows 101-106: Rep Rows 11-16.
Row 107: Rep Row 5.
Row 108: Rep Row 2.
Row 109: Rep Row 7.
Row 110: Rep Row 2.
Row 111: Rep Row 2.
Fasten off. Weave in loose ends.
Tassels (make 2)
Cut 15 strands of yarn 17½” / [44 cm] in length. Fold 13 strands in half/double, take the 14th strand and knot it around the centre of the fold, take the 15th strand of yarn and wrap it around the group of 13 (now doubled to 26) strands of yarn, and knot it tightly. Trim tassel to measure 8” / [20 cm].
Finishing
With needle, attach 1 tassel to either end of the scarf, making sure to gather the ends of either side of the scarf together when attaching the tassel.
Block scarf to size and shape.
I like to be able to have a printed copy of the pattern that I keep with the yarn so I can mark off where I am and so I can work on it when I am not near my computer. I don’t see how to print the cable scarf pattern. Is there a way to do that? If I have to go back to the computer to look at the pattern, it will never get done. Thank you.
You are welcome to save this pattern by copying and pasting into a word document or by printing the pattern via the printer icon on the left hand side of your screen. Hope this helps! – Nicola, Editor