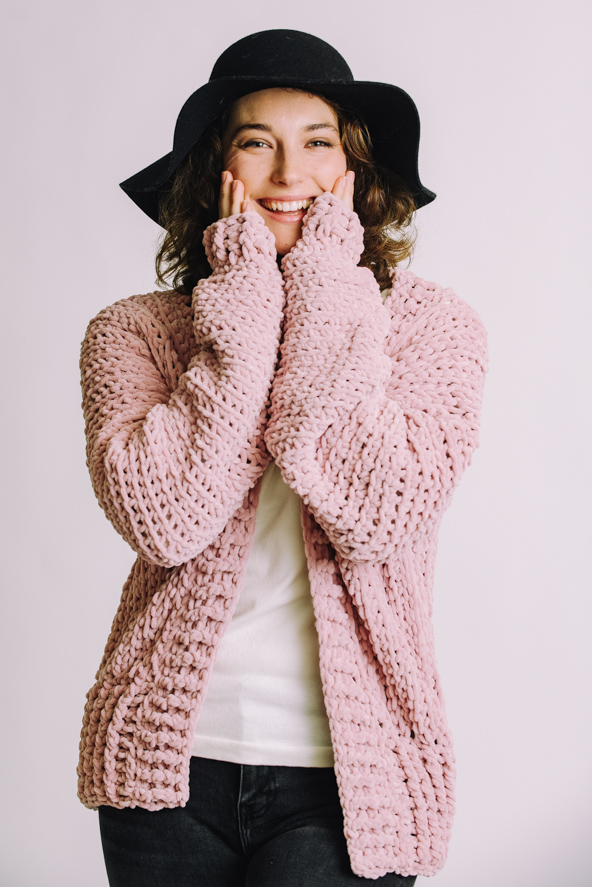
Soft, fluffy and super cuddly, Piper is hooked up in a flash, working from the center back to the cuff. Size up for an even more oversized fit, and snuggle down on a chilly evening!
Skill Level: Easy
Size: Finished Bust Size 41.5 (45.5, 53.5, 53.5, 69.5, 77.5, 85.5, 93.5, 101.5)” to fit bust 30 (32, 36, 40, 44, 48, 52, 56, 60)”
Shown in size 36”
Gauge: 6 sts and 7 rows = 4” [10 cm] on smaller hook in alternating FPdc/BPdc to form rib stitch
7 sts and 6 rows = 4” [10 cm] on larger hook in alternating rows of sc FL and sc BL.
Materials
 Yarn: Cygnet Yarns Chenille Chunky (100% Polyester; 116 yards [106 meters]/100 grams): 4539 Sorbet (7 (8, 9, 9, 13, 15, 17, 19, 21) balls)
Hook: US size N/P-15 (10.0 mm), US size K-10.5 (6.5 mm)
Notions: Tapestry needle
Abbreviations
sc3tog: single 3 stitches together
Pattern Notes
This pattern is worked flat from center back to the shoulder, increased to work the cardigan front, then joined and worked in the round for the sleeve. The two panels are seamed at the center back and the hem and neck trim worked at the end.
Pattern
Left Back Panel
With larger hook, ch 33 (34, 35, 35, 38, 40, 41, 43, 45)
Row 1: Sc in 2nd ch from hook across. 32 (33, 34, 34, 37, 39, 40, 42, 44) sts)
Row 2: Ch 1, turn, sc FL across.
Row 3: Ch 1, turn, sc BL across.
Rep Rows 2-3, 3 (3, 4, 4, 5, 7, 7, 8, 8) more times.
Rep Row 2 once more. Do not turn, ch 33 (34, 35, 35, 38, 40, 41, 43, 45).
Left Front, Back Panel, and Sleeve (worked together)
Next Row: Sc in 2nd ch from hook across new ch, then cont sc BL along existing Back Panel.
Rep Rows 2-3 as for Left Back Panel 4 (5, 6, 6, 7, 8, 9, 10, 11) more times.
Fold with WS facing, sl st 19 (20, 20, 20, 21, 22, 22, 22, 23) using BL of Front Panel and FL of Back Panel, then sc BL around rem 26 (26, 28, 28, 32, 34, 36, 40, 42) sts to form sleeve. Work sc BL for 28 (29, 30, 30, 33, 34, 36, 36, 37) rnds, amigurumi style.
Next Rnd: Sc2tog 10 (13, 14, 14, 16, 14, 16, 20, 18) times, sc3tog 2 (0, 0, 0, 0, 2, 1, 0, 2) times, sc 0 ( 2, 0, 0, 0, 0, 1, 0, 0). (12 (14, 14, 14, 16, 16, 18, 20, 20) sts)
With smaller hook, *FPdc, BPdc; rep from * around for 3 rnds. Fasten off.
Right Back Panel
With larger hook, ch 33 (34, 35, 35, 38, 40, 41, 43, 45).
Row 1: Sc in 2nd ch from hook across. 32 (33, 34, 34, 37, 39, 40, 42, 44) sts)
Row 2: Ch 1, turn, sc FL across.
Row 3: Ch 1, turn, sc BL across.
Rep Rows 2-3, 3 (3, 4, 4, 5, 7, 7, 8, 8) more times. Do not turn, ch 33 (34, 35, 35, 38, 40, 41, 43, 45).
Right Front & Back Panel & Sleeve (worked together)
Next Row: Sc in 2nd ch from hook across new ch, then cont sc FL along existing Back Panel.
Rep Row 3 same as for Left Back Panel.
Rep Rows 2-3 same as for Left Back Panel 4 (5, 6, 6, 7, 8, 9, 10, 11) more times.
Fold with WS facing, sl st 19 (20, 20, 20, 21, 22, 22, 22, 23) using BL of Front Panel and FL of Back Panel, then sc BL around rem 26 (26, 28, 28, 32, 34, 36, 40, 42) sts to form sleeve. Work sc BL for 28 (29, 30, 30, 33, 34, 36, 36, 37) rnds, amigurumi style.
Next Rnd: Sc2tog 10 (13, 14, 14, 16, 14, 16, 20, 18) times, sc3tog 2 (0, 0, 0, 0, 2, 1, 0, 2) times, sc 0 (2, 0, 0, 0, 0, 1, 0, 0). (12, 14, 14, 14, 16, 16, 18, 20, 20 sts)
With smaller hook, *FPdc, BPdc; rep from * around for 3 rnds. Fasten off.
Finishing
Lay panels together, sl st with larger hook. Fasten off.
With smaller hook join yarn to RS bottom edge, ch 1.
Row 1 (RS): Sc across.
Row 2 (WS): Ch 2, turn, *BPdc, FPdc; rep from * evenly across, working final st in end st.
Row 3: Ch 2, turn, *BPdc, FPdc; rep from * evenly across, working final st in turning ch.
Row 4: Ch 2, turn. *FPdc, BPdc; rep from * evenly across, working final st in turning ch.
Rep Rows 3-4, 4 (4, 4, 4, 5, 5, 6, 6, 7) more times.
Next Row: Ch 1, turn 90 degrees, sc evenly along neckline, across back neckline, and down opposite front.
Row 1: Ch 2, turn, *FPdc, BPdc; rep from * evenly along neckline, working final st in end st.
Row 2: Ch 2, turn, *FPdc, BPdc; rep from * evenly along neckline, working final st in turning ch.
Row 3: Ch 2, turn, *BPdc, FPdc; rep from * evenly along neckline, working final st in turning ch.
Sizes 44, 48, 52, 56, 60 only
Rep Row 2 once.
Sizes 58, 60 only
Rep Row 3 once.
All Sizes
Fasten off.
Finishing
Weave in all ends.


This is not as straight forward as an ‘Easy’ pattern should be, I’m an experienced crocheter and am also confused about the folding part. A diagram or clearer instructions would help, but Nicola’s comment does help
Thank you for your feedback! So glad Nicola’s comment was helpful! – Dana, Editor
I think this is to complicated for me. With a diagram or video, I’m sorry.
Let me know if there is anything we can help with! I can reach out to the designer if you have a specific question. – Nicola, Editor
I am a beginner with sweaters.
What does ”amigurumi style” mean? I know how to BL sc. I’m not sure about amigurumi though.
Is there a video or detailed explanation somewhere?
Thank you for the help!
Fantastic pattern. Excited to make this!
Is there a diagram? What does under Left front, Back panel and sleeve worked together section “Fold with WS facing , sl stitch using BL of front panel and FL of back panel?” Where is the fold? And where are the front panel and back panel? A diagram would help to see what’s being written in the instructions
Hello! I’ve reached out to the designer for advice and she or I will reply as soon as possible. Thanks! – Nicola, Editor
Hello! The cardigan is worked in two halves, from the center back to the cuff.
The first section is the center back, then you work a chain to create the front and back at the same time, then fold it and slip stitch the front and back together to create a side seam, then work in continuous rounds in the gap to create the sleeve.
Hope this helps! – Nicola, Editor
Is there a diagram for this Cardi?
Thanks!
Tamra
Found it. The chain is at the end of the previous row.
The Left Front does not mention a chain, however the Right Front does. Do you just use the same numbers? Thank you
Hello! I’ve reached out to the designer for advice and she or I will reply as soon as possible. Thanks! – Nicola, Editor