


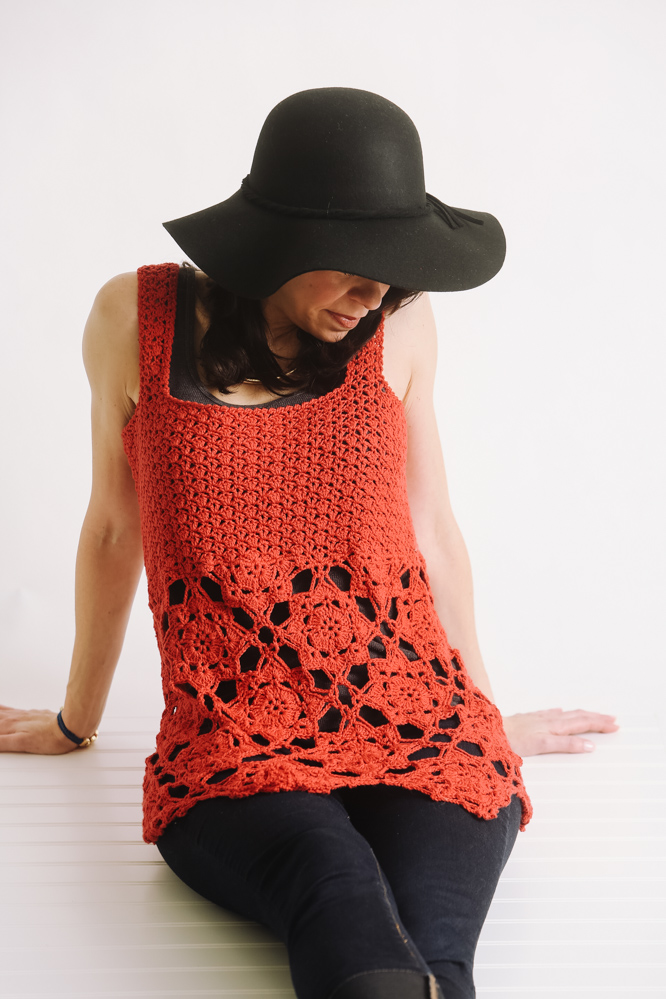
Crochet motifs are a really fun way of creating fabric—especially when they are joined as you go. Changing hook sizes is an easy way to create shaping with smaller motifs at the waist, and larger, looser ones at the hips. Make this top as shown or customize the length into an airy summer dress!
Skill Level: Intermediate
Size: Finished Bust Size 30 (36, 42, 48, 54)” (76 (91.5, 106.5, 122, 137) cm) to fit bust 29 (35, 41, 47, 53)”
1″ (2.5 cm) positive ease recommended.
Shown in size 36″ (91.5 cm)
Gauge: Diamond Motif measures 5″ (12.5 cm) diagonally from corner to corner using the larger hook (see Notes); 4 SR and 28 rows = 4″ (10 cm) in Lace Pattern using the smaller hook, after wet blocking.
Materials
Yarn:
![]() Quince & Co. Willet (100% cleaner cotton; 160 yards (146 meters)/50 grams): #705 Flare (5 (6, 8, 9, 11) skeins)
Quince & Co. Willet (100% cleaner cotton; 160 yards (146 meters)/50 grams): #705 Flare (5 (6, 8, 9, 11) skeins)
Hook: US sizes D/3 (3.25 mm) and F/5 (3.75 mm)
Notions: Tapestry needle
Abbreviations (as needed)
Picot: Sc into indicated st, ch 3, sc into the side of the sc just made.
SR: stitch pattern repeat(s)
V-st: (dc, ch 1, dc) into indicated st
Special Stitches
Diamond Motif
(also, see chart)
Ch 6, sl st into first to join into a ring.
Rnd 1: Ch 3 (counts as dc, ch 1), (dc, ch 1) 7 times, sl st into 2nd ch of tch to join.
Rnd 2: Sl st into ch-1 sp, ch 3 (counts as dc, ch 1), 3 dc into same ch-1 sp as sl st, ch 1, (dc, ch 3, dc) into next ch-1 sp, ch 1, *3 dc, ch 1) twice into next ch-1 sp, (dc, ch 3, dc) into next ch-1 sp, ch 1; rep from * around, 2 dc into same ch-1 sp as first sl st, sl st into 2nd ch of tch to join.
Rnd 3: Ch 1, sc into ch-1 sp, *ch 5, sk 4 dc, (sc, ch 3, sc) into ch-3 sp, ch 5, sk 4 dc, sc into ch-1 sp; rep from * to end, sl st into first sc to join.
Rnd 4: Ch 5 (counts as dc, ch 3), dc into sc, ch 1, sc into ch-5 sp, 4 dc into ch-3 sp, ch 5, sl st into 4th ch from hook, ch 1, 4 dc into same ch-3 sp, sc into ch-5 sp, ch 1, *(dc, ch 3, dc) into sc, ch 1, sc into ch-5 sp, 4 dc into ch-3 sp, ch 5, sl st into 4th ch from hook, ch 1, 4 dc into same ch-3 sp, sc into ch-5 sp, ch 1; rep from * around, sl st into 2nd ch of tch to join.
(Note: Work the following First Rnd 5 on the very first square motif, then all the following square motifs will be joined to the existing motifs by working the Joining Rnd 5.)
First Rnd 5: Sl st into ch-3 sp, ch 2 (counts as dc), (2 dc, ch 3, 3 dc) into same ch-3 sp, sc into sc, ch 5, (sc, ch 5) 3 times into corner ch-3 loop, sc into sc, *(3 dc, ch 3, 3 dc) into ch-3 sp, sc into sc, ch 5, (sc, ch 5) 3 times into corner ch-3 loop, sc into sc; rep from * to end, sl st into top of tch to join. Fasten off.
Joining Rnd 5: Sl st into ch-3 sp, ch 2 (counts as dc), (2 dc, ch 3, 3 dc) into same ch-3 sp, sc into sc, ch 5, (sc, ch 5, sc) into corner ch-3 loop, *ch 5, sc into same corner ch-3 loop, ch 5, sc into sc, (3 dc, ch 3, 3 dc) into ch-3 sp, sc into sc, ch 5, (sc, ch 5, sc) into corner ch-3 loop; rep from * for each non-joined edge, **ch 2, sl st into corresponding ch-5 sp on joining motif, ch 2, sc into same corner ch-3 loop as before, ch 5, sc into sc, 3 dc into ch-3 sp, ch 1, sl st into corresponding ch-3 sp on joining motif, ch 1, 3 dc into same ch-3 sp as before, sc into sc, ch 5, sc into corner ch-3 loop, ch 2, sl st into corresponding ch-5 sp on joining motif, sc into same corner ch-3 loop as before; rep from ** for each joined edge, ch 5, sc into same ch-3 loop as before, ch 5, sc into sc, sl st into top of tch to join.
Triangle Motif
(also, see chart)
With smaller hook, ch 5, sl st into first ch to join into a ring.
Row 1 (WS): Ch 3 (counts as dc, ch 1), dc into ring, (ch 1, dc) 4 times into ring, turn. (5 ch-1 sps)
Row 2 (RS): Ch 3 (dc, ch 1), dc into first ch-1 sp, ch 1, (3 dc, ch 1, 3 dc) into next ch-1 sp, ch 1, (dc, ch 3, dc) into next ch-1 sp, ch 1, (3 dc, ch 1, 3 dc) into next ch-1 sp, ch 1, (dc, ch 1, dc) into last ch-1 sp, turn.
Row 3: Ch 4 (counts as dc, ch 2), sc into first ch-1 sp, ch 5, sk 4 dc, sc into ch-1 sp, ch 5, (sc, ch 3, sc) into ch-3 sp, ch 5, sk 4 dc, sc into ch-1 sp, ch 5, sk 4 dc, (sc, ch 2, dc) into last ch-1 sp, turn.
Row 4: Ch 8, sl st into 4th ch from hook, ch 1, 4dc into ch-2 sp, sc in ch-5 sp, ch 1, (dc, ch 3, dc) into sc, ch 1, sc into ch-5 sp, 4 dc into ch-3 sp, ch 5, sl st into 4th ch from hook, ch 1, 4 dc into same ch-3 sp, sc into ch-5 sp, ch 1, (dc, ch 3, dc) into sc, ch 1, sc into ch-5 sp, 4 dc into tch-sp, ch 5, sl st into 4th ch from hook, ch 1, dc into 2nd ch of tch, turn.
(Note: When working the sl st to join to another motif remember that the wrong side of the triangle motif is facing, so hold the joining motifs with the wrong side facing as you join.)
Joining Row 5 (WS): Sl st into ch-1 sp, ch 1, sc into corner ch-3 loop, *ch 2, sl st into corresponding ch-5 sp on joining motif, ch 2, *sc into same corner ch-3 loop as before, ch 5, sc into sc, 3 dc into ch-3 sp, ch 1, sl st into corresponding ch-3 sp on joining motif, ch 1, 3 dc into same ch-3 sp as before, sc into sc, ch 5, sc into corner ch-3 loop, ch 2, sl st into corresponding ch-5 sp on joining motif, ch 2; rep from * once more, sl st into same corner ch-3 loop as before. Fasten off.
Lace Pattern
Worked in Rounds (multiple of 6 sts)
Set-up Rnd: Ch 1, *sc into first sc, ch 1, sk 2 sc, work 3 dc into next sc, ch 1, sk 2 sc; rep from * around, sl st into first sc to join. Do not turn.
Rnd 1: Ch 4 (counts as dc, ch 1), dc into same sc used for joining sl st, ch 1, sk 1 dc, sc into next dc, ch 1, *V-st into sc, ch 1, sk 1 dc, sc into next dc, ch 1; rep from * around, sl st into 3rd ch of tch to join.
Rnd 2: (Sl st, ch 1, sc) into ch-1 sp, ch 1, work 3 dc into next sc, ch 1, sk 1 ch-1 sp, *sc into ch-1 sp of V-st, ch 1, work 3 dc into next sc, ch 1, sk 1 ch-1 sp; rep from * around, sl st into first sc to join.
Rep Rnds 1 and 2 for pattern.
Worked in Rows
Row 1 (WS): Ch 1, sc into first dc, *ch 1, V-st into next sc, ch 1, sk 1 dc, sc into next dc; rep from * to last sc, ch 1, work 2 dc into last sc, turn.
Row 2 (RS): Ch 1, sc into first dc, ch 1, *work 3 dc into next sc, ch 1, sk 1 ch-1 sp, sc into ch-1 sp of V-st, ch 1; rep from * to last sc, work 2 dc into last sc, turn.
Rep Rows 1 and 2 for pattern.
Crab Stitch
Rnd 1: *Insert hook into next st to the right, yarn over and pull up a loop, yarn over and draw through both loops on hook; rep from * around, slip st into first st to join.
Pattern Notes
– Measure the Diamond Motif from the end of the fabric on one corner diagonally across the motif to the end of the fabric on the opposite corner. Note that an additional 1″ [2.5 cm] will be added between each motif when it is joined. For example: The sample size has 6 motifs worked around the skirt measuring 5″ [12.5 cm] each, plus 1″ between each motif, resulting in a 36″ [91.5 cm] skirt circumference.
– This top has subtle waist shaping by using a larger size hook for the lower diamond motifs, and a smaller size hook for the upper diamond motifs and triangle motifs. To make the waist shaping more dramatic, or to create a flared lower edge, choose hook sizes that are a few sizes apart and adjust the width of your motifs accordingly.
– To make fewer ends that need to be woven in, work the tail from the beginning of each motif into the motif stitches as they are being worked by wrapping the tail over and under the working yarn, while crocheting many stitches, or by laying the tail over existing stitches and crocheting over it.
– The diamond motifs on the skirt are worked first, joining the new motifs to the existing motifs as they are being made. Then the Triangle Motifs are worked at the top edge of the Diamond Motifs. Edging is worked at the lower edge of the skirt, then the bodice is worked from the top edge of the skirt to the underarm in the Lace Pattern. The straps are worked by extending up from the front, and are then sewn to the back.
Pattern
Skirt
Using the larger hook, begin with the Diamond Motif near the lower left corner of the motif diagram. Continue to work all the other Diamond Motifs for your size, following the diagram, and joining to the existing motifs on Rnd 5 as they are being made.
When working the Diamond Motifs at the right edge of the diagram, join them to the Diamond Motifs at the left edge of the diagram to form a ring for the body of the sweater.
When all the Diamond Motifs are complete using the larger and smaller hook, then use the smaller hook to work the Triangle Motifs along the top edge of the diagram.
Lower Skirt Edging
With larger hook and RS of lower edge of skirt facing, join yarn with a sl st to the right ch-5 corner loop of a Diamond Motif toward the back of the skirt. (See Edging Chart.)
Rnd 1: Ch 1, sc into same ch-5 sp, *ch 5, picot into next ch-5 sp, ch 5, picot into ch-3 sp, (ch 5, picot into next ch-5 sp) 4 times, ch 5, picot into next ch-3 sp, ch 5, picot into next ch-5 sp, ch 5, sc into next corner ch-5 sp, sc into corner ch-5 sp of the next motif; rep from * around, ending before the last sc, sl st into the first sc to join. Fasten off.
Bodice
Set-up Rnd: With right side of triangle-edge of skirt facing and larger hook, join yarn into the ch-5 loop on the left of the top corner of a diamond motif (see Bodice Set-up Round Chart), ch 1, *sc 2 sts into the ch-5 corner loop, work 32 sc across the top of the triangle motif, then work 2 sc into the next ch-5 corner loop of the next diamond motif; rep from * around, sl st into first sc to join. (180 (216, 252, 288, 324) sc)
Work Rnd 1 of Lace Pattern in the Rnd. (30 (36, 42, 48, 54) SR)
Continue working Lace Pattern in the Rnd until Rnds 1–4 have been worked 11 (12, 13, 14, 15) times, then work Rnd 1 once more. Break yarn.
(Piece should meas about 6½ (7, 7½, 8¼, 8¾)” [16.5 (18, 19, 21, 22) cm] from skirt.)
Left Strap
Set-up Row (RS): With RS of bodice facing, skip 2 (3, 4, 5, 6) V-sts, then join into the ch-1 sp of next V-st with a slip st, *ch 1, sc into same ch-1 sp used for join, ch 1, work 3 dc into next sc, ch 1, sk 1 ch-1 sp, sc into ch-1 sp of next V-st; rep from * 0 (0, 1, 1, 2) more times, ch 1, work 2 dc into next sc, turn. (1½ (1½, 2½, 2½, 3½) SR)
Work Rows 1 and 2 of Lace Pattern (worked in rows) until strap meas 13 (14, 15, 16, 17)” from bodice. Fasten off.
Right Strap
Set-up Row (RS): With RS of bodice facing, skip 7 (8, 7, 8, 9) V- sts from left strap, then join into the ch-1 sp of next V-st with a slip st. Cont working the same as the left strap.
Finishing
Sew the ends of the straps to the back.
Armhole and Neck Trim
Join yarn with a sl st at the corner of the back strap, then work Crab St evenly around. Fasten off. Rep for each armhole and neckline.
Weave in ends. Block piece to measurements.
Hi- the directions mention a diagram, but I don’t see one- please post- thanks
Hello Linden! Charts are always on the far right side of the pattern page underneath the photos. Here is a direct link to the charts as well:
https://www.ilikecrochet.com/wp-content/uploads/Rad-in-Red-Tank-Chart-1.pdf
https://www.ilikecrochet.com/wp-content/uploads/Rad-in-Red-Tank-Chart-2.pdf
Thanks! – Nicola, Editor
Loverly can’t wait to try..
I hope I got everything of Rad Red. It’s beautiful and I don’t know when I will get to it. ????