


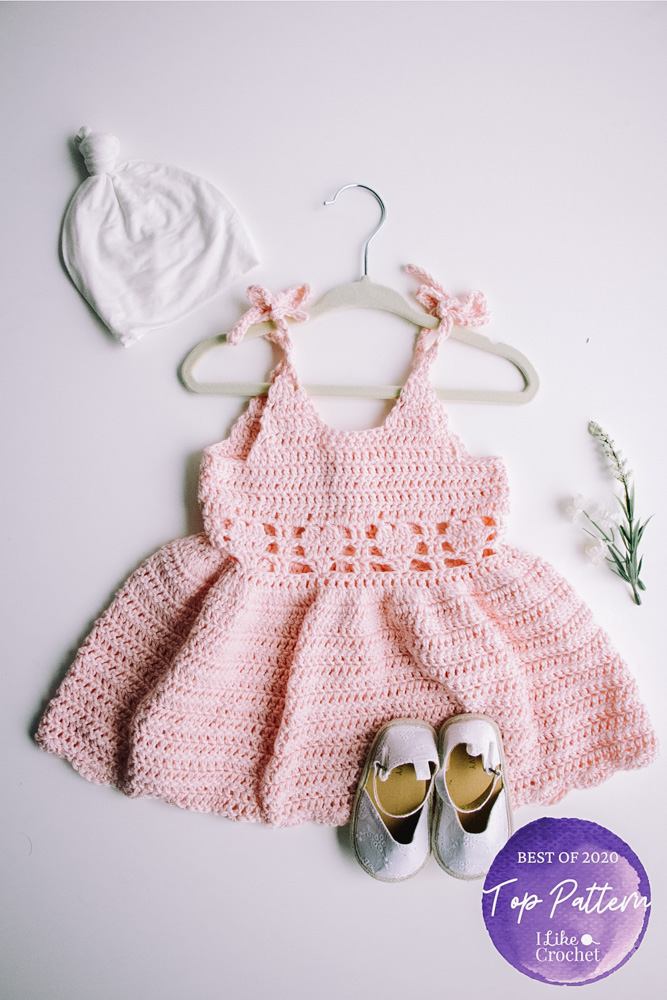
This easy little dress crocheted in soft cotton is crafted to be a special occasion spring dress, but feels as comfortable as everyday playwear. Its soft pink color is easy to match and the band of hearts around the waist adds the perfect, final sweet touch.
Time: Weekend Project
Skill Level: Easy
Size: Finished Chest Size 22 (25, 26.25)” to fit sizes 2 (4, 6)
Shown in size 2
Gauge: 14 sts and 8 rows = 4” [10 cm] in dc
Materials
 Yarn: Universal Yarn Cotton Supreme DK (100% Cotton; 231 yards [211 meters]/100 grams): Color #705 Pink 2 (2, 3) balls
Hook: US size G/6 (4.25 mm)
Notions: Five 5/8” buttons, tapestry needle
Pattern Notes
Foundation chain is at the waist. The bodice is worked up from the chain and the skirt is worked down from the chain.
Ch-3 counts as 1 dc.
On Strap sections, beg ch-2 + first dc = a dc2tog decrease. When working the subsequent rows just work in top of dc and ignore the ch-2.
Pattern
Bodice
Ch 80 (88, 96). Updated 3/9/2021
Row 1 (WS): Dc in 4th ch from hook and in each ch across, ch 3, turn. (78 (86, 94) dc) Updated 3/9/2021
Row 2: Dc in next 3 dc, *ch 2, sk 3 dc, 3 dc in next dc, ch 2, sk 3 dc, dc in next 2 dc; rep from * across, ending with dc in last 2 dc, ch 3, turn. (8 (9, 10) 3-dc shells)
Row 3: Dc in next 3 dc, *ch 1, sk ch-2 sp, 2 dc in next dc, dc in next dc, 2 dc in next dc, ch 1, sk ch-2 sp, dc in next 2 dc; rep from * across, ending with dc in last 2 dc, ch 3, turn. Updated 3/9/2021
Row 4: Dc in next 3 dc, *ch 2, sk ch-1 sp, work (dc3tog, ch 1, dc3tog) over the next 5 dc, placing the first leg of the second dc3tog in the same (center) st as the last leg of the first dc3tog, ch 2, sk ch-1 sp, dc in next 2 dc; rep from * across, dc in last 2 dc, ch 3, turn. Updated 3/9/2021
Row 5: Dc across, placing 1 dc in each dc, 2 dc in each ch-2 sp, 1 dc in each ch-1 sp, and 1 dc in top of each dc3tog, ch 3, turn. [78 (86, 94) dc] Updated 3/9/2021
Rows 6 – 8 (6 – 11, 6 – 14) : Dc across, ch 3 except for final row, ch 1, turn after final row. Updated 3/9/2021
Back Right Strap
Row 1: Sc in first 1 (2, 3) dc, dc2tog, dc in next 9 (10, 11) dc, dc2tog, ch 2, turn leaving rem sts unworked. (11 (12, 13) dc)
Row 2: Dc in next dc (see note), dc across to last 2 sts, dc2tog. (9 (10, 11) dc)
Rows 3-5 (5, 6): Rep Row 2. (3 (4, 3) dc)
Size 4 only
Row 6: Dc in next st, dc2tog. (3 dc)
All Sizes
Last Row: Dc2tog. Make a chain 8 (9, 10)” long, sc in 2nd ch from hook and in each ch across, join with sl st to top of dc2tog just made. Fasten off.
Center Front Section
Row 1: Sk 10 (11, 12) dc from end of Back Strap, join yarn in next dc, ch 2, dc in next dc (counts as dc2tog, see note), dc in each of next 24 (26, 28) dc, dc2tog, ch 2, turn.
Row 2: Dc in next st, dc across to last 2 sts, dc2tog. Ch 2, turn. (22 (24, 26) dc)
Size 2 only
Go to Front Right Strap.
Sizes 4 (6) only
Rep Row 2, 1 (2) time(s). (22 sts all sizes)
Front Right Strap
Row 1: Dc in next dc, dc in next 5 (6, 7) dc, dc2tog. Leave rem sts unworked. (7 (8, 9) dc)
Rep Rows 2-4 of Back Right Strap.
Size 4 only
Rep Row 6 of Back Right Strap.
All Sizes
Rep Last Row of Back Right Strap.
Front Left Strap
Sk 6 (7, 8) sts from end of Front Right Strap, join yarn with sl st in next dc and ch 2.
Rep all instructions of Front Right Strap.
Back Left Strap
Row 1: Sk 10 (11, 12) dc from end of Back Strap, join yarn in next dc, ch 2, dc in next dc (counts as dc2tog, see note), dc in each of next 9 (10, 11) dc, dc2tog, ch 2, turn. (9 (10, 11) dc)
Rep all instructions from Back Right Strap beg with Row 2.
Skirt
Row 1: With RS facing, orient work so you can stitch across the opposite side of foundation chain, join yarn with sl st at beg of row, dc in same st as rnd join, 2 dc in each dc across, ch 3, turn. (156 (174, 192) dc)
Work even in rows in dc until Skirt meas approx. 3.5 (4.5, 6)” from start of Skirt, join Skirt in the rnd with sl st in first dc of row, ch 3, turn.
Next Rnd: Dc around, join rnd with sl st in top of first dc, ch 3, turn.
Rep last rnd until Skirt meas 8 (9.5, 11)” from start of Skirt.
On final rnd, increase 2 sts evenly spaced around, ch 1, turn. (158 (176, 194) dc)
Edging
Rnd 1: Sc in same st as rnd join, *sk 2 dc, 5 dc in next dc, sk 2 dc, sc in next dc; rep from * around, eliminating final sc and joining rnd with sl st in first sc. Fasten off.
Finishing
Buttonhole Band Edging
Work 1 row in sc evenly spaced along right hand side of back opening from top to bottom. Do not fasten off, keep working up the other side for the button band.
Button Band Edging
Work 1 row dc evenly spaced along left hand side of back opening from bottom to top. Fasten off.
Align Buttonhole Band over Button Band, align buttons on the Button Band opposite the dc you wish to use as buttonholes, sew buttons into place.
Weave in all ends.
View this post on Instagram
How can I modify this pattern to fit 6-9 months?
What is the size in? USA or European? If european which size would fit 12m?
All I Like Crochet patterns are in USA sizes and follow the CYC sizing guidelines: https://www.craftyarncouncil.com/standards/child-youth-sizes
Is it sizes for 2yrs, 4yrs, 6yrs?
Hi Cheyenne, yes, I believe that is how the sizing works for this one! – Nicola, Editor
Hi I’m trying to figure out the 2nd row on the bodice cause I’m calculating it should be 75 stitches please help
Hello! I’ve reached out to the designer for advice and she or I will reply as soon as possible. Thanks! – Nicola, Editor
From the designer: For the size 2 there are 78 dc at the end of Row 1 as written; 46 dc at the end of Row 2 (8 3-dc shells as written, plus 7 2-dc groups, plus 4 dc at the beginning and end of the row.
Hope this helps! – Nicola, Editor
Keşke videolu anlatım olsaydı bu şekilde yeni başlayanlar için çok zor
Hi there, I apologize but there is not a video tutorial for this project at the moment. Please let me know if there is a specific part that you need help with and I can reach out to the designer for advice. Thank you! – Nicola, Editor
Would it be possible please to have a picture of the back Thankyou Val
Hi Val! Additional photos can be found on the right hand of the screen, or below if you are on a mobile device. Here’s a photo of the back: https://www.ilikecrochet.com/wp-content/uploads/Heart-to-Heart-Toddler-Dress-6.jpg
Happy crocheting! – Nicola, Editor
Could you tell how I get the updated pattern please
The pattern has been updated above, happy crocheting! – Nicola, Editor
How can I get a print-out of this pattern? Heart to Heart Toddler Dress…..
Hi Joanne! You are welcome to save this pattern by copying and pasting into a word document or by printing the pattern via the printer icon on the left hand side of your screen. Hope this helps! – Nicola, Editor
The pattern doesn’t appear to be correct? Any luck at getting clarification yet?
Hi Dianna! Pattern has just been updated! Happy crocheting! – Nicola, Editor
Can’t wait to figure out how like or favorite a pattern. I know it must be something I’m just completely overlooking
Hello! This is currently a function we are working on implementing in the near future. In the meantime, we recommend using your web browser’s book mark tool or Pinterest for saving your favorite patterns. Hope this helps for now! – Nicola
This is perfect for my little princess
Have started making it but could you give more precise instructions about centre front after first strap? Thank you- I am a novice at crochet!
Hello Anne-Marie! We’ve reached out to the designer for clarification and she or I will reply as soon as possible. Thanks! – Nicola
Pattern has been updated!
When I go to do row 3 on the bodice the part for the heart is not on top of the 3 DC..can u help me
Hello Brittny! We’ve reached out to the designer for clarification and she or I will reply as soon as possible. Thanks! – Nicola
Pattern has been updated!
Hello I’m having a hard time with row 2 and 3 on the bodice…it’s not matching up..maybe I’m doing something wrong…I have 77 DC including the chain at the beggining and on round 2 I started with 3 DC including the chain 3..and started in the stitch after the ch3..is this right? Please and thank you
I think that little dress is so cute. Can’t wait to make it!