


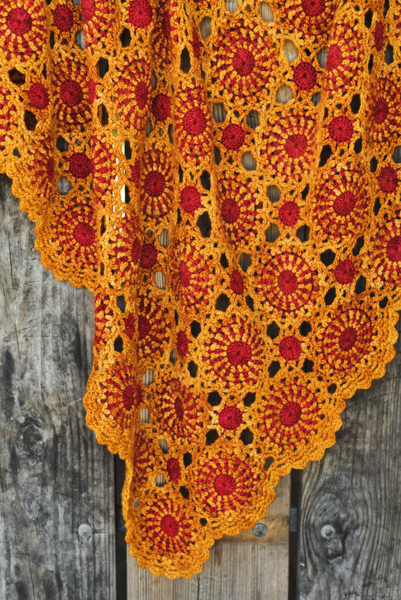
Inspired by the vibrant hues of a beloved fall flower, this afghan unites the coziness of the season with the fresh feeling of chrysanthemum motifs. Even better, it’s easy to work up because the motifs are joined as you go.
Skill Level: Intermediate
Size: 42” x 59”, blocked
Gauge: Larger Motif = approx. 5” wide, unblocked and before joining
Gauge is not critical for this project
Materials
Yarn: Malabrigo Yarn Merino Worsted (100% Merino Wool; 210 yards [192 meters]/100 grams): 096 Sunset (MC), 6 skeins; 102 Sealing Wax (CC), 4 skeins
Hook: US size H/8 (5 mm)
Notions: Removable markers (or safety pins); tapestry needle.
Special Stitches
Standing sc st (Standing single crochet stitch): With slip knot on hook, insert hook into designated st, yo, pull lp through, yo, pull through both lps on hook completing the Standing sc st.
Pattern Notes
Color changes are made by removing hook and placing loop on a removable marker so that yarn can be carried up the back on alternate rounds minimizing the number of ends to weave in later.
Accurate gauge is not critical but the project will look best if the gauge is not tight. Also, a looser gauge will help the motif easily stretch flat if it starts to cup after Rnd 5.
Pattern
Larger Motif (make 88)
With CC, make magic ring.
Rnd 1: Ch 3 (counts as first dc), work 15 dc in ring, sl st in top of first dc, remove hook and place loop on removable marker, hold in back, pull magic ring tight – 16 dc.
Rnd 2: With MC, start with a standing sc st on opposite side of where Rnd 1 ended, ch 1, (sc in next st, ch 1) 15 times to end, sl st in top of first sc, remove hook and place loop on removable marker, hold in back.
Rnd 3: Remove removable marker from Rnd 1 and insert hook in loop, ch 1, sc in ch-1 sp made in Rnd 2 that is directly above last st made in Rnd 1, ch 1, (sc in next sp, ch 1) 15 times to end, sl st in top of first sc, remove hook and place loop on removable marker, hold in back.
Rnd 4: Remove removable marker from Rnd 2 and insert hook in loop, ch 1, sc in ch-1 sp made in Rnd 3 that is directly above the st made in Rnd 2, ch 2, (sc in next sc, ch 2) 15 times to end, sl st in top of first sc, remove hook and place loop on removable marker, hold in back.
Rnd 5: Remove removable marker from Rnd 3 and insert hook in loop, ch 1, sc in ch-2 sp made in Rnd 4 that is directly above the st made in Rnd 3, ch 2, (sc in next sc, ch 2) 15 times to end, sl st in top of first sc. Fasten off.
Rnd 6: Remove removable marker from Rnd 4 and insert hook in loop, ch 1, sc in ch 2 sp made in Rnd 5 that is directly above the st made in Rnd 4, ch 3, sc in same sp, (sc in next sp, ch 3, sc in same sp) 15 times to end, sl st in first sc.
Rnd 7: Sl st in next sp, ch 1, sc in same sp, ch 3, sc in same sp, (sc in next sp, ch 3, sc in same sp) 15 times to end, sl st in first sc. Fasten off.
Note: The above instructions for Rnd 7 are for first motif only. Connecting motifs are joined as follows:
Rnd 7 (Connecting Rnd): Work same as Rnd 7 above until reaching side of motif to join, (sc in next sp, ch 1, remove hook from loop and insert hook (front to back) in corresponding ch-3 sp on motif being joined, insert hook into loop and draw through ch-3 sp, ch 2, sc in same sp) twice, motifs are now joined on one side. Fasten off.
Note: All Large Motifs are joined at the top, bottom, and side in 2 adjacent ch-3 loops. There will always be 2 unjoined ch-3 loops between joins of the Larger Motifs. These free-standing ch-3 loops will later be joined to the Smaller Motifs.
Connecting Larger Motifs
Work 8 Larger Motifs and join across to create the first row. On the second row, the first motif will be joined to the side of the last motif on the bottom. The next motif will be joined to the top of the first motif and then to the side of second motif from Row 1. Continue joining motifs in rows until 11 rows (88 motifs) have been completed. Motifs can also be joined in smaller sections instead of rows. Weave in ends.
Note: If using Malabrigo Yarn which is kettle-dyed, each skein will be slightly different. When joining motifs, try to vary the skeins in an area so that the different skeins will blend together evenly.
Smaller motif (make 70)
With CC, make magic ring.
Rnd 1: Ch 3 (counts as first dc), work 15 dc in ring, sl st in top of first dc. Fasten off. Pull magic ring tight – 16 dc.
Note: Weaving in ends of Rnd 1 before starting Rnd 2 will minimize number of ends to weave in later.
Rnd 2 (Connecting Rnd): With MC, make a standing sc st in any dc in Rnd 1, (ch 2, remove hook from loop and insert hook (front to back) in corresponding ch-3 loop of Larger Motif being joined, insert hook into loop and draw through ch-3 sp, ch 2, sc in next 2 dc of Smaller Motif) 7 times, end with sl st in first sc. Fasten off. Weave in ends.
Note: Smaller Motifs can be joined after all Larger Motifs are joined or after the first 2 rows of Larger Motifs have been completed.
Border
Rnd 1: With MC, make a standing sc st in any ch-3 sp, ch 3, sc in same sp, (sc in next ch-3 sp, ch 3, sc in same sp) to end, sl st in first sc.
Note: Do not work in area where motifs are joined. Each motif should have 6 ch-3 sps and corner motifs should have 10 ch-3 sps.
Rnd 2: Sl st in ch-3 sp, ch 1, sc, hdc, dc, hdc, sc in same ch-3 sp, [(sc, hdc, dc, hdc, sc) in next sp] to end, sl st in first sc. Fasten off. Weave in ends.
Finishing
Weave in all ends. Block to measurements.
When I try to print, the paragraph under the opening photos won’t print. Not in landscape or portrait mode. The paragraph ends up partially cut off and partially showing up as reading from top to bottom, all on the far right side.
Hi Elizabeth, thank you for bringing this to my attention! I believe I’ve fixed the issue and it should print properly now. Please let me know if you run into any more issues! – Nicola, Editor
How do I see the pictures?
Any chance you can provide charts for the motifs?
I was looking for a chart, too!
Hello Carolyn! Charts are always on the far right side of the pattern page underneath the photos.
Thanks! – Nicola, Editor