


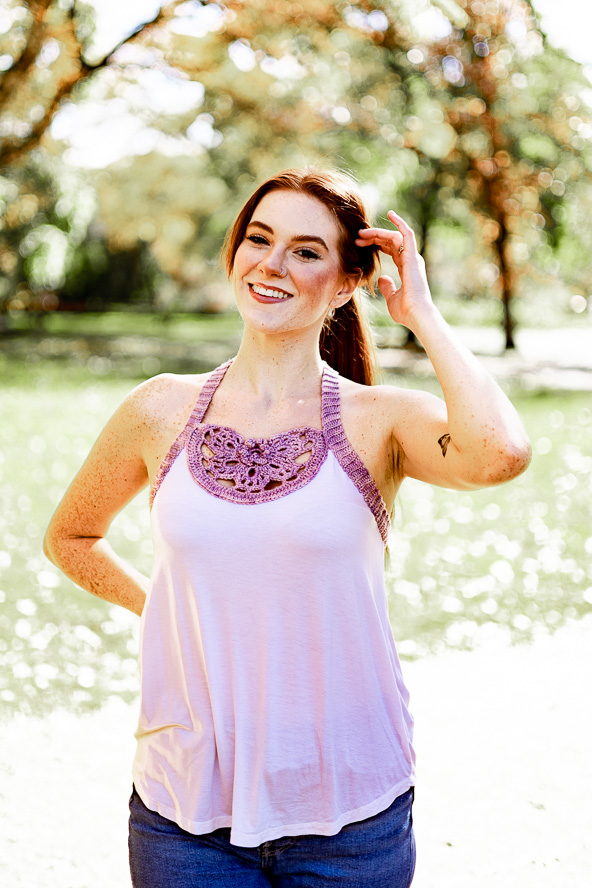
Turn an everyday tank top into a stylish halter top with this crochet pattern. With encased elastic in the halter band and a center back strap this halter will fit nicely and not pull on the back of your neck.
Time: Weekend Project
Skill Level: Intermediate
Size: Finished Bust Size 31 (36, 42, 48, 53, 57)” to fit bust 32 (38, 44, 50, 56, 60)”
1-3” negative ease recommended – depending on size and undergarment.
Shown in size 36”
Gauge: 18 sts and 24 rows = 4” [10 cm] in sc st after wet blocking
Materials
 Yarn: Wonderland Yarns Alice DK (70% superwash merino / 30% silk; 242 yards [221 meters]/113 grams): 315 Melancholy Maiden 1 ball
Hook: US size H/8 (5.0 mm) & US size 7 (4.5 mm)
Notions: tapestry needle, tank top, sewing needle, sewing thread to match tank top, straight pins, 2 yds of 1/2, 5/8, or ¾-inch bias tape to match tank top, 1.5 yds of ¼ or 3/8-inch wide elastic
Special Stitches
Baste: With sewing thread, *sew up through fabric, go over about ½ inch, sew down through fabric, go over about ½”; repeat from * across. Basting stitches are meant to basically “pin” fabric together. When a project is done, basting stitches are removed if possible.
Back Stitch: With sewing thread, sew up through fabric about 1/8 inch past where stitching should start, sew down where stitching should start, *sew up about 1/8” past end of last stitch, sew down at end of last stitch; repeat from * across. The top of the backstitch is short stitches one directly after the other, the back has the thread overlapping.
Whip Stitch (to encase a cut edge): With sewing thread, *sew through fabric under the cut edge picking up about 1/8 inch of the fabric below the cut edge, move over 1/8”; repeat from * encasing the cut edge in the whip stitches.
Pattern Notes
- Pattern makes 3 pieces, the Front Flower, the Halter Band (which goes around the top of the tank), and the Halter Strap (which goes vertically from the back of the tank to the base of the neck).
- Next the pieces are sewn onto the tank top and the excess tank fabric is cut away to make the halter.
- A piece of single-fold bias tape is sewn inside the halter band and a thin elastic is threaded through it so the band will stay as tight as the wearer wishes. This counteracts the issue of the crochet “growing” as the day wears on.
Pattern
Halter Band – make with H/8 (5.0 mm) hook
Ch 8 (8, 9, 9, 10, 10),
Row 1: Sl st in second ch from hook, sl st in each remaining ch. (7 (7, 8, 8, 9, 9) sc)
Row 2: Ch 1, turn, sl st in blo of each st across. (7 (7, 8, 8, 9, 9) sl st)
Repeat Row 2 to proper length:
When band is stretched there will be obvious ridges. Make band 19 ridges long for each 10 inches of band needed. Make band to the following number of ridges: 85 (96, 113, 126, 142, 151)
Tie Strings: Ch 80, sl st in each st of first row of strap, ch 80.
Repeat on last row of band.
Center Back Strap – make with H/8 (5.0 mm) hook
Ch 8 (8, 9, 9, 10, 10),
Row 1: Sl st in second ch from hook, sl st in each remaining ch. (7 (7, 8, 8, 9, 9) sc)
Row 2: Ch 1, turn, sl st in blo of each st across. (7 (7, 8, 8, 9, 9) sl st)
Repeat Row 2 to proper length:
When band is stretched there will be obvious ridges. Make band to the following number of ridges: 22 (25, 26, 29, 30, 32)
Fasten off and weave in ends.
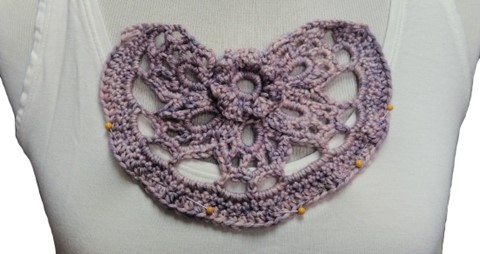
Flower Center – make with 7 (4.5 mm) hook
Flower Center
Rnd 1 (RS): Ch 5, sl st to first ch made to form a loop, ch 1 (does not count as a st here or throughout), 25 sc in loop, sl st to first sc. (25 sts)
Rnd 2: Ch 1, sc in flo of first st, ch 3, [sc in flo of next st, ch 3] 25 times, sl st to top of first sc. (25 sc)
Rnd 3: Sl st to blo of first sc of Rnd 2, ch 1, sc in same back loop, sc in blo of each of next 15 sts, leave remaining sts unworked. (16 sc)
Do not fasten off.
Petals
Row 1 (WS): Ch 1, turn, sc in first st, sc in next st, [ch 7, sl st in first ch made, sc in each of next 3 sts] 4 times, ch 7, sl st in first ch made, sc in each of last 3 sts. (16 sc, 5 ch-7 sps)
Row 2 (RS): Ch 1, turn, sl st in first st, [skip 1, 15 sc in ch-7 sp, skip 1, sl st in next st] 5 times. (15 sc in each petal)
Row 3: Turn, [ch 3, skip 2, sc in next st, [ch 2, skip 1, hdc in next st] 4 times, ch 2, skip 1, sc in next st, ch 3, skip 2, sl st in sl st between petals] 5 times working last sl st in side of row 1. (6 sts in each petal)
Row 4: Ch 1, turn, 4 sc in ch-3 sp, *3 sc in each of next 5 ch-2 sps, skip next 2 ch-3 sps; repeat from * 3 more times, 3 sc in each of next 5 ch-2 sps, 4 sc in last ch-3 sp, sl st in last st of Row 2. (83 sts)
Row 5: Turn, sl st in each of next 6 sc, ch 3, skip 2, hdc in next st, *[ch 3, skip 2, hdc in next st] 2 times, ch 4, skip 8, hdc in next st; repeat from * 3 more times, [ch 3, skip 2, hdc in next st] 2 times, ch 3, skip 2, sl st in next st.
Fasten off.
Row 6: Do not turn, attach yarn with a sl st to first ch-3 sp of Row 5, ch 1, 3 sc in next ch-3 sp, 5 sc in next ch-3 sp, [7 sc in next ch-4 sp, 5 sc in each of next 2 ch-3 sps] 3 times, 7 sc in next ch-4 sp, 5 sc in next ch-3 sp, 3 sc in next ch-3 sp, ch 1, sl st in next ch-3 sp. (74 sts)
Row 7: Ch 4 (does not count as a st), turn, sc3tog, sc in each of next 68 sts, sc3tog. (70 sts)
Row 8: Ch 4 (does not count as a st), turn, hdc4tog, hdc in each of next 62 sts, hdc4tog. (64 sts)
Sizes 31 & 36, fasten off.
Row 9: Ch 3 (does not count as a st), turn, sc3tog, [sc in each of next 11 sts, 2 sc in next st] 4 times, sc in each of next 10 sts, sc3tog. (64 sts)
Row 10: Ch 4 (does not count as a st), turn, hdc4tog, hdc in each of next 54 sts, hdc4tog. (58 sts)
Sizes 42 & 48, fasten off.
Row 11: Ch 3 (does not count as a st), turn, sc3tog, [sc in each of next 12 sts, 2 sc in next st] 3 times, sc in each of next 13 sts, sc3tog. (57 sts)
Row 12: Ch 4 (does not count as a st), turn, hdc4tog, hdc in each of next 49 sts, hdc4tog. (51 sts)
Sizes 53 & 57, fasten off.
Construction Steps
1. Place flower over front neck line and pin down.
2. Mark where flower border crosses over neck line edge.
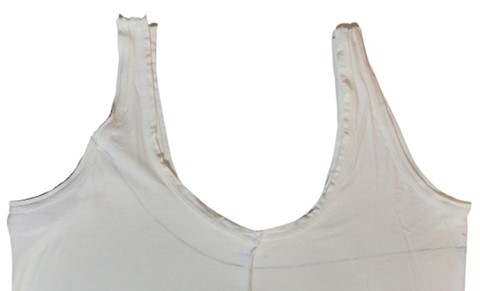
3. Cut tank top shoulder seams.
4. Fold tank top in half with folds on center front and center back.
5. Draw line for bottom of halter top strap as follows:
a.1.5 inch below center back to
b. 1.5 inch below armhole on side seam to
c. Mark made in Step 2
6. Flip top over and repeat line on other side.
7. Pin bias tape to wrong side of top just above the line, while slightly stretching the tank top.
8. Baste the bias tape in place and remove pins.
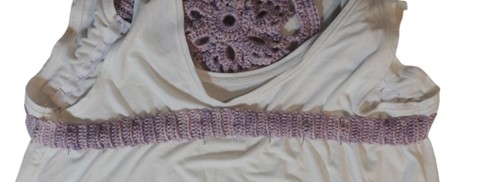
9. Pin halter band to right side of top so bottom of band is just below the bottom of the bias tape on the other side of the fabric.
a. Fold tape in half and pin center of tape to center of top.
b. Stretch band and determine how many ridges need to be past the neckline of the top to the back of the neck – making sure the band stops about 1-2 inches before the center back of neck.
c. Count the determined number of ridges from each end and pin to the edge of the neckline where the bias tape ends on each side.
d. Pin between each set of pins in the center, repeating as needed to place as many pins as needed to hold the band in place.
10. Back stitch along bottom edge of band being sure to catch bottom edge of bias tape as well.
11. Cut fabric between band and bias tape leaving about ¼ inch seam allowance.
12. Whip stitch top of bias tape to back of band so that the seam allowance is completely hidden.
13. Place a safety pin on the end of the elastic and thread the elastic through the bias tape.
14. Sew down one end of the elastic tightly at the neckline edge. Leave the other end free for fitting.
15. Pin remainder of flower down so that the top sides of the flower border overlaps the band just a little.
16. Backstitch around the flower border.
17. Cut neckline ¼ inch above flower backstitch, taking care not to cut yarn.
18. Whipstitch on wrong side to encase the neckline of the top behind the flower.
19. Center Back Strap
a. Fold top in half to find the center of the back on the halter band.
b. Backstitch one end of the center back strap inside the halter band at the center back.
c. Use a crochet hook to pull the tie strings through the top sides of the center back strap
i. Top left tie string will be pulled through the top left of the strap.
ii. Bottom left tie string will be pulled through a few rows below the top left tie string.
iii. Top right tie string will be pulled through the top right of the strap.
iv. Bottom right tie string will be pulled through a few rows below the top right tie string.
20. Try on halter top.
a. Tie left ties and right ties together.
b. Pull un-sewn end of elastic to make halter band as tight as needed.
c. Pin end of elastic in place.
d. Sew elastic down tightly and cut end.
Use the flower for the front of a Tee
Use the flower for the front of a T-shirt. Not making a halter top
Hi! I think that could be really cute! Love the creative ideas that patterns like this can inspire!
So unique! Can’t wait to try this.