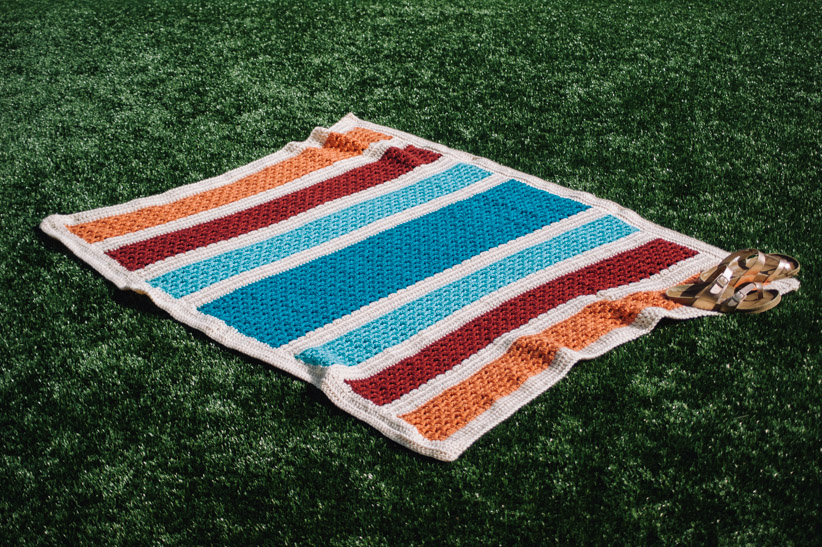
This beginner friendly blanket makes quick work with bulky yarn and a larger hook. The double crochet stitch is used in two different ways to create an interesting, cozy blanket.
Time: Weekend Project
Skill Level: Beginner
Size: 45” x 57”
Gauge: 10 sts = 4″ [10 cm] in sc
Materials
 Yarn: Cascade Yarns Anthem Chunky (100% Acrylic; 218 yds [200 meters]/200 grams): 40 White Peach (MC, 3 balls), 45 Autumn Sunset (CC1, 2 balls), 47 Sun Dried Tomato (CC2, 2 balls), 30 Bachelor Button (CC3, 2 balls), 42 Dark Turquoise (CC4, 2 balls)
Hook: US size K/10.5 (6.5 mm)
Notions: Tapestry needle
Special Stitches
BegShell: (Ch 3, dc) in same st/sp.
Shell: 3 dc in same st/sp.
EndShell: 2 dc in same st/sp.
Pattern Notes
The Border is worked only on the two vertical sides of blanket.
Pattern
With MC, ch 109.
Row 1: Dc in 4th ch from hook, and in each ch to end, turn. (106 dc)
Rows 2-3: Ch 3, sk first st, dc in each st to end, turn. Fasten off after Row 3. (106 dc)
Row 4: Join CC1 with sl st to first st, BegShell in first st, sk next 2 sts, [Shell in next st, sk next 2 sts] to last st, EndShell in last st, turn.
Row 5: Ch 3, Shell between EndShell and next Shell, [Shell between previous and next Shell] to end, dc in last st, turn.
Row 6: BegShell in first st, [Shell between next 2 Shells] to end, EndShell in last st, turn.
Rows 7-10: Rep Rows 5-6. Fasten off after Row 10.
Rows 11-13: Join MC with sl st to first st, rep Row 2. Fasten off after Row 13. (106 dc)
Row 14: Join CC2 with sl st to first st, BegShell in first st, sk next 2 sts, [Shell in next st, sk next 2 sts] to last st, EndShell in last st, turn.
Rows 15-20: Rep Rows 5-6. Fasten off after Row 20.
Rows 21-23: Join MC with sl st to first st, rep Row 2. Fasten off after Row 23. (106 dc)
Row 24: Join CC3 with sl st to first st, BegShell in first st, sk next 2 sts, [Shell in next st, sk next 2 sts] to last st, EndShell in last st, turn.
Rows 25-30: Rep Rows 5-6. Fasten off after Row 30.
Rows 31-33: Join MC with sl st to first st, rep Row 2. Fasten off after Row 33. (106 dc)
Row 34: Join CC4 with sl st to first st, BegShell in first st, sk next 2 sts, [Shell in next st, sk next 2 sts] to last st, EndShell in last st, turn.
Rows 35-50: Rep Rows 5-6. Fasten off after Row 50.
Rows 51-53: Join MC with sl st to first st, rep Row 2. Fasten off after Row 33. (106 dc)
Row 54: Join CC3 with sl st to first st, BegShell in first st, sk next 2 sts, [Shell in next st, sk next 2 sts] to last st, EndShell in last st, turn.
Rows 55-60: Rep Rows 5-6. Fasten off after Row 60.
Rows 61-63: Join MC with sl st to first st, rep Row 2. Fasten off after Row 63. (106 dc)
Row 64: Join CC2 with sl st to first st, BegShell in first st, sk next 2 sts, [Shell in next st, sk next 2 sts] to last st, EndShell in last st, turn.
Rows 65-70: Rep Rows 5-6. Fasten off after Row 70.
Rows 71-73: Join MC with sl st to first st, rep Row 2. Fasten off after Row 73. (106 dc)
Row 74: Join CC1 with sl st to first st, BegShell in first st, sk next 2 sts, [Shell in next st, sk next 2 sts] to last st, EndShell in last st, turn.
Rows 75-80: Rep Rows 5-6. Fasten off after Row 80.
Rows 81-83: Join MC with sl st to first st, rep Row 2 three times. Fasten off after Row 83. (106 dc)
Border
Row 1: With vertical side facing up, join MC with sl st to right corner, ch 3, work dc evenly across side to end, turn.
Rows 2-3: Ch 3, sk first st, dc in each st across, turn. Fasten off after Row 3.
Rep Rows 1-3 on other vertical side.
Finishing
Weave in all ends.
Block.


is there supposed to be a diagram or schematic to this afghan.
theres nothing under downloads
thank you
Hi! Nope, there shouldn’t be anything there, just fixed that on the back-end of things. Let me know if you need any help with the pattern! – Nicola, Editor