


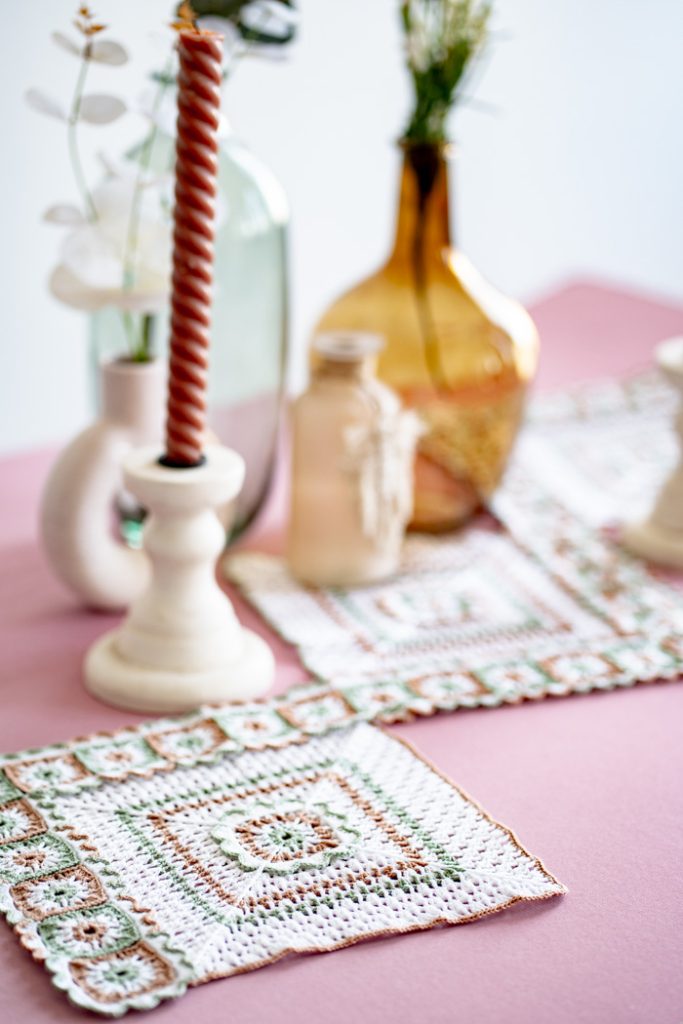
Bring the beauty of late-summer meadows into your home with the Wanderstitch Crochet Table Runner. This garden-inspired design features richly textured granny squares that combine front post treble crochets with an eye-catching construction, inviting the viewer on a visual stroll through a field of blooms. A fresh take on the classic motif, this project is perfect for granny square enthusiasts looking to explore new territory. The soft, earthy palette evokes the calm of a dew-kissed pasture, making this runner a serene and stylish addition to any space. Let your stitches bloom with this wildflower-inspired accent.
Time: I am a slow crocheter and I only work on it in the evenings maybe 3 hours an evening. I made this one in 7 evenings.
Skill Level: Easy
Sizes: Finished size 40” x 14.25”
Gauge: Small squares 1.5” after blocking.
Materials
 Aunt Lydia’s crochet cotton size 10,
MC 4 #0001 White 400 yds per ball 4 – balls,
CC1 #0310 Copper Mist 350 yds per ball 2 – balls,
CC2 #0661 Frosty Green 350 yds per ball 2 – balls
Hook: US size 7/1.65 mm
Special Stitches
Front Post Treble Crochet – (fptr) – Work as a treble stitch working around the specified stitch instead of into the top of it.
Joined front post treble – (joined fptr) – Work fptr around the designated stitch pulling through 2 lps twice. (There will be 2 lps left on the hook) Insert hook through top of coordinating fptr on prev motif to join the two motifs tog, yo then pull through all lps on hook.
Pattern Notes
All rounds end with a slip stitch into the top of the beginning chain-3 unless otherwise stated.
Weave in and trim loose ends.
It helps to fold the scallops forward when working in the round behind them.
The motifs are joined on the go with joined front post trebles coordinating with the motif being joined to.
There will be some stitches with other stitches worked into the same stitch.
Make sure when joining all the motifs are facing up to the right side.
There are lots of twists and turns when working the borders. It can get a bit confusing at times.
Pattern
Center Motif
Make 3 motifs alternating color patterns as shown in the photo. (Two will be the same color pattern and one will be the opposite.)
Rnd 1: With CC1, ch 8, join with a sl st to beg ch to form a ring. Ch 3, 2 dc in ring. [Ch 1, dc in ring. Ch 1, 3 dc in ring]. 3 times. Ch 1, dc in ring. Ch 1, sl st to top of beg ch-3. Fasten off. (4 3-dc groups, 4 dc, 8 ch-1 sps)
Rnd 2: Join MC with a sl st in ch-1 sp to right of a single dc. Ch 3, 2 dc in ch-sp. *Ch 1, fptr around dc. Ch 1, 3 dc in ch-1 sp. Ch 1, fptr around middle dc. Ch 1, **3 dc in ch-1 sp. Rep from * around. End last rep at **, join with a sl st in top of beg ch-3. Fasten off. (8 3-dc groups, 8 fptr, 16 ch-1 sps)
Rnd 3: Join CC2 with a sl st in ch-1 sp to right of a corner fptr. Ch 3, 2 dc in ch-1 sp. *Ch 1, fptr around fptr. Ch 1, 3 dc in ch-1 sp. Ch 1, fptr around middle dc. Ch 1, 3 dc in fptr. Ch 1, fptr around middle dc. Ch 1,** 3 dc in ch-1 sp. Rep from * around ending last rep at **. Join with a sl st to top of beg ch-3. Fasten off. (12 3-dc groups, 12 fptr, 24 ch-1 sps)
Rnd 4: Join MC in any fptr. [Ch 5, sl st in next fptr] around, sl st in beg sl st. (12 ch-5 sps)
Rnd 5: Sl st into ch-sp, ch 1. [Sc, hdc, dc, 3 tr, dc, hdc, sc] in each ch-5 sp around. Join with a sl st in sc, fasten off. (12 scallops)
Rnd 6: Join CC1 in any sc. Sc in each st around. Fasten off.
Rnd 7: (This round is worked into rnd 3. It helps to fold the scallops forward to work behind them. The corner fptr are worked over the front of the scallop. The 3-dc groups are worked into the same stitch as the slip stitches were worked in rnd 4.) Join MC with a sl st in a ch-1 sp to right of a corner fptr. Ch 3, 2 dc in ch-1 sp. *Ch 1, fptr around fptr over the front of the scallop into the fptr of rnd 3. Ch 1, 3 dc in next ch-1 sp. *[Ch 1, fptr around middle dc. Ch 1, 3 dc in fptr] twice. Ch 1, fptr around middle dc. Ch 1, 3 dc in ch-1 sp. Rep from * around. Join with a sl st to top of beg ch-3. (16 3-dc groups, 16 fptr, 32 ch-1 sps)
Rnd 8: Sl st to ch-1 sp. Ch 3, 2 dc in sp. *Ch 1, fptr around fptr. Ch 1, 3 dc in ch-1 sp. [Ch 1, fptr around middle dc. Ch 1, 3 dc in fptr] 3 times. Ch 1, fptr around middle dc. Ch 1, 3 dc in ch-1 sp. Rep from * around. End with sl st to top of beg ch-3. (20 3-dc groups, 20 fptr, 40 ch-1 sps)
Rnds 9-18: Work as rnd 8. There will be one more rep between the [ ]’s each rnd. Fasten off after rnd 18. Change colors as follows by joining in a ch-1 sp to the right of a corner fptr.
Rnd 9: (24 3-dc groups, 24 fptr, 48 ch-1 sps)
Rnd 10: (28 3-dc groups, 28 fptr, 56 ch-1 sps) Fasten off.
Rnd 11: Join CC2. (32 3-dc groups, 32 fptr, 64 ch-1 sps) Fasten off.
Rnd 12: Join MC. (36 3-dc groups, 36 fptr, 72 ch-1 sps) Fasten off.
Rnd 13: Join CC1. (40 3-dc groups, 40 fptr, 80 ch-1 sps) Fasten off.
Rnd 14: Join MC. (44 3-dc groups, 44 fptr, 88 ch-1 sps)
Rnd 15: (48 3-dc groups, 48 fptr, 96 ch-1 sps)
Rnd 16: (52 3-dc groups, 52 fptr, 104 ch-1 sps)
Rnd 17: (56 fptr, 56 3-dc groups, 112 ch-1 sps)
Rnd 18: (60 fptr, 60 3-dc groups, 120 ch-1 sps) Fasten off.
Small Motifs
The small motifs will be joined around the larger one on 2 sides and to each other to join the next large motifs on as work progresses. Check the photos for placement. The colors will be alternated on every other small block.
First motif, work and join as follows:
Work rnds 1-2 for center motif. Work rnd 1 in CC2, work rnd 2 in MC.
Rnd 3: Join CC1 in a ch-1 sp to the right of a corner fptr. Ch 3, 2 dc in same sp. Ch 1, joined fptr (see special stitches) in bottom right corner fptr of center section. Ch 1, 3 dc in ch-1 sp, ch 1, joined fptr around middle dc of 3-dc group and next fptr on center section, ch 1, 3 dc in fptr, ch 1, fptr around middle dc. Ch 1, 3 dc in ch-1 sp. Ch 1, joined fptr around corner fptr and with next fptr on center section. *Ch 1, 3 dc in ch-1 sp. Ch 1, fptr around middle dc of 3-dc group. Ch 1, 3 dc in fptr. Ch 1, fptr around middle dc, ch 1, 3 dc in ch-1 sp, ch 1, fptr around fptr. Rep from * around ending with a sl st in top of beg ch-3. Fasten off. (8 joined fptr, 28 3-dc groups, 20 fptr, 56 ch-1 sps)
Continue making the small motifs alternating colors and joining them to each other as previous motif was joined starting on the bottom corner of the previous motif following photo.
Where the motifs are joined to the previous motif will depend on the location of the previous motif.
Trim
Work along the two edges of the large motif that there were no motifs worked onto. With the motif facing up, join in the right corner with a sl st with the opposite color that rnd 13 was worked in. Single crochet evenly around the two sides working a single crochet into each stitch or ch-1 sp. Do this for all 3 large motifs changing colors to coordinate.
Scallops
Rnd 1: Join MC in any fptr on a small motif with a sl st. [Ch 5, sl st in next fptr or joined fptr] around outside edge of centerpiece, around the corner end motifs and along the area where the motifs are joined to the center motif. End with a sl st in beg sl st.
Rnd 2: Sl st into ch-5 sp. [Sc, hdc, dc, 3 tr, dc, hdc, sc] in each ch-5 sp around, join with a sl st in beg sc. Fasten off.
Rnd 3: Alternating the opposite color to the last color worked in the small motif, work a sc in every st around, alternating colors on each small motif. Watch pictures for color changes. The unused thread can be carried along under the stitches. End with a sl st in beg sc, fasten off.
Finishing
Weave in all loose ends and trim, block.
I don’t know how I missed this one, adding to my make it list! So many color options in my mind.
Wow! This Table Runner is gorgeous.
I can see this pattern made into a purse using the small blocks as the sides and bottom parts. Very pretty pattern!