


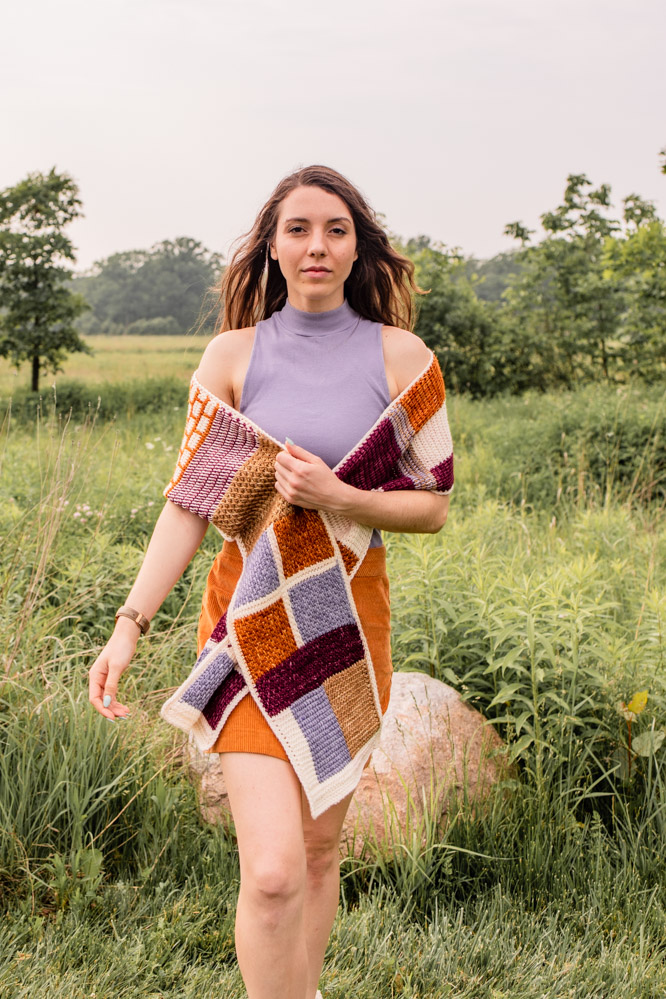
The Leighton Patchwork Scarf is the Tunisian crochet sampler scarf of your dreams. Inspired by the shift in seasons, this pattern is written in self-contained sections that can be rearranged to suit your preference. The customizable pattern combines a balance of textures and colorwork to create a bold and romantic statement scarf. The name “Leighton” means “meadow town” and we can’t help but think that this scarf resembles an aerial view of meadows and fields in the countryside.
Time: 1 Week or Less
Skill Level: Easy
Size: 78” [198 cm] long x 9.5” [24 cm] wide
Each section includes instructions on adjusting the length.
To adjust the width, work fewer or more starting chain stitches, maintaining an odd number.
Gauge: 16 sts and 12 rows = 4” [10 cm] in Tunisian Simple Stitch after wet blocking
Materials
 Yarn: 6 skeins of Swish Worsted by WeCrochet (worsted (4) weight, 100% superwash merino, 220 yards [201 meters]/ 100 grams)
Sample uses bare Swish yarn hand-dyed by Janine of Capital Crochet (kits available TBD)
Color A: Bare It All (bare, 2 skeins)
Color B: Autumn Romance (red, 1 skein)
Color C: Late Summer Chill (grey, 1 skein)
Color D: Warm Whispers (brown, 1 skein)
Color E: Summer’s Last (orange, 1 skein)
Feel free to choose a different order for your colors!
Hooks:
For main sections: US size K/10.5 (6.5mm) Tunisian crochet hook (or interchangeable with short cord attached), or size required to meet gauge.
For bind off and border: US size I (5.5mm) regular crochet hook (or 2 sizes/1mm down from hook used to meet gauge).
Notions: measuring tape, scissors, tapestry needle, four (4) locking stitch markers, blocking mats and iron/steamer, blocking pins (optional)
Abbreviations:
Ch: chain
Lts: last Tunisian stitch (see Special Stitches)
Post: Post Stitch (see Special Stitches)
RetP: Return Pass (see Special Stitches)
Sc: single crochet
Sl st: slip stitch
St(s): stitch(es)
Tps: Tunisian Purl Stitch
Tss: Tunisian Simple Stitch
Special Stitches
Cross Stitch: this stitch is used in Section 3. Insert hook under the front vertical bars of the next 2 sts and pull up a loop. Insert hook under front vertical bar of the first of the 2 sts and pull up a loop.
Last Tunisian Stitch: this is the very last stitch of each row. Insert hook under both vertical bars and pull up a loop.
Post Stitch: this stitch is used in Section 2. Instead of working into the vertical bar of the designated stitch in the same row, yarn over and insert your hook behind both bars of the stitch 3 rows below. Pull up a loop, yarn over and pull through first loop, yarn over and pull through 2 loops.
Return Pass: this is worked the same throughout the pattern. Ch 1, *yarn over and pull through 2 loops. Repeat from * until 1 loop remains on the hook.
Slip: this stitch is used in Section 1. Insert hook under vertical bar and keep this bar on the hook. Do not pull up another loop. This extends the vertical bar from the row below.
Changing Colors: this pattern uses four types of color changes.
- To begin a new row: pull through the last loop of the previous row’s Return Pass with the new color.
- In the middle of the row, Forward Pass: drop previous color after last stitch worked (keep it to the rear of your work) and work next stitch with the new color.
- In the middle of the row, Return Pass: when you pull through the last loop on the hook of the previous color, drop the previous color and yarn over with the new color. Pull through the last loop of the previous color and the first loop of the new color.
- At the end of the row: complete the Last Tunisian stitch with the old color, and ch 1 to start the Return Pass with the new color.
Pattern Notes
This pattern consists of 7 interchangeable sections. For the sample, each section has been worked twice, with slight modifications noted. Feel free to switch up the order and explore suggested modifications to make your own Patchwork Romance scarf truly unique!
The first loop on your hook counts as the first stitch in the row, but it is not included in the working instructions.
When cutting yarn, leave a tail that is approx. 6”/15cm. This will keep your stitches from coming undone as you work through the sections, and help make it easier to weave in the ends after blocking.
Some sections require a set-up row to start the next section, so that the stitch pattern is not ended abruptly. These set-up rows will be clearly marked at the end of the sections that require them, and are to be started with the next section’s colors.
Tunisian crochet is worked with the right side of your work facing you at all times.
Pattern
Starting Section
With Color A and larger Tunisian crochet hook:
Ch 39 and turn.
Row 1: Starting in second ch from hook, pull up a loop in back bump of each ch, RetP.
Rows 2 and 3: Tps across, RetP. Cut yarn.
Section 1 – 4 Square
Join Color B.
Row 1: Tss next 17 sts, switch to Color A, tss next 3 sts, switch to Color C, tss next 17 sts, Lts and RetP, changing colours accordingly.
Row 2: *Slip next st, tss next st. Repeat from * across, changing colors accordingly, until 2 sts remain. Slip next st, Lts and RetP, changing colors accordingly.
Row 3: *Tss next st, slip next st. Repeat from * across, changing colors accordingly, until 1 st remains. Lts and RetP, changing colors accordingly.
Rows 4-17: Repeat Rows 2 and 3. Cut yarns, and join Color A.
Rows 18 and 19: Tss across, Lts and RetP. Join Color C.
Rows 20-36: Repeat Rows 1-17, using opposite colors (Color C first, Color A second, Color B third). Cut all yarns.
Section 2 – Bricks
Join Color D
Row 1: Tss across, Lts and RetP. Switch to Color A.
Rows 2 and 3: Tss across, Lts and RetP. Switch to Color D at the end of Row 3.
Row 4: Tss next 4 sts, post next st. *Tss next 5 sts, post next st. Repeat from * across until 3 sts remain. Tss next 2 sts, Lts and RetP. Switch to Color A.
Rows 5 and 6: Tss across, Lts and RetP. Switch to Color D at the end of Row 6.
Row 7: Tss next st, post next st. *Tss next 5 sts, post next st. Repeat from * across until 6 sts remain. Tss next 5 sts, Lts and RetP. Switch to Color A.
Rows 8-13: Repeat Rows 2-7. Cut yarn.
Section 3 – Diagonal Lattice
Join Color E
Row 1: Tss across, Lts and RetP.
Row 2: Cross stitch across until 1 st remains, Lts and RetP.
Row 3: Tss next st, cross stitch across until 2 sts remain. Tss next st, Lts and RetP.
Rows 4-7: Repeat Rows 2 and 3. Cut yarn.
Set Up Instructions for next section: Join next section’s yarn color and repeat Row 2.
Section 4 – Diagonal Split
Join Color A
Rows 1 and 2: Tss across, Lts and RetP.
Row 3: Tss across until 3 sts remain. Switch to Color B, tss next 2 sts, Lts and RetP, changing colors accordingly.
Row 4: Tss across until 6 sts remain. Switch to Color B, tss next 5 sts, Lts and RetP, changing colors accordingly.
Row 5: Tss across until 9 sts remain. Switch to Color B, tss next 8 sts, Lts and RetP, changing colors accordingly.
Row 6: Tss across until 12 sts remain. Switch to Color B, tss next 11 sts, Lts and RetP, changing colors accordingly.
Row 7: Tss across until 15 sts remain. Switch to Color B, tss next 14 sts, Lts and RetP, changing colors accordingly.
Row 8: Tss across until 18 sts remain. Switch to Color B, tss next 17 sts, Lts and RetP, changing colors accordingly.
Row 9: Tss next 17 sts. Switch to Color B, tss across remainder of row, Lts and RetP, changing colors accordingly.
Row 10: Tss next 14 sts. Switch to Color B, tss across remainder of row, Lts and RetP, changing colors accordingly.
Row 11: Tss next 11 sts. Switch to Color B, tss across remainder of row, Lts and RetP, changing colors accordingly.
Row 12: Tss next 8 sts. Switch to Color B, tss across remainder of row, Lts and RetP, changing colors accordingly.
Row 13: Tss next 5 sts. Switch to Color B, tss across remainder of row, Lts and RetP, changing colors accordingly.
Row 14: Tss next 2 sts. Switch to Color B, tss across remainder of row, Lts and RetP, changing colors accordingly. Switch to Color B.
Rows 15-17: Tss across, Lts and RetP. Cut both yarns.
Section 5 – Two Color Simple Stitch
Join Color C
Row 1: Tss across, Lts. Switch to Color D for the RetP.
Row 2: Still working Color D, Tss across, Lts. Switch to Color C for the RetP.
Rows 3 and 4: Repeat Rows 1 and 2. Cut both yarns.
Section 6 – Uneven Columns
Join Color B
Row 1: Tss next 9 sts, switch to Color A, tss next 16 sts, switch to Color E, tss next 12 sts, Lts and RetP, changing colors accordingly.
Row 2: Tss next 9 sts, switch to Color A, tps next 16 sts, switch to Color E, tss next 12 sts, Lts and RetP, changing colors accordingly.
Rows 3-21: Repeat Row 2. Cut all yarns.
Section 7 – Honeycomb
Join Color C
Row 1: Tss across, Lts and RetP.
Row 2: *Tss next st, tps next st. Repeat from * until 1 st remains. Lts and RetP.
Row 3: *Tps next st, tss next st. Repeat from * until 1 st remains. Lts and RetP.
Rows 4-13: Repeat Rows 2 and 3. Cut yarn.
For the remainder of the sample, the sections are worked in the following order and with the following colors:
Section 4: Join Color D, work a set-up row of tss, then repeat Section 4 instructions.
Section 2: Join Color E (Color A secondary). Repeat Section 2 instructions until you have 6 lines of bricks (19 rows total).
Section 5: Join Color A (Color B secondary). Repeat Section 5 instructions until you have worked 11 rows total.
Section 3: Join Color D, repeat Section 3 instructions until you have worked 15 rows total.
Section 1: Join Color C (Color A second, Color E third). Repeat Section 1 instructions, but instead of Row 1 to start the section, work a repeat of Section 3, Row 3 in Color C which will serve as a set-up row to this section.
Section 7: Join Color B, repeat Section 7 instructions until you have worked 7 rows total.
Section 6: Join Color A (Color C second, Color D third). Repeat Section 6 instructions with the following amendments (this will make the columns different sizes from the original instructions, and switches the tps and tss stitches to create a variation on the texture).
Row 1: Tss next 6 sts, switch to Color C, tss next 15 sts, switch to Color D, tss next 16 sts, Lts and RetP, changing colors accordingly.
Row 2: Tss next 6 sts, switch to Color C, tps next 15 sts, switch to Color D, tss next 16 sts, Lts and RetP, changing colors accordingly.
Rows 3-17: Repeat Row 2. Cut all yarns.
End Section
Continue with (or join) Color A
Row 1: Tss across, Lts and RetP.
Rows 2 and 3: Tps across, Lts and RetP. Do not fasten off.
Border
With Color A still attached, switch to smaller hook. Ch 1, bind off in sc. At the last st, insert hook as for Lts. Ch 1, yarn over and pull through 2 loops.
TIP: if you find that the bind off row seems too loose, rework it with a smaller hook. If it seems too tight, rework it with a larger hook. Use whatever hook gets you the best result on the bind off for the remainder of the border.
Do not fasten off. Rotate your scarf so that you will work into the ends of the rows along the side of your scarf, with the right side of your work facing you.
Round 1: Ch 1 (does not count as a st here or in Round 2), 3 sc into first row end, place a marker into second sc st of this group. *Sc into each st (each row end counts as a st) until you reach next corner. 3 sc into corner st, place a marker into second sc st of this group. Repeat from * twice more. Sc across last side and join with a sl st to first sc of round.
Round 2: Ch 1, sc in first st, *3 sc in marked st, sc to next marker. Repeat from * around and join with a sl st to first sc of round.
Finishing
Wet block your scarf by soaking it in a cool bath with wool wash for approx. 20 minutes. Gently squeeze excess water out by rolling it up in a towel, then lay it flat on your blocking mats. Shape it so that the corners are square and there are no overly stretched or bunched up parts. You may wish to place pins at the sides of the Diagonal Lattice and Honeycomb sections, as they tend to be a little tighter. Gently pin them so that they stretch to the same width as the rest of the scarf. Let dry, remove the pins, and weave in all ends to the wrong side of your scarf.