


With so many techniques used within this mocha cardigan, any crocheter will find this piece exciting. The design makes it easy to adjust measurements as you go just by adding or eliminating stitch repeats.
Designed by Marlaina “Marly” Bird.
Skill Level: Intermediate
Size: Finished Bust: 34 (38, 42, 46, 50, 54, 58)”, 86.36 (96.52, 106.68, 116.84, 127, 137.16, 147.32) cm; To fit bust: 32 (36, 40, 44, 48, 52, 56)”
Gauge: 20 sts and 8 rows= 4” x 4” (10×10 cm in Lakota Lattice stitch pattern)
Materials
Yarn: The Buffalo Wool Co. DK Yarn (90% bison, 10% nylon; 200 yards [183 meters]/50 grams): Earth (6 [6, 7, 9, 9, 10, 10] skeins), Burgundy (CC, 1 skein)
Hook: US size G/6 (4.0 mm) hook
Notions: Stitch makers, tapestry needle, 2 matching buttons – 1 1/4”, 3 sets of hook and eye closures, 1/2” grosgrain ribbon, matching sewing thread, sewing needle
Special Stitches
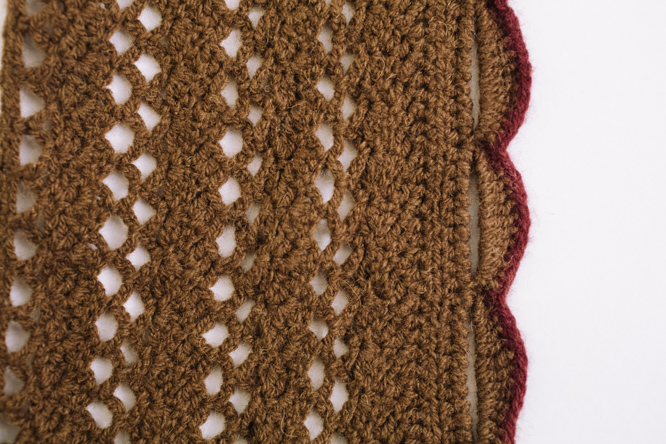
Lakota Lattice (multiple of 4+2 chains)
Row 1: SC in 2nd ch from hook, *ch 5, skip next 3 ch, sc in next ch; rep from * across, turn.
Row 2: Ch 4 (counts as dc, ch 1), sc in next ch-5 loop, (ch 3, sc) in each ch-5 loop across to last ch-5 loop, ch 1, dc in last sc, turn.
Row 3: Ch 3 (counts as dc), 2 dc in first dc, (sc, ch 3, 2 dc) in each sc across to within last sc, sc in lst sc, 2-dc cluster working first half-closed dc in same sc holding last sc, and 2nd half- closed dc in 3rd ch of turning ch, yo, complete 2-dc cluster, turn.
Row 4: Ch 1, sc in first cluster, ch 2, 2 dc in next ch-2 space, (sc, ch2, 2dc) in each ch-2 space across to last ch-2 space, sc in 3rd ch of turning ch, turn.
Row 5: Ch 5 (counts as dc, ch 2), sc in next ch-2 space, (ch 5, sc) in each ch-2 space across to last ch-2 space, ch 2, dc in last sc, turn.
Row 6: Ch 1, sc in first dc, (ch 5, sc) in each ch-5 loop across, ending with last sc in 3rd ch of turning ch, turn.
Rep Rows 2-6 for Lakota Lattice stitch pattern.
Scallop Edge (multiple of 9+1 chains)
Row 1: With WS facing join with a sl st in rev sc in left front corner, ch 1, sc in same rev sc, ch 8, skip next 8 rev sc, sc in next rev sc; rep from * to end. Turn.
Row 2: Ch 1, sc in last sc of row 1, *(sc, 2 hdc, 3 dc, 3 tr, 3 dc, 2 hdc, sc) in ch-8 sp, sc in next sc; rep from * end, do not turn.
Row 3: Work in CC; Ch 1, rev sc in sc of last row, skip next sc, rev sc in next 13 sts, skip next sc, rev sc in next st; rep from * to end, finish off.
Pattern Notes
Garment is made in two pieces from sleeve to middle then seamed together in an invisible join.

Pattern
Sleeve (Make Two)
With MC, ch 74 (82, 94, 102, 114, 122, 122).
Work row 1 of Lakota Lattice St pat. (18 (20, 23, 25, 28, 30, 30) pat repeats)
Cont in est pat until measures 4 (4, 4, 6, 6, 6, 6)” 10.16 (10.16, 10.16, 15.24, 15.24, 15.24, 15.24) cm ending on a row 5.
Body (Make Two)
To add sts for body you will remove the hook at the beginning of the row, add chain sts to the opposite end, fasten off and pick up the dropped loop to continue.
Row 1: Drop yarn, join new yarn to opposite end with sl st, ch 80 (80, 80, 80, 92, 92, 92), fasten off. Pick up loop again and ch 82 (82, 82, 82, 94, 94, 94), work across the chain sts in row 1 of Lakota Lattice St pat to est pat of the sleeve and continue with row 6 across sleeve, then work row 1 across ch sts. (58 (60, 63, 65, 74, 76, 76) pat repeats)
Continue in pattern beginning on row 2 of pattern stitch until front measures 3.5 (4.5, 5.5, 6.5, 7.5, 8.5, 9.5)” ending on a row 4. For the back cont in est pat across 29 (30, 31, 32, 37, 38) pat repeats until back measures 8.5 (9.5, 10.5, 11.5, 12.5, 13.5, 14.5)” from ch edge ending on a row 4, not finish off. (Piece A)
When making second piece end on a row 5 for the back finish off. (Piece B)
Joining Two Sides
With pieces facing each other begin to join backs continuing on piece A: Ch 2, sc in tch or dc ch-2 sp on piece B, ch 2, *sc in next ch-2 space of piece A, (ch 2, sc in ch-5 sp of piece B, ch 2), rep from * to last ch-2 sp of piece A, sc in ch-2 sp, ch 2, sc in ch-5 sp of piece B, ch 2, sl st into 3rd ch of turning ch, finish off.
Collar
With MC and RS facing join with a sl st in sc in right front corner, ch 2, hdc in sc, hdc in next 2 dc, *hdc in ch-2 sp, hdc in next 2 dc; rep from * 18 (18, 18, 18, 21, 21, 21) times, then work 42 hdc evenly spaced across the back of neck, then *hdc in next 2 dc, hdc in ch-2 sp; rep from * 19 (19, 19, 19, 22, 22, 22) times, do not turn. 162 (162, 162, 162, 180, 180, 180) hdc.g second piece end on a row 5 for the back finish off (piece B).
Base
Row 1: Ch 1, rev sc (also known as crab stitch) in each hdc around, do not turn. (162 (162, 162, 162, 180, 180, 180) rec sc)
Row 2: Ch 2, hdc in each rev sc around, do not turn.
Rep rows 1 and 2 once more then only row 1 again with MC. Work row 2 in CC.
Work row 1 in MC, finish off.
Scallop Edge
Row 1: With WS facing join with a sl st in rev sc in left front corner, ch 1, sc in same rev sc, ch 8, skip next 8 rev sc, sc in next rev sc; rep from * to end. Turn. (18 (18, 18, 18, 20, 20, 20) ch-8 sps)
Row 2: Ch 1, sc in last sc of row 1, *(sc, 2 hdc, 3 dc, 3 tr, 3 dc, 2 hdc, sc) in ch-8 sp, sc in next sc; rep from * end, do not turn.
Row 3: Work in CC; Ch 1, rev sc in sc of last row, skip next sc, rev sc in next 13 sts, skip next sc, rev sc in next st; rep from * to end, finish off. (253 (253, 253, 253, 281, 281, 281) rev sc sts)
Button Band
Ch 31, sc in 2nd ch from hook and in each ch across, turn. (30 scs)
Row 1: Ch 2, hdc in each sc across, turn. Repeat row 1 three more times, finish off.
Sew 1 ¼” (32mm) buttons on each end of the band using sewing needle and sewing thread.
Finishing
Weave in all ends. Wash and block to measurements. Using sewing needle and thread sew hook and eye closures to 1” length cut grosgrain ribbon (fold the raw edges in toward the center to make a clean edge). Then sew the ribbon with the closures attached to the WS of three scallop edges across front bust making sure it is hidden.