


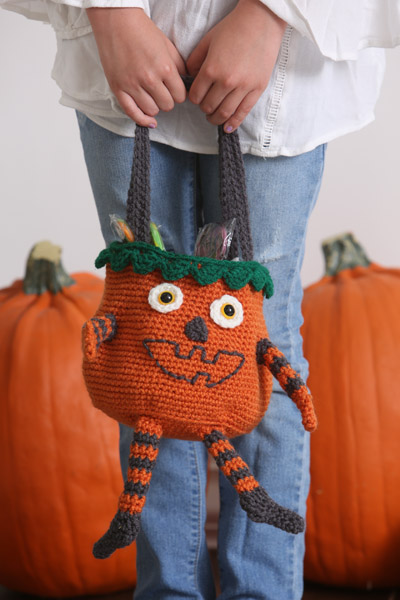
This cute bag can’t wait to go Trick or Treating with your little one! This is a great project to practice increasing in single crochet and using the technique to make various shapes.
Skill Level: Intermediate
Size: Diameter of bottom circle = 6” and Height = 6”
Arm length including hand = 4”
Leg length (including to tip of foot) = 6 ½”
Gauge: Rnds 1-13 = 6” diameter. Gauge is not necessary for this project.
Materials
Yarn:
![]() Red Heart Super Saver (100% Acrylic; 364 yards [333 meters]/198 grams): 256 Carrot (C1), 1 skein; 368 Paddy Green (C2), 1 skein; 3950 Charcoal (C3), 1 skein; 316 Soft White (C4), 1 skein.
Red Heart Super Saver (100% Acrylic; 364 yards [333 meters]/198 grams): 256 Carrot (C1), 1 skein; 368 Paddy Green (C2), 1 skein; 3950 Charcoal (C3), 1 skein; 316 Soft White (C4), 1 skein.
Hook: US size H/8 (5.0 mm)
Notions: Tapestry needle; two 15mm plastic safety eyes
Special Stitches
2dc CL = (YO, insert hook into next st, YO, draw up a lp, YO, pull through 2 lps) twice, YO, pull through all 3 lps on hook.
Pattern Notes
This pattern is worked from the bottom up. Do not join any round with sl st unless otherwise instructed. When changing colors for arms and legs, change color as complete last stitch of previous row and carry yarn along edge of work. For placement of all body parts use photo as a guide.
Pattern
Pumpkin Base
Rnd 1: With C1, work 6 sc in an adjustable ring.
Rnd 2: Work 2 sc in each st around – 12 sc.
Rnd 3: *Work 2 sc in next st, sc in next st; rep from * around – 18 sc.
Rnd 4: *Work 2 sc in next st, sc in each of next 2 sts; rep from * around – 24 sc.
Rnd 5: *Work 2 sc in next st, sc in each of next 3 sts; rep from * around – 30 sc.
Rnd 6: *Work 2 sc in next st, sc in each of next 4 sts; rep from * around – 36 sc.
Rnd 7: *Work 2 sc in next st, sc in each of next 5 sts; rep from * around – 42 sc.
Rnd 8: *Work 2 sc in next st, sc in each of next 6 sts; rep from * around – 48 sc.
Rnd 9: *Work 2 sc in next st, sc in each of next 7 sts; rep from * around – 54 sc.
Rnd 10: *Work 2 sc in next st, sc in each of next 8 sts; rep from * around – 60 sc.
Rnd 11: *Work 2 sc in next st, sc in each of next 9 sts; rep from * around – 66 sc.
Rnd 12: *Work 2 sc in next st, sc in each of next 10 sts; rep from * around – 72 sc.
Rnd 13: *Work 2 sc in next st, sc in each of next 11 sts; rep from * around – 78 sc.
Rnd 14: Working in the back loop only, *work 2 sc in next st, sc in each of next 12 sts; rep from * around – 84 sc.
Rnds 15-18: Now working through both loops, sc in each st around.
Rnd 19: *Work 2 sc in next st, sc in each of next 13 sts; rep from * around – 90 sc.
Rnds 20-25: Repeat Rnd 15.
Rnd 26: *Sc in next 10 sts, sc2tog over next 2 sts; rep from * around, ending with sc in remaining 6 sts – 83 sts.
Rnd 27: Repeat Rnd 15.
Rnd 28: *Sc2tog over next 2 sts, sc in next 10 sts; rep from * around, ending with sc in last 11 sts – 77 sc.
Rnd 29: Repeat Rnd 15.
Rnd 30: *Sc2tog over next 2 sts, sc in next 10 sts; rep from * around, ending with sc in last 4 sts – 71 sc.
Rnd 31: Repeat Rnd 15.
Rnd 32: *Sc2tog over next 2 sts, sc in next 10 sts; rep from * around, ending with sc in last 11 sts – 66 sc.
Rnds 33-38: Repeat Rnd 15.
Rnd 39: *Sc2tog over next 2 sts, sc in next 7 sts; rep from * around, ending with sc in last 3 sts – 59 sc.
Fasten off.
Leaf Edging
Rnd 1: With C2 and WS facing (which is also inside of bag), join with sc in any sc on back side of top edge (Rnd 39), *sk 2 sts, dc in next st, ch 2, 3 dc around post of previous dc, sc in next st; rep from * around, ending with sl st in 1st sc. Fasten off.
Note: You may need to skip just one st or 3 sts for last ‘leaf’ to fit in nicely
Rnd 2: With RS facing (outside of bag), join with sc in any skipped st along the back side from previous round, sc in each st around, working in EVERY st (those used and unused), simply working around the sts that there from Rnd 1 of Leaf Edging, sl st to 1st sc. Fasten off.
Handles (make 2)
With C3, ch 55.
Row 1: Working in the back bar of the ch, sc in 2nd ch from hook and in each ch across, turn – 54 sc.
Row 2: Ch 1, sc in each st across row.
Fasten off leaving a long tail for assembly.
Arms (make 2)
With C3, ch 8.
Row 1: Sc in 2nd ch from hook and in each ch across row, turn – 7 sc.
Row 2: Ch 1, sc in each st across row, turn. Change to C1.
Rows 3-10: Repeat Row 2 alternating colors every 2 rows.
Fasten off.
Legs (make 2)
With C1, work as for Arms. Do not fasten off after Row 10.
Rows 11-12: Repeat Row 2 with C3.
Rows 13-14: Repeat Row 2 with C1. Fasten off.
Hands (make 2)
Rnd 1: With C1, work 6 sc in an adjustable ring.
Rnd 2: Sc in each st around.
Rnds 3-4: Repeat Rnd 2.
Rnd 5: Ch 2, sc in 2nd ch from hook (to make thumb), sc in each st around.
Rnd 6: Sk the ‘thumb’, (sc in next st, sc in next st) 3 times.
Fasten off leaving a long tail for assembly.
Feet (make 2)
With C3, work as for Hand for Rnds 1-4. Do not fasten off.
Rnd 5: Sc in each st around.
Rnd 6: (Sc in next st, 2 sc in next st) 3 times – 9 sc.
Rnd 7: Sc in next st, hdc in next st, dc in next st, tr in next st, dc in next st, hdc in next st, sc in next 3 sts.
Rnd 8: Sc in next st, hdc in next st, dc in each of next 3 sts, hdc in next st, sc in rem 3 sts around.
Eyes (make 2)
With C4, work 12 hdc in an adjustable ring, join with sl st.
Fasten off.
Nose
With C3, ch 6.
Row 1: Work 2dcCL in 5th and 6th ch from hook.
Fasten off.
Finishing
Using tapestry needle and matching yarn throughout, secure handles to top inside of bag.
Insert plastic safety eyes through center of white eye circles and insert through bag. Lock on eyes with included safety ring. Sew on nose. Using tapestry needle and C3, embroider mouth below nose. Roll up all arm and leg pieces and sew up so form tubes using matching yarn for each row of color. Sew on hands and feet to ends of tubes. Sew other ends of tubes to side and bottom of bag.