


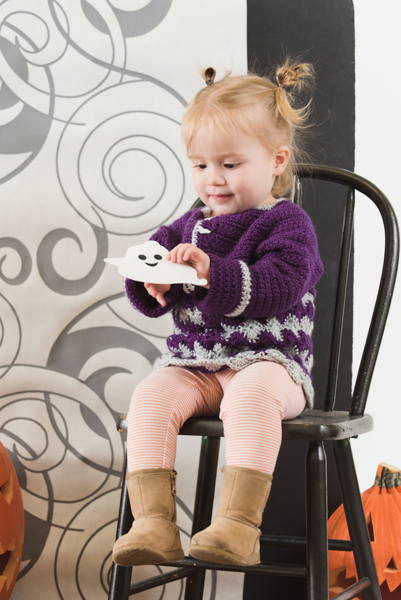
Don’t be spooked — this striking sweater does not require otherworldly crochet skills. The rows of Catherine’s Wheel stitches are interesting and edgy and your little one will be snuggly prepared for October nights.
Skill Level: Intermediate
Size: 3mo (6mo, 12mo, 18mo, 2T)
1 ½-2” positive ease recommended.
Shown in size 2T
Gauge: 7 rows and 12 LDC = 3”
Materials
Yarn: Knit Picks Brava Worsted (100% Acrylic; 219 yards [200 meters]/100 grams): 26366 Mulberry (MC), 1 (1, 2, 2, 2) balls; Knit Picks Brava Worsted (100% Acrylic; 219 yards [200 meters]/100 grams): 25696 Dove Heather (CC), 1 (1, 1, 1, 1) balls
Hook: US size H/8 (5 mm)
Notions: Tapestry needle; stitch marker; three-five 1” buttons
Special Stitches
Dec – Pull up a loop in 1 st, pull up a loop in the next st, yo, pull through both loops
LDC (Linked Double Crochet) – Insert the hook down through the horizontal bar in the center of the stem of the previous st, pull up a lp, insert hook into next st, pull up another lp (3 loops on hook), yo, pull through 2 lps, yo, pull through rem 2 lps. (Video and picture tutorial is located here: http://www.mooglyblog.com/linked-double-crochet/)
RSC (Reverse Single Crochet) – Insert hook in st to the st to the right, yo, pull a lp (2 lps on hook), yo, pull through both lps on hook. (Video and picture tutorial for RSC located here: http://www.mooglyblog.com/reverse-single-crochet-crab-stitch/)
Inc – Work 2 sc in st indicated
Pattern Notes
This pattern is worked top down. The first half of the sweater is a basic cardigan design using a LDC stitch. The bottom half will be worked in the round using a Catherine’s Wheel motif.
Pattern
With MC, ch 36 (40, 44, 46, 50).
Row 1: Ch 3 extra sts and work first LDC into them, LDC in next 4 (6, 7, 7, 8) ch, LDC 3 times in the next single ch placing a stitch marker in the middle of the 3, LDC in next 6 ch, LDC 3 times in the next single ch placing a stitch marker in the middle of the 3, LDC in next 8 (12, 14, 14, 16) chains, LDC 3 times in the next single chain placing a stitch marker in the middle of the 3, LDC in next 6 ch, LDC 3 times in the next single chain placing a stitch marker in the middle of the 3, LDC in rest of ch, ch 3, turn.
Row 2: *LDC in each st to stitch marker, remove stitch marker, work 3 LDC in that ch, replace stitch marker in the middle LDC; rep from * to end of row, ch 3, turn.
Rep Row 2, 9 (9, 10, 11, 11) more times.
Divide for Sleeves
LDC in each st to first stitch marker and work a LDC, fold garment in half, LDC in next marked st (this will form the first sleeve), LDC across the back to next stitch marker and work a LDC, fold garment in half, LDC in next marked st (this will form the second sleeve), LDC in each st to end of the row. Do not fasten off.
Creating Buttonholes
Row 1: Work 3 sc in corner, turn the corner and begin sc evenly up the side until you reach the top corner of the neckline, ch 1, turn.
Row 2: Sc in each st back down the side to the bottom corner, ch 3, sl st into the bottom corner of other side. (See picture…crochet hook points to the stitch to attach the ch-3).
Row 3: Sc evenly up the other side to the top corner of the neckline, ch 1, turn.
Row 4: Sc in first st, *ch 2, sk next 2 sts, sc in next 4 sts (buttonhole created); rep from * down to the bottom corner (if you have any extra sts, sc in them), ch 1, turn.
Row 5: Sc in each st upwards to neckline, working 2 sc in each ch-2 sp. Fasten off at the top corner.
Creating Sleeves
Attach yarn in the armpit area with the RS side of work facing, ch 3 and work first LDC, work LDC in continuous rnds until Sleeve meas 6 (6½, 7½, 8, 8½)” from armpit to wrist
Note: When working first continuous rnd, LDC on next rnd may slant dramatically. This is nothing to worry about. The sts will straighten as you keep working.
Fasten off Sleeve by pulling up 3 loops as if making another LDC, however, yo, pull through all 3 loops at the same time, as if working a hdc, sc in the next st, join with sl st or invisible join. Fasten off.
Trim
Row 1: Attach CC to cuff of Sleeve and with RS facing, sc in each st around cuff, join with sl st, ch 1, do not turn.
Row 2: *Sc in next 4 sts, dec; rep from * around cuff (if you have extra sts, sc), join with sl st, ch 1, do not turn.
Row 3: RSC in each st around cuff of Sleeve. Fasten off.
Rep for second Sleeve.
Row 4: Attach CC to front bottom corner of the buttonhole side of garment, sc evenly up the buttonhole side to the corner of the neckline, work 3 sc in the corner, continue around the neckline with sc to the other side of the neckline, ch 1, do not turn.
Row 5: RSC around the neckline, ending at the corner of the neckline (not at the bottom of the buttonhole side where the CC was originally attached). Fasten off.
Catherine’s Wheel Section
Rnd 1: Attach CC to the bottom side of garment, sc in each st all the way around, working 3 sc in ch-3 sp where you connected the sides, join with sl st.
Note: Count your sts around. If your st count is a multiple of 6, proceed to Rnd 2. If your st count is not a multiple of 6, simply ch 1 and do another rnd of sc, working inc sts evenly around until you’ve reach a multiple of 6, join with sl st, then proceed to Rnd 2.
Rnd 2: Ch 1, *sk next 2 sc, 7 dc in next st, sk next 2 sts, sc in next st; rep from * around, join with sl st. Change to MC, turn.
Note: Catherine’s Wheels take 2 rnds to complete. Each “wheel” is worked in two halves, however, because we are working this stitch in the rnd, we will start off by making ¼ of a Catherine’s Wheel before we start making the halves. Then, we will end each rnd with another ¼ of a Catherine’s Wheel and sl st it to the first ¼ making the half. This will allow us to work the stitch in the rnd without creating a seam.
Rnd 3: Ch 3 (count as first dc)
Step 1: Yo, insert hook in next st, yo, pull through just 2 loops as if working a dc halfway, instead of completing a dc, *yo, insert hook in the next st and work another ½ dc; rep from * once more (4 loops on hook), your work should look like this:
Step 2: Yo, pull through all 4 loops creating ¼ of a Catherine’s Wheel, ch 1 to create the “eye” of the wheel, ch 2, sc in next st (this should be the middle dc of shell from the previous rnd).
Step 3: Ch 3, *yo, insert hook in next st, work a ½ dc; rep from * over next 6 sts including the sc in between the 2 shells from the previous rnd (8 loops on hook), your work should look like this:
Step 4: Yo, pull through all 8 loops creating ½ of a Catherine’s Wheel, ch 1 to create the “eye” of the wheel, ch 2, sc in next st, (this should be the middle dc of the shell from the previous rnd).
Step 5: Rep Step 3 and then Step 4 all the way around until there are 3 sts remaining. In these 3 sts, work ½ dc as you did to start the rnd creating the ¼ Catherine’s Wheel, yo, pull through 4 loops, but instead of chaining to create and “eye,” simply sl st into the eye of the first ¼ Catherine’s Wheel created, turn.
Rnd 4: Ch 3 (counts as first dc), in the same “eye” dc 3 times creating ¾ of a Catherine’s Wheel, *sc in the sc from the previous rnd, sk chains and work dc 7 times in the “eye” of the next ½ Catherine’s Wheel creating a full wheel; rep from * all the way around to the ¾ Catherine’s Wheel, dc 3 times in that eye, sl st in beg ch-3, completing the wheel, turn.
Rnd 5: Change to CC, ch 3, *yo, insert hook in next st, work a ½ dc; rep from * over the next 6 sts including the sc in between the 2 shells from the previous rnd, yo, pull through all 8 loops creating ½ of a Catherine’s Wheel, ch 1 to create the “eye” of the wheel, ch 2, sc in next st, (this should be the middle dc of the shell from the previous rnd). Continue in this fashion all the way around the base of the garment, end with a sc in the same st at start of rnd, turn.
Rnd 6: *Sk chains and work dc 7 times in the “eye” of the next ½ Catherine’s Wheel creating a full wheel, sc in the sc from the previous rnd; rep from * all the way around, sc in the same st at start of rnd, turn.
Rep Rnds 3-6 until garment meas 6 (7, 7½, 8, 8½)” from neckline to bottom or desired length
Note: You should switch colors after every full Catherine’s Wheel is completed.
Finishing
Sew buttons to correspond with buttonholes.
Weave in all ends.
Blocking tip: Catherine’s Wheels can bunch up when you work them. When blocking, I like to lay something flat on top of them (a plastic cutting board works nicely) and put something very heavy on top of the flat surface. This will allow them to dry flat and smooth.