


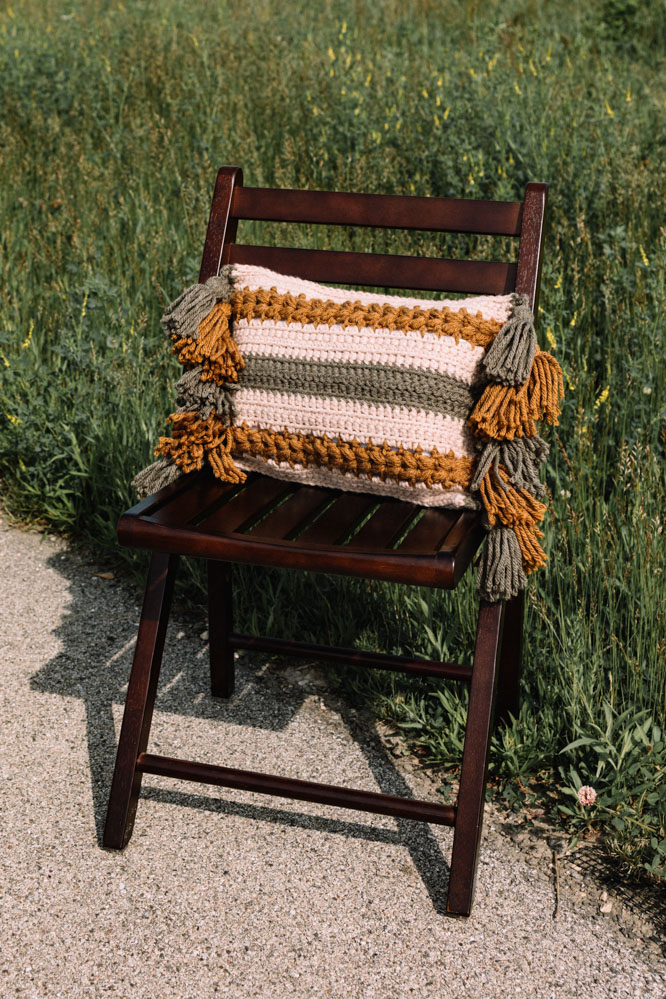
This accent pillow features strips done with a V-puff stitch for a braided look. Worked flat in sections, the first section is done with the V-puff stitch, then single crochet rows are added along the sides. Tassels are added to complete the Bohemian dreams style.
Time: Weekend Project
Skill Level: Easy
Size: Finished Size: 12 x 16”
Gauge: 5 sts and 5 rows = 2” in sc st
Finished PS strip = 2 x 16” (5 ps rows = 4”)
Materials
 Yarn: Lion Brand Two of Wands Hue + Me (80% Acrylic/20% Wool; 137 yards [125 meters]/125 grams): 617-0099U Desert (MC, 1 skein), 617-132AA Arrowwood (CC1, 1 skein), 617-174W Fatigues (CC2, 1 skein)
Crochet Hooks: US sizes K/10.5 (6.5 mm) and J/10 (6 mm)
Notions: Markers (x4), tapestry needle, 12 x 16-inch pillow form
Downloads:
Abbreviations
ps – puff stitch
V-ps – V-puff stitch
Special Stitches
Puff stitch (ps): yo, insert hook in indicated st, yo, pull lp through st and make lp same height as previous sts in working row, [yo, insert hook in same st, yo, pull lp through st and make lp same height as working row] twice, yo, pull through all 7 lps on hook, ch 1 to close.
V-puff stitch (V-ps): (ps, ch 1, ps) in same st. (Note: Since the puff stitch ends with a ch 1 to close, the ch 1 between the 2 puff sts is in addition to the one used to close the first ps.)
Pattern Notes
Chain-3 at beginning of row counts as first double crochet unless otherwise stated.
To change colors, work to last 2 lps on hook, with new color yo and pull through last 2 lps. Fasten off non-working yarn after each color change.
When working the Panel Sections, it is helpful to label them as Lower Panel and Upper Panel, so you know where to place them when joining.
The front and back sides of the pillow are identical.
Pattern
Puff Stitch Strip (make 4)
With K hook and CC1, ch 6.
Row 1 (RS): Sc in 2nd ch from hook and each ch across. (5 sc)
Place marker in end of row on side.
Row 2: Ch 1, turn, sc in first 2 sts, ch 1, sk next st, sc in last 2 sts. (4 sc, 1 ch-1 sp)
Row 3: Ch 3, turn, sk next st, V-ps in ch-1 sp, sk next st, dc in last st. (2 dc, 1 V-ps)
Row 4: Ch 3, turn, V-ps in ch-1 sp of V-ps of previous row, dc in 3rd ch of beg ch-3.
Rows 5-20: Rep Row 4.
Row 21: Ch 1, turn, sc in first st, sc in next ps, sc in ch-1 sp, sc in next ps, sc in 3rd ch of beg ch-3. (5 sc)
Row 22: Ch 1, turn, sc in each st across.
Fasten off.
Front Side
Lower Panel
First Section
Hold first Puff Stich Strip with RS facing, with K hook join MC with sl st in end of first row where st marker is, then remove marker.
Row 1 (RS): Ch 1, sc in same sp as join, sc in end of next row, [2 sc around post of dc in next row] 18 times, sc in end of next row, sc in end of last row. (40 sc)
Row 2: Ch 1, turn, sc in FL of each st across.
Row 3: Ch 1, turn, sc in both lps of each st across.
Row 4: Rep Row 2, changing to CC2 in last sc.
Row 5: Rep Row 3.
Row 6: Rep Row 2.
Fasten off.
Second Section
With RS facing, rotate lower panel to work other side. With K hook join MC with sl st in end of row at top right corner of panel.
Rows 1-3: Rep Rows 1-3 of First Section instructions.
Fasten off and add label.
Upper Panel
Third Section
Hold second Puff Stich Strip with RS facing, with K hook join MC with sl st in end of first row where st marker is, then remove marker.
Rows 1-3: Rep Rows 1-3 of First Section instructions.
Fasten off.
Fourth Section
With RS facing, rotate lower panel to work other side. With K hook join MC with sl st in end of row at top right corner of panel.
Rows 1-6: Rep Rows 1-6 of First Side instructions.
Do not fasten off and add label.
Join Lower and Upper Panels
Hold Lower Panel and Upper Panel with WS tog, ch 1, insert hook under the inner lp from each panel, [sl st, ch 1] in each st across to join panels.
Fasten off.
Back Side
Repeat Front Side instructions.
Finishing
Step 1: Hold front and back pillow pieces with WS tog and upper sections of both sides facing up. With K hook join MC with sl st in st at top right corner of back piece, ch 1. Insert hook under the inner lp from each panel, sl st in each st across to join. Rotate fabric and repeat sl st joining process across the bottom.
Step 2: Weave in ends. Slide the pillow insert inside the fabric casing.
Step 3: For each open side: With J hook join CC2 with sl st in end of row at top right corner. Working through both thicknesses in sts and in ends of row, evenly work sts across.
Row 1: Work 33 sc across. (33 sc)
Row 2: Ch 1, turn, sc in first st, [ch 2, sk next st, sc in next st] across. (17 sc, 16 ch-2 sps)
Fasten off.
Step 4: Tassels: With CC1 and CC2 make 8 tassels each color. Make each tassel 15 strands that measure 10 inches long.
- Cut 16 strands each color that measure 15” to use as ties. Set aside until needed.
- For each tassel, wrap yarn around a 5” piece of cardboard 15 times.
- Use one of the 15” tie strands to securely tie the top of the tassel, then cut across the other end at the bottom.
- Use another one of the 15” tie strands to tie around the tassel about 1” from the top.
Trim tassels as needed. - Use the top ties to attach the tassels to the ch-2 sps on each side of pillow. Skip every other ch-2 sp with an extra sp in the middle. Reference photo for color placement. With tapestry needle hide the loose tie ends inside the tassel.