


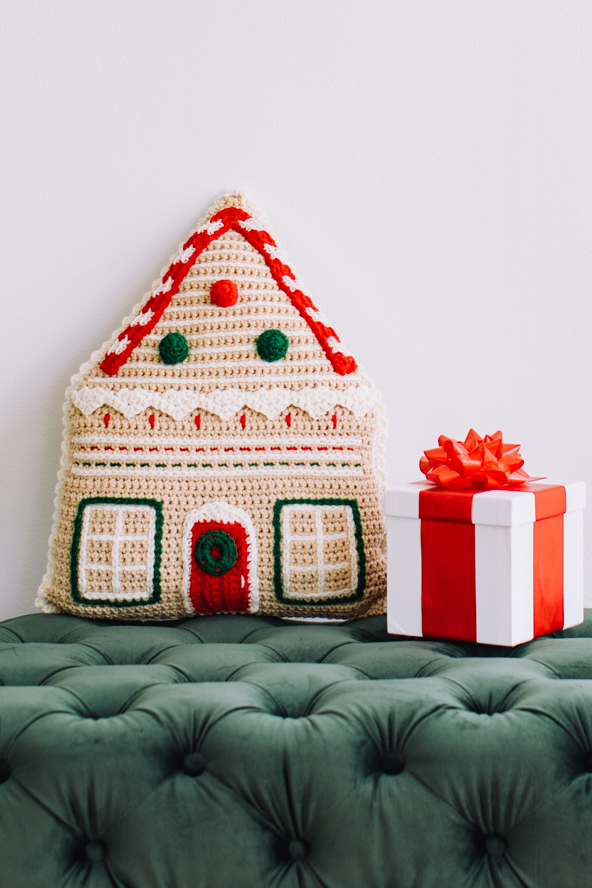
This charming pillow is brought to life through a combination of intricate crochet techniques, resulting in a stunningly realistic appearance. The attention to detail is evident in every aspect of this design. A beautifully crafted row of shell stitches adorns the bottom edge of the roof, providing an enchanting finishing touch. Surface slip stitch stripes add depth and character, accentuating the roof and creating the illusion of charming windows. The eave is cleverly fashioned to resemble a peppermint stick, while the door is adorned with a wreath, capturing the quintessential holiday spirit. Additionally, gumdrop appliqués are crocheted separately and lovingly attached to the finished piece, adding a sweet finishing touch.
Time: Weekend Project
Skill Level: Easy
Size: 15” wide, 20” high”
Gauge: 12 sts and 14 rows = 4” [10 cm] in Sc
Materials
 Yarn: Red Heart Super Saver (100% acrylic; 364 yards [333 meters]/198 grams): 0334 Buff (MC), 0319 Cherry Red (CC1), 0313 Aran (CC2), 0368 Paddy Green (CC3): 1 skein each
Hook/Needles: US size H/8 (5.0 mm) hook
Notions: Tapestry needle, polyester fiberfill, straight pins.
Special Stitches
Shell: Work 5 dc in indicated stitch or space.
Single crochet join (sc join): Place slip knot on hook, insert hook in indicated st, yo and pull up a lp, yo and draw through both lps on hook.
Pattern Notes
This pattern is worked in two panels (front and back) from the top down.
Pattern
House
Make 2.
Row 1 (WS): With MC, ch 2, 3 sc in 2nd ch from hook, turn. (3 sc at end of this row)
Row 2 (RS): Ch 1, sc in each st across, turn.
Row 3: Ch 1, 2 sc in first st, sc in next st, 2 sc in last st, turn. (5 sc at end of this row)
Row 4: Ch 1, 2 sc in first st, sc in each st across to last st, 2 sc in last st, turn. (7 sc at end of this row)
Row 5: Ch 1, sc in each st across, turn.
Row 6: Ch 1, 2 sc in first st, sc in each st across to last st, 2 sc in last st, turn. (9 sc at end of this row)
Row 7: Rep Row 6. (11 sc at end of this row)
Rows 8-31: [Rep Rows 5-7] 8 times. (43 sc at end of row 31)
Row 32: Sc in BL of each st across, turn.
Rows 33-66: Sc in each st across, fasten off.
Peppermint Eave
Note: Eave piece is worked with tapestry crochet technique: carry unused yarn color along top of stitches of row below, working over the strand not in use. When changing color, work to last loop of stitch with current color, yo and draw through with new color. Each row is worked from right to left on right side of work. Fasten off and cut yarn at end of first row.
With CC1, ch 62.
Row 1 (RS): Sc in back bar of 2nd ch from hook and in next 2 chs, change color to CC2, sc in next 3 chs, [change color to CC1, sc in next 3 chs, change color to CC2, sc in next 3 chs] 4 times, change color to CC1, 3 sc in next ch, [change color to CC2, sc in next 3 chs, change color to CC1, sc in next 3 chs] 5 times, fasten off. (63 sc at end of this row)
Row 2 (RS): Working in BLs, sc join (See Special Stitches) CC1 in first st of Row 1, sc in next st, change color to CC2, sc in next 3 sts, [change color to CC1, sc in next 3 sts, change color to CC2, sc in next 3 sts] 4 times, change color to CC1, sc in next 2 sts, 3 sc in next st, sc in next 2 sts, change color to CC2, sc in next 3 sts, [change color to CC1, sc in next 3 sts, change color to CC2, sc in next 3 sts,] 4 times, change color to CC1, sc in last 2 sts, fasten off. (65 sc at end of this row)
Gumdrop
Make 1 with CC2, 2 with CC3
Rnd 1 (RS): Make slip ring, 6 sc in ring, do not join rounds throughout.
Rnd 2: 2 sc in each st around. (12 sc at end of this rnd)
Rnd 3: Sc in each st around.
Rnd 4: Sl st in next 3 sts, fasten off.
Door
Note: Do not chain one at beginning of rows 2-6. Instead, raise loop on hook to height of single crochet, then work into the first stitch of row as indicated.
With CC1, ch 13.
Row 1 (WS): Sc in back bar of 2nd ch from hook and in each ch across, turn. (12 sc at end of this row)
Row 2 (RS): Sc in both Lps of first st, sc in FL of each st across to last st, sc in both Lps of last st, turn.
Rows 3-6: Rep Row 2, do not fasten off.
Ch 1, rotate work, sc 7 sts evenly across short edge (top edge of door), fasten off.
Door Trim
(RS) Working in BLs, sc join CC2 in sc at bottom right corner of door, sc in each st across, rotate door, 3 sc in first st of top edge, hdc in next st, dc in next st, 2 dc in next st, dc in next st, hdc in next st, 3 sc in next st, rotate door, sc in each st across, fasten off. With CC2 and tapestry needle, embroider a straight stitch handle on door as shown in photo. (30 sc, 2 hdc, 4 dc at end of this row)
Wreath
With CC3 ch 6, join with sl st to form ring, 18 sc in ring, join to beg sc, fasten off. Position wreath on door as shown. With CC1 and tapestry needle, sew wreath to door with small running stitches to resemble berries.
Shell Icing Trim
Row 1 (RS): With roof pointing down, join CC2 in unused Lp of first st of row 32, [sk next 2 sts, shell (see Special Stitches) in next st, sk next 2 sts, sl st in next st] across, turn. (7 shells, 8 sl sts at end of this row)
Row 2: Ch 1, sl st in first st, [sc in each of next 2 dc, (sc, ch 2, sc) in next dc, sc in each of next 2 dc, sl st in next sl st] across, fasten off. (8 sl sts, 42 sc, 7 ch-sps at end of this row)
With CC2 and tapestry needle, tack the point of each shell to the front panel to prevent it from curling up.
Surface Slip Stitch Icing Trim
Note: When working surface slip stitches, maintain even tension to prevent fabric from puckering.
Referring to Chart, with RS facing and positioning yarn at back of work, insert hook from front into space between rows 30 and 31 as indicated on Chart, * pull up a lp, draw lp through to front of work and then through lp on hook, insert hook between next pair of sts, rep from * across roof as indicated, fasten off. Repeat process to create 13 additional stripes as indicated on Chart.
Using the same technique, work three horizontal stripes below icing trim as shown on Chart.
Surface Slip Stitch Windows
Following surface slip stitch technique above and referring to Chart, work 4 CC2 horizontal lines on the left side of the house panel, then work 3 vertical CC2 lines intersecting the horizontal lines. Repeat the process to make window on right side of panel. With CC3, work surface slip stitch trim around each window as indicated on Chart.
Embroidery
Referring to photo, with CC2 and tapestry needle, embroider a running stitch line between top two surface slip stitch stripes on house front. With CC3, embroider a running stitch line between the two lower slip stitch stripes.
Referring to photo, using a double strand of CC2 and straight stitch, embroider a short line below the peak of each shell of icing trim.
Attach Appliqués
Position peppermint eave on roof as shown in photo and pin in place. With matching yarn and tapestry needle, sew eave to roof.
Stuff each gumdrop lightly with fiberfill and pin in position on roof as shown. Sew gumdrops to roof with matching yarn.
Position door, centered, between windows on house panel, approximately ¾ inch from bottom edge of front panel. With CC2, sew door in place concealing stitches in the door trim.
Panel Borders
(RS): Sc join CC2 in end of row at bottom right corner of pillow front, sc in end of each of next 34 rows, 2 sc in end of next row, sc in end of each of next 30 rows, rotate work, 3 sc in top point of roof, rotate work, sc in end of each of next 30 rows, 2 sc in end of next row, sc in end of each row across to bottom left corner, fasten off. (137 sc at end of this row)
Crochet border on back panel in same way.
Finishing
Assemble Pillow
Place pillow front and back together with wrong sides facing. Working from pillow back through both thicknesses, join CC2 in bottom right corner, [dc in next st, sl st in next st] across to center st of roof point, (dc, sl st) in roof point, [dc in next st, sl st in next st] across to last st at bottom left corner, sl st in last st, fasten off. Stuff pillow with fiberfill. With MC and tapestry needle, sew bottom edge closed.
love this and there is no mess to clean up in the kitchen
This pattern is the cutest! I made the pillow for my mom for Christmas, I’m sure she’ll love it! It was definitely a labor of love, it took me 10-15 hours to complete the pillow, but I did a lot of it while watching TV. I had also never done surface slip stitching before so it took me a few rows to get comfortable with that. I’m so pleased with this pattern and I can’t wait to gift my adorable pillow!
So glad you loved it!