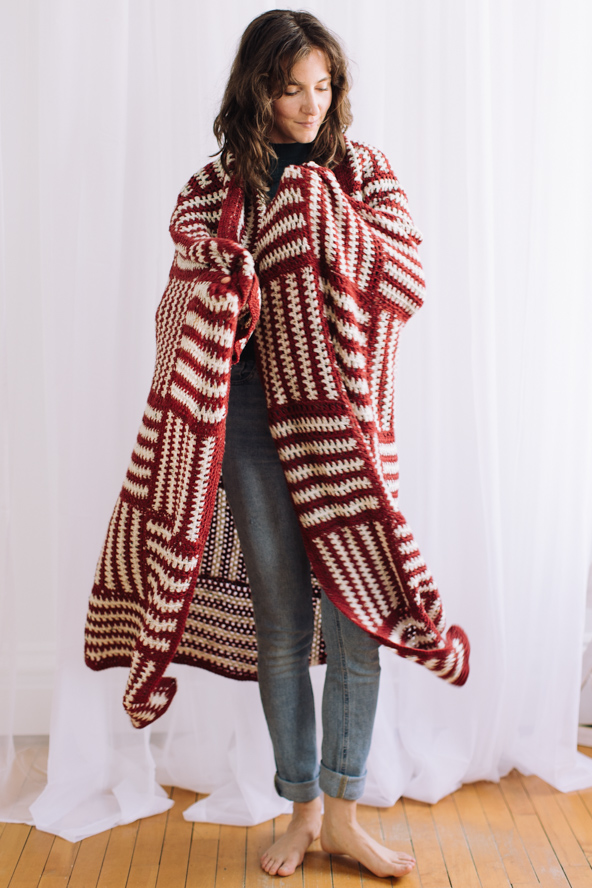
Designed with a playful stripe pattern, this blanket adds a touch of pizzazz to your crochet repertoire. The beauty of this pattern lies in its construction; you’ll be pleased to find that there’s less seaming than meets the eye! Each row, or strip, is crafted together as a single unit, minimizing the need for extensive finishing work. Complete with a simple single crochet edging, this blanket is a quick and enjoyable creation that will bring warmth and charm to your space.
Time: 3 Weeks
Skill Level: Easy
Size: 56” X 64” with 56 total squares, 8 sq’s long, 7 sq’s wide.
Gauge: 33 sts and 22 rows = 8” [20 cm] square
Materials
 Yarn: Universal Yarn Deluxe DK Tweed Superwash (90% super wash wool, 3% viscose, 7% acrylic; [100 grams] 284 yards/260 meters): 401 Garnet (MC, 8 balls), 410 Porcelain (CC, 5 balls) 3700 yards total, 2272 of mc, 1420 of cc
Hook/Needles: US size I/9 (5.5 mm)
Notions: Tapestry needle
Abbreviations
Approx. – Approximately
Cc – Contrast Color
Ch(s) – Chain(s)
Esc – Extended Single Crochet
Mc – Main Color
Rep – Repeat
Sk – Skip
Slst(s) – Slip Stitch(es)
Sp(s) – Space(s)
Sq(s) – Square(s)
St(s) – Stitch(es)
Yo – Yarn Over
Special Stitches
ESC – Insert hook into st, yo, pull loop through (two loops on hook), yo, pull loop through first loop on hook (2 loops on hook), yo, pull through both loops on hook.
Pattern Notes
- You will be making this blanket in squares but joining as you go. You’ll create the first square, then work off the side of it to create the second square, and so on. Once you’ve completed one entire row, you will create the second row. You will need to seam the rows together at the end to finish the blanket.
- Ch 3 at the beginning of each row counts as esc plus ch 1.
- I carried the colors alongside my work without cutting to avoid extra ends. You can cut and weave them in if you prefer, but you will be working along the edges and able to hide the carried yarn.
Pattern
Sq 1
In mc, ch 35.
Row 1: Esc in 5th ch from hook, [ch 1, sk 1, esc] across, ch 3, turn. (33)
Row 2: Sk 1, [esc in next ch-sp, ch 1, sk 1] across until 1 st remains (beginning ch-3), esc in last ch-sp, switch to cc (mc), ch 3, turn.
Row 3-4: Rep row 2 switching to mc on row 4.
Row 5-6: Rep row 2 switching to cc on row 6.
Row 7-22: Rep rows 3-6 until you have a total of 22 rows. You should end on a 2-row stripe of mc and have 5 stripes (2 rows each) of cc.
Fasten off cc do not fasten off mc.
One sq completed.
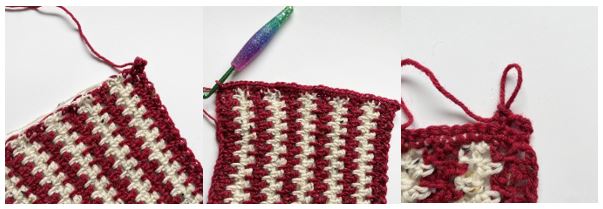
Sq 2
Row 1: Turn your work, working along the edge that you carried your yarn (or cut it), sc across working 3 sc into the side of each stripe (2 rows), ch 3, turn. (33)
Row 2: Sk 1, [esc, ch 1, sk1] across until 1 st remains, esc, ch 3, turn.
Row 3: Sk 1, [esc, ch 1, sk1] across until 1 st remains, esc, switch to cc (mc) ch 3, turn.
Row 4-5: Rep row 3 except switch to mc on row 5.
Row 6-7: Rep, row 3 except switch to cc on row 7.
Row 8-22: Rep rows 4-7 until you have a total of 22 rows. You should end on a 2-row stripe of mc and have 5 stripes (2 rows each) of cc.
Fasten off cc, do not fasten off mc.
Two sq’s completed.
Sq 3
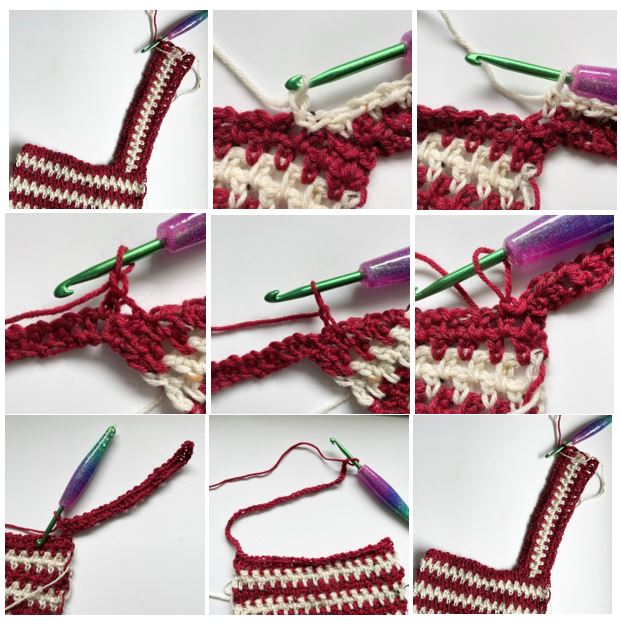
Row 1: Ch 35, esc in 5th ch from hook, [ch 1, sk1, esc] across to end, slst in next 2 sts on side of last sq, turn.
Row 2: Ch 1, [sk 1, esc in next ch-1, ch 1] across until 1 st remains, esc, switch to cc, ch 3, turn.
Row 3: [Esc in ch-1, ch 1, sk 1] across, your last esc should end in the ch-1 sp made after you slst to the side of sq 2, sk 1 st on sq 2, slst to next 2 sts, turn.
Row 4: Ch 1, [esc in ch-1, ch 1, sk 1] across, switch to mc(cc), ch 3, turn.
Row 5-6: Rep rows 3-4 except switch to cc on row 6.
Row 7-8: Rep rows 3-4 except switch to mc on row 8.
Row 9-22: Rep rows 5-8 until you have a total of 22 rows. You should end on a 2-row stripe of mc and have 5 stripes (2 rows each) of cc.
Fasten off cc, do not fasten off mc.
Three sq’s completed.
Sq 4
Row 1-22: Rep sq 2.
Sq 5:
Row 1-22: Rep sq 3.
Sq 6:
Row 1-22: Rep sq 2.
Sq 7:
Row 1-22: Rep sq 3.
Fasten off both colors.
Sq 8:
Row 1-22: Rep sq 3.
Fasten off cc.
Row 23: Turn, sc down the entire edge of the sq’s working 3 sc’s on the side of each row and 1 sc per ch. You should have 33 sc’s per sq. (264)
Repeat this until you have a total of 7 rows of blocks with 8 blocks per row.
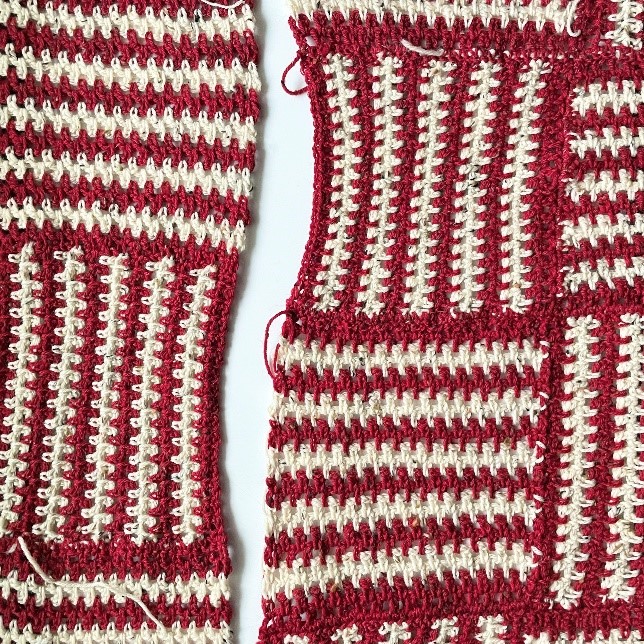
Sew all the rows together, being sure to alternate the squares as shown.
Edging
Attach yarn at any corner. I used mc for my edging, but you can use either color you like or even alternate mc and cc.
Row 1: Ch 1, *sc in each st and ch and sc 3 sts per row, (sc, ch 2, sc) at corner*, working down the side, rep from * to * around, slst to beginning sc, turn.
Row 2: Ch 1, sc in each st around, (sc, ch 1, sc) in each ch-2, slst to beginning sc, turn.
Row 3: Rep row 2.


Beautiful blanket
This looks beautiful. Anxious to try this pattern.