

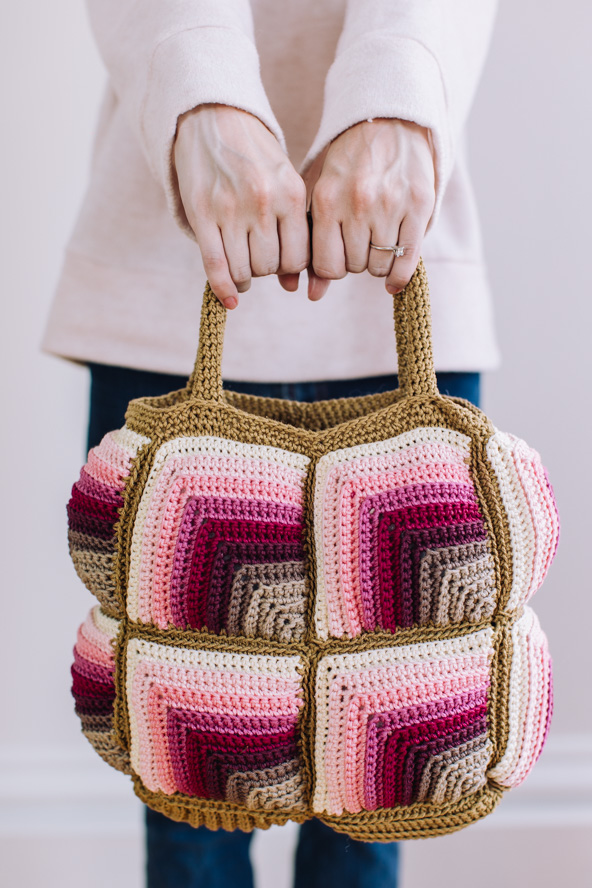
Crochet a chic and inviting creation inspired by the trendy puffer bag designs gracing the fashion scene. This cozy yet sophisticated bag is an ideal canvas for showcasing stuffed crochet squares, infusing the piece with a delightful texture and depth. The back loop single crochet rows lend a unique texture to each square, while the gradual color palette adds a mesmerizing 3D effect. This intricate play of patterns and hues elevates the bag, ensuring it stands out as a statement accessory. The ingenious double-sided crochet squares not only form the bag’s exterior but also create a sturdy lining, combining style with practicality. This thoughtful design choice ensures that your bag maintains its shape and durability, while still exuding a touch of elegance.
Time: 1 Week Project
Skill Level: Intermediate
Finished Size: Approx. 12 inches wide and 9.5 inches from top edge to bottom.
Gauge: 5 sc x 4 rows = 1 inch
Materials
 Yarn: Lion Brand 24/7 Cotton® (100% cotton; 186 yards [170 meters] / 3.5 ounces [100 grams]):
[761-173AA] Hay Bale (MC 3 balls), [761-122D] Taupe (CC1 1 ball), [761-126AA] Café Au Lait (CC2 1 ball), [761-146AM] Beets (CC3 1 ball), [761-144L] Magenta (CC4 1 ball),
[761-142G] Rose (CC5 1 ball), [761-101A] Pink (CC6 1 ball), [761-103X] Pink Lemonade (CC7 1 ball), [761-098C] Ecru (CC8 1 ball).
Hook: US size G/6 4.0 mm
Notions: tapestry needle, poly-fil stuffing
Pattern notes
The pattern is worked in squares, 16 solid and 12 colored.
The squares are worked in rows. The starting chain on each row does not count as a stitch.
Pattern
Motifs (make 16 solid and 12 colored)
Solid motif
With MC ch 2.
Row 1 (RS): Sc 3 in 2nd ch from hook.
Row 2 (WS): Ch 1 (does not count as a st here and throughout, turn, sc blo in first sc, sc blo 3 in 2nd sc, put a stitch marker in the middle of the 3 sts, sc blo in 3rd sc. (5 sc at end of this row)
Row 3: Ch 1, turn, sc blo in each st to marked st, sc blo 3 in marked st (move marker up to middle st), sc blo in each st to end. (7 sc at end of this row)
Row 4: Ch 1, turn, sc blo in each st to marked st, sc blo 3 in marked st (move marker up to middle st), sc blo in each st to end. (9 sc at end of this row)
Row 5: Ch 1, turn, sc blo in each st to marked st, sc blo 3 in marked st (move marker up to middle st), sc blo in each st to end. (11 sc at end of this row)
Rows 6-20: Repeat and increase stitches on each row same way. (41 sc at end of row 20)
Cut off, fasten off.
Colored motif
With CC1 ch 2.
Rows 1-6: Repeat same as solid motifs, at the end of row 6 cut off and fasten off CC1.
Rows 7-8: Join CC2 with sc blo in first sc, continue pattern same way, at the end of row 8 cut off and fasten off CC2.
Rows 9-10: Join CC3 with sc blo in first sc, continue pattern same way, at the end of row 8 cut off and fasten off CC3.
Rows 11-12: Join CC4 with sc blo in first sc, continue pattern same way, at the end of row 8 cut off and fasten off CC4.
Rows 13-14: Join CC5 with sc blo in first sc, continue pattern same way, at the end of row 8 cut off and fasten off CC5.
Rows 15-16: Join CC6 with sc blo in first sc, continue pattern same way, at the end of row 8 cut off and fasten off CC6.
Rows 17-18: Join CC7 with sc blo in first sc, continue pattern same way, at the end of row 8 cut off and fasten off CC7.
Rows 19-20: Join CC8 with sc blo in first sc, continue pattern same way, at the end of row 8 cut off and fasten off CC8.
Attaching motifs
- Hold 1 solid and 1 colored square together, right side out on both squares.
- Join MC with sc in first st (where you did first 3 sc on row 1), inserting hook through both squares.
- Sc in end space of each row inserting hook through both squares. On colored square it is the side where you have all the yarn tails – tuck them inside as you stitch along the edge. (21 sc on first side)
- On the 2nd and 3rd side insert hook first through blo of each sc on colored square and then both loops of each sc on solid square: 19 sc on 2nd side + 3 sc in corner + 19 sc on 3rd (41 sc)
- Insert stuffing.
- On 4th side sc in end space of each row inserting hook through both squares (20 sc), sl st in first sc, don’t cut off yarn (you will continue using it attaching 2 puffy squares).
- Attach the first 5 colored puffy squares following the steps above, but 6th and 12th squares are finished differently – see “Adding 6th colored puffy square” below.
- Attach 2 solid squares same way as described above (twice) to make 2 solid puffy squares for the bag base.
Attaching puffy squares
- Hold 2 puffy squares right side facing each other, sl st in each stitch inserting hook through blo on both squares.
- First connect 2 solid color puffy squares (see connected squares on photo 1).
- When finished crocheting first colored puffy square, place it against solid color square, right sides facing, sl st along the side inserting hook through blo on both squares (photo 1).
- Adding 2nd colored puffy square: after finishing sc around the edge to connect 2 motifs, place the puffy square against 2nd solid square (the one attached to first colored square), right sides facing, sl st along the edge to attach it to solid square, then continue by placing it against first colored square and sl st on next side, cut off MC (photo 2).
- Adding 3rd colored puffy square: place it against first solid square, right sides facing, so you can attach bottom side to solid square and left side to 2nd colored square next to it (photo 3).
- Adding 4th colored puffy square: place it against first solid square, right sides facing, and attach bottom side to solid square and left side to 3rd colored square next to it (photo 4).
- Adding 5th colored puffy square: place it against 2nd solid square, right sides facing, and attach bottom side to solid square and left side to 4th colored square (photo 5).
- Adding 6th colored puffy square: BEFORE adding it, start attaching 2 square motifs with sc stitches on last row of CC8 (inserting hook first through blo of each sc on colored square and then both loops of each sc on solid square), so you finish at the end of the side with all the yarn tails. Next, to add the 6th square, place it against the first colored square to attach the right side, then place it against the solid square to attach bottom side, and last attach the left side to 5th colored square next to it (photo 6).
- Add the 2nd layer of puffy squares (7th – 12th) as shown on photos 7-11. Don’t cut off MC when finished connecting the last square.
Edge
Round 1: With MC sc 9 along the top edge, sc2tog in next 2 st, sc 8, sc2tog inserting hook in last st of the 1st square and first st of next square, *sc 8, sc2tog in next 2 st, sc 8, sc2tog in last st of current square and first st of next square; rep from * to end, for last sc pull up loop in last st, insert hook in first sc, yarn over and pull through all loops on hook. (108 sc at end of this round)
Round 2: Ch 1, *sc 5, sc2tog in next 2 st; rep from * around, finish the round with 3 sc, sl st in first sc. (93 sc at end of this round)
Round 3: Ch 1, sc in each st, sl st in first sc.
Cut off and fasten off yarn.
Handles (make 2)
- With MC (leaving 15-inch tail for stitching) ch 8, sl st in first ch to make a ring.
- Sc in each ch, continue sc in each st in continuous rounds.
- Make each handle 11 inches long, cut off yarn leaving 15-inch tail for stitching.
- Fasten off.
- With tapestry needle and long tails sew on the handles (photo 11).
- Weave in all ends.