


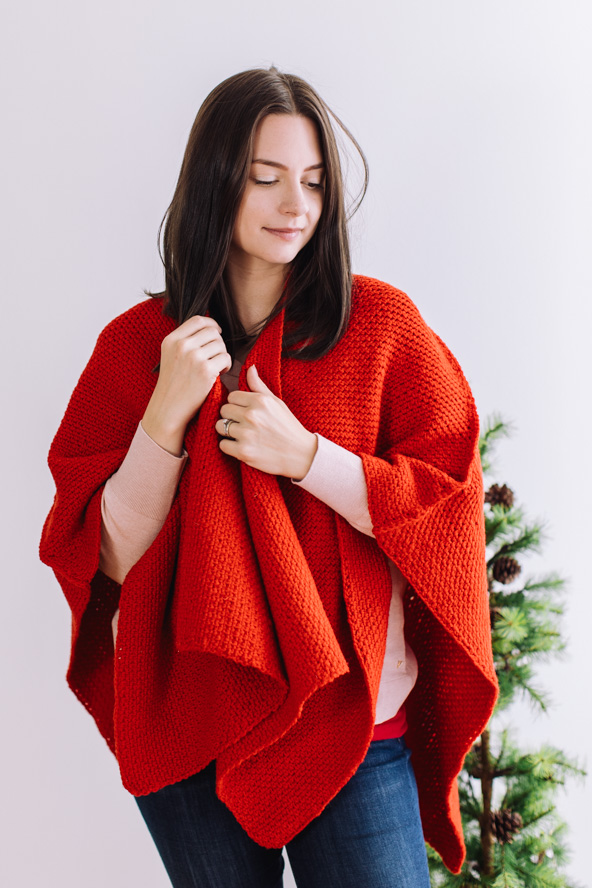
With its relaxed design and straightforward construction, this Winterberry Red Ruana is the ideal project for crocheters seeking both ease and artistic expression. The easy-going nature of the pattern ensures a satisfying and enjoyable crocheting experience, making it a perfect choice for crocheters of all levels.
Skill Level: Beginner/Intermediate
Size: Adult Small/Medium (Large) 40 (50)” / 100 (137) cm x 24 (26)” / 61 (66) cm
Gauge: 21 sts and 21 rows = 4” [10 cm] in Linen Stitch lightly blocked
Materials
 Yarn: Universal Yarn, Deluxe Worsted Superwash (100% Wool, 20%; 220 yards [218 meters]/100 grams): Color #736, Christmas Red (8 (9) skeins)
Hook: US Size 7/G+ (4.5 mm)
Notions: Tapestry needle, 12 (20) locking plastic stitch markers (optional to facilitate alignment of panels during finishing which is completed after an initial steam blocking)
Pattern Notes
Worked side to side each panel is the same and the pattern is 100% reversible. Increases are recommended to be done at the end of the RS rows however if the crocheter prefers, they may be done on the WS row. Consistent placement of the increases is critical to having the pieces line up properly when seamed.
To make a wider kimono, work more rows. To make a longer kimono, start with more stitches in multiples of 2.
To facilitate alignment of the finished panels, use locking stitch markers to denote the position of the Increase Rows as they are worked.
Ch 1 at beginning of each row does not count as a stitch.
The first row is worked into the back bump of each stitch of the setup chain so as to present the even V’s of the chain at the sides of the work.
Special Stitch
Linen Stitch (ch a multiple of 2 sts + 2)
Row 1 (RS): Sc in back loop of 2nd ch from hook, *ch 1, sk next ch, sc in back loop of next ch; rep from * across, turn.
Row 2 (WS): Ch 1, sc in first st, *sc in next ch-1 sp, ch 1, sk next st; rep from * across to last st, sc in last st, turn.
Row 3: Ch 1, sc in first st, ch 1, sk next st, *sc in next ch-1 sp, ch 1, sk next st; rep from * across to last st, sc in last st, turn.
Rep Rows 2-3 for patt.
Pattern
Bodice (Make 4):
Setup Row: Ch 122 sts, turn work.
Row 1 (RS): Sc in back of 2nd ch from hook, *ch 1, sk next ch, sc in back of next ch; rep from * across, turn.
Row 2 (WS): Ch 1, sc in first st, *sc in next ch-1 sp, ch 1, sk next st; rep from * across to last st, sc in last st, turn.
Row 3 (RS): Ch 1, sc in first st, ch 1, sk next st, *sc in next ch-1 sp, ch 1, sk next st; rep from * across to last st, sc in last st, turn.
Rep Rows 2-3 until work measures 9 (10)”/23 (25) cm
Rep Row 2
Increase Row (RS): Ch 1, sc in first st, ch 1, sc in same stitch, ch 1, *sc in next ch-1 sp, ch 1, sk next st; rep from * across to last st, sc in last st, turn. (2 sts increased)
Place marker to denote Increase Row.
**Continue in pattern as established by Row 2 – 3 for 1.5″/4 cm ending on a WS row.
Repeat Increase Row and repeat from ** until work measures desired shoulder width measured from starting chain to spine, roughly one half the desired bust measurement plus 4″/10cm positive ease. 20 (25)”/ 50 (63) cm.
Final Row: Ch 2, hdc across. Fasten off. Cut yarn leaving 4″/10 cm tail.
Do not remove markers.
Weave in ends.
Finishing
Gently steam finished panels and block to desired width and length, weave any ends in which may have presented during/after steaming.
Back:
Lay the two panels for the back side by side with the hdc rows aligned to each other. One panel will have the RS facing, and the other will have the WS facing however the pieces are reversible so they will present as the same on each side.
Work an hdc seam vertically using the loop furthest from you of each hdc of the final row. This seam will align to the spine when worn.
Fasten off and weave in ends.
Shoulder:
Using the locking stitch markers on the next panel and Back as guides, place a panel next to the Back aligning the stitch markers to each other.
Starting at the spine, work an hdc into the selvedge stitch of each stitch along the Increase side of the panels from the Spine out to the Setup Row to form seam along top of shoulder.
Repeat for second shoulder.
Gently steam kimono to relax the seams.
Thank you for your time and this pattern!
Plus size options would have been nice.
To make a wider kimono, work more rows. To make a longer kimono, start with more stitches in multiples of 2.
very nice.